Monday, May 11, 2020

GitLab Deploy Keys and Deploy Tokens

GitLab is a web-based DevOps lifecycle tool that provides a Git-repository manager providing wiki, issue-tracking and CI/CD pipeline features, using an open-source license, developed by GitLab Inc.

Both Deploy Keys and Deploy Tokens allow you to checkout code without using your personal GitLab username/password.  And as their name indicates, they are best suited for deployments, usually automated/scripted. What are their features?

Deploy Keys
  • Utilize SSH keys (public and private)
  • Checkout via SSH (requires port 22 open)
  • GitLab will store the public SSH key
  • The server doing the checkout will have to have the private SSH key
  • Allows read and/or write of repository
  • More steps for setup
Deploy Tokens
  • Use a generate once password ie token
  • Check via HTTPS (requires port 443 open, more common)
  • Token can have an expiration date
  • Allows read only of repository
  • Simpler setup

How to create and use Deploy Keys (SSH)


By default, when you use SSH, it reads from ~/.ssh/id_rsa
But that is your personal SSH key

Create a SSH key for GitLab deployments with a unique name
Login to the server where you will clone/deploy your code
> ssh-keygen -t rsa -b 4096 -f ~/.ssh/gitlab_deploy_rsa

Tell ssh about the new gitlab key
> vim ~/.ssh/config
Host gitlab.yourdomain.com
  Preferredauthentications publickey
  IdentityFile ~/.ssh/gitlab_deploy_rsa

Note: for the Host, use the host GitLab references
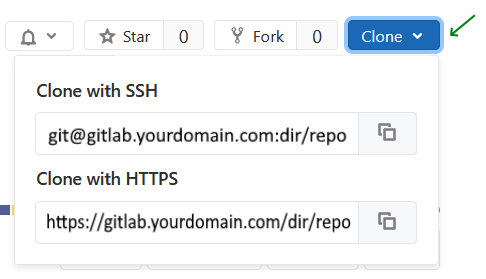
GitLab: Repo: Clone button
git@gitlab.yourdomain.com:dir/repo.git

For security, and to allow SSH, make the config read only by you
> chmod 600 ~/.ssh/config

So GitLab knows about your new key, create a GitLab Deploy Key

GitLab: Repo: Settings -> Repository, scroll to Deploy Keys
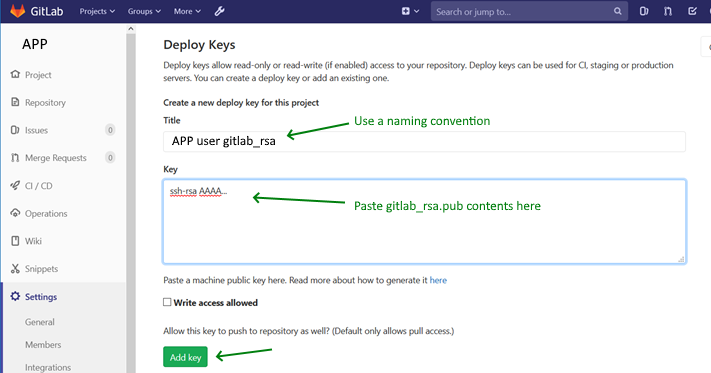
Copy the contents of your public key ~/.ssh/gitlab_rsa.pub to the Key section

Back on your server,
Test that SSH access works
> ssh -vT git@gitlab.yourdomain.com
-T Disable pseudo-terminal allocation ie just give return result "as is"
-v verbose

If SSH times out, try a public site to ensure port 22 is open
> ssh -vT gitlab.com

If SSH gitlab.com does not work, then enable port 22 on your server, most likely via it's firewall.
If SSH gitlab.com does work, then maybe SSH is not enabled or accessible on your GitLab server. Review your GitLabs firewall ie iptables, tcp wrappers ie /etc/hosts.deny and /etc/hosts.allow, and the SSH daemon configuration ie /etc/sshd_config

Assuming
> ssh -vT git@gitlab.yourdomain.com
finally works

You should be able to checkout your code using SSH, using
> git clone git@gitlab.yourdomain.com:dir/repo.git target_dir
which is a slight shorthand for
> git clone ssh://git@gitlab.yourdomain.com/dir/repo.git target_dir

Note: If you cannot get SSH working, you can try using Deploy Tokens, which uses HTTPS, which is more often accessible.

How to create and use Deploy Tokens (HTTPS)


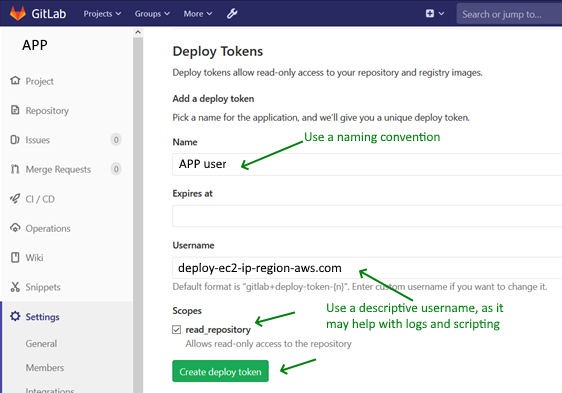
Create a GitLab Deploy Token

GitLab: Repo: Settings -> Repository, scroll to Deploy Tokens
 

After creating the Deploy Token, make sure to copy and save the token
 

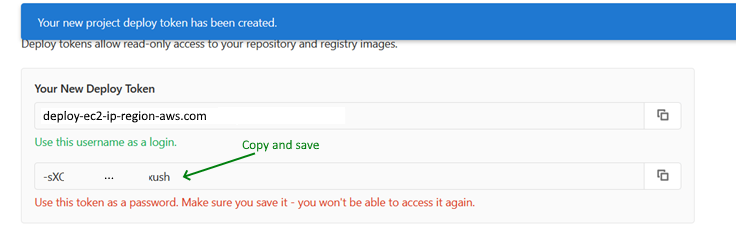
From your server, you can checkout your code using
> git clone https://<username>:<token>@gitlab.yourdomain.com/dir/repo.git target_dir

After cloning, you can simply Pull changes
> git pull

So, should you use SSH or HTTPS?
Ideally you should use SSH keys as they are a way to identify trusted computers, without involving passwords, but HTTPS is the easiest to set up on the widest range of networks and platforms.


-End of Document-
Thanks for reading


Monday, April 20, 2020

AWS RDS MySQL User Creation

When you create a AWS RDS MySQL instance, you will be asked to also create a master username/password.  The master RDS user acts like the root user of all it's databases, with full access to SQL commands such as DROP and CREATE.  While you can use this root user within your applications, you should create an application specific database user with limited privileges, which will prevent harm from accidental and malicious use.

Note: AWS (Amazon Web Services) RDS (Relational Database Service) is a managed service, and it doesn't provide SYS access (SUPER privileges)

View permissions of root user

Show grants for RDS MySQL root user ie master username

SQL: 
SHOW GRANTS FOR 'professor';

Result:
GRANT SELECT, INSERT, UPDATE, DELETE, CREATE, DROP, RELOAD, PROCESS, REFERENCES, INDEX, ALTER, SHOW DATABASES, CREATE TEMPORARY TABLES, LOCK TABLES, EXECUTE, REPLICATION SLAVE, REPLICATION CLIENT, CREATE VIEW, SHOW VIEW, CREATE ROUTINE, ALTER ROUTINE, CREATE USER, EVENT, TRIGGER ON *.* TO `professor`@`%` WITH GRANT

Create new application user

Create a new user to be used by just the application

SQL:
CREATE USER 'express_app'@'%' IDENTIFIED BY '20charRandomPwd';

Note: The username should be related to the application, and the password does not need to be readable as it will only be used within the application configuration.

Grant permissions

For application users, remove:
CREATE, DROP, RELOAD, PROCESS, REFERENCES, INDEX, ALTER, SHOW DATABASES, CREATE TEMPORARY TABLES, LOCK TABLES, CREATE VIEW, SHOW VIEW, CREATE ROUTINE, ALTER ROUTINE, CREATE USER, EVENT

Leaving the basics:
SELECT, INSERT, UPDATE, DELETE, EXECUTE, REPLICATION SLAVE, REPLICATION CLIENT, TRIGGER


SQL:
GRANT SELECT, INSERT, UPDATE, DELETE, EXECUTE, REPLICATION SLAVE, REPLICATION CLIENT, TRIGGER ON *.* TO `express_app`@`%` WITH GRANT OPTION;

Note: If using multiple databases in a RDS instance, then grant access only to the required databases ie ON `planet.*` TO `express_app` 

You can now use the newly created, and restricted, database user express_app in your application.


-End of Document-
Thanks for reading

Monday, March 30, 2020

Replace PHP short-hand tags and normalize usage

What are PHP tags?

When PHP parses a file, it looks for opening and closing tags, which are <?php and ?> which tell PHP to start and stop interpreting the code between them. Parsing in this manner allows PHP to be embedded in all sorts of different documents, as everything outside of a pair of opening and closing tags is ignored by the PHP parser.

PHP includes a short echo tag <?= which is a short-hand to the more verbose <?php echo.

PHP also allows for short open tag <? (which is discouraged since it is only available if enabled using the short_open_tag php.ini configuration file directive, or if PHP was configured with the --enable-short-tags option).

If a file contains only PHP code, it is preferable to omit the PHP closing tag at the end of the file. This prevents accidental whitespace or new lines being added after the PHP closing tag, which may cause unwanted effects because PHP will start output buffering when there is no intention from the programmer to send any output at that point in the script.
Source: php.net

With PHP 7.4, per the PHP RFC: Deprecate PHP Short open tags, a deprecation noticed is issued for usage of the short-hand tag, and in PHP 8.0, the short-hand tag will be removed.
While the <?= short tag is unaffected, for completeness, using the full PHP tag should be preferred.
And using the short-hand tags generally make code less portable as it requires a non common ini change.

Ok, so for new projects you can start using <?php ?>.
But, maybe you inherited an old project which uses the short-hand tags, which was more common in the earlier pre PHP 7 days.  And you don't want to manually replace all the tags in 100s of files.

The following are some command line find + sed calls to replace PHP short-hand and normalize PHP tags across multiple files:

What is going to be replaced and the sed command used:
DescriptionFromTosed
new line; start of file'<?\n''<?php\n'-e 's/^<?\n/<?php\n/'
block'<?\n''<?php\n'-e 's/<?\n/<?php\n/g'
inline'<? ''<?php '-e 's/<? /<?php /g'
echo shorthand'<?=''<?php echo '-e 's/<?\=/<?php echo /g'
lowercase'<?PHP''<?php'-e 's/<?PHP/<?php/g'
no closing tag'?>''\n'-e 's/^?>/\n/'

Note: lowercase: PHP functions are case insensitive. Why? Just how PHP evolved.  "all the functions introduced essentially felt like tags in an HTML document and since HTML tags were case insensitive, he chose function names in PHP to be case insensitive."
Source: stackoverflow
But keeping everything lowercase is more normal, compared to other languages.

Note: no closing tag: If your code or templates have mixed PHP/HTML content, then you do not want to remove the closing tags.  The intent is for files which are only PHP, you can and should remove the closing tag.

Make sure to make a backup, or using version control such as git or svn.

OK, now on to the actual commands:

First, optionally, convert window new lines to unix new lines, so the patterns in sed can match
> find . -iname '*.php' -type f -print0 |xargs -0 -I file dos2unix file

Details: Finds and print all php files in the current ie . and sub directories
find . -iname '*.php' -type f -print0 

Details: Takes the first result and stores to 'file'
xargs -0 -I file

Then, test the sed replacement
> find app/ -iname '*.php' -type f -print0 |xargs -0 sed -n -e 's/^<?\n/<?php\n/p' -e 's/<?\n/<?php\n/g' -e 's/<? /<?php /gp' -e 's/<?\=/<?php echo /gp' -e 's/<?PHP/<?php/gp' -e 's/^?>/\n/p';

Note: sed options:
-e = pattern
-i = inplace
-n = --quite
p = print current pattern

Run the replacements:

Removing closing tag:
> find app_src/ -iname '*.php' -type f -print0 |xargs -0 sed -i -e 's/^<?\n/<?php\n/' -e 's/<?\n/<?php\n/g' -e 's/<? /<?php /g' -e 's/<?\=/<?php echo /g' -e 's/<?PHP/<?php/g' -e 's/^?>/\n/';

Keeping closing tag due to mixed PHP/HTML:
> find html_templates/ -iname '*.php' -type f -print0 |xargs -0 sed -i -e 's/^<?\n/<?php\n/' -e 's/<?\n/<?php\n/g' -e 's/<? /<?php /g' -e 's/<?\=/<?php echo /g' -e 's/<?PHP/<?php/g';


Now all your PHP short-hand tags should be replaced and normalized.
Of course, verify using version control diffs and test your code.


-End of Document-
Thanks for reading

Monday, March 9, 2020

AWS configure application environment


After creating and starting an AWS EC2 instance, and installing nginx and the latest php
you will probably want to configure the application environments, deployment user, permissions, and re-configure nginx and php.

Goal

Create a user to be the owner of the deployed code (application abbreviation, internal code, etc)
               professor
Create environment-based directories for the application (/data could be an external volume)
/data/prod/fry/www/html
/data/dev/fry/www/html
/data/qa/fry/www/html
Create environment-based urls for the application
fry.domain.com
fry-qa.domain.com
fry-dev.domain.com

Note: while this should allow multiple apps per EC2, it may be better and simpler to have one app per EC2, in which case, there would not necessarily be a need for the /fry directory, although it may add clarity when view logs and debugging deployments.

Setup

Note: To facilitate getting stuff done, and to minimize permission problems, disable selinux.
If you have utilized and configured used services with selinux successfully before, then keep enabled and configure it appropriately.

Temporarily disable selinux
> # sudo setenforce 0

Permanently disable selinux
> sudo vi /etc/selinux/config
SELINUX=disabled


Create or obtain your ssh key pairs
You can create key pairs from AWS EC2ssh-keygen, or putty
Note: Be sure to securely store/backup your private key and distribute the public key as needed

Add a user to be used for deploying code
Note, there could be a user per app too, but for now, one user, 
which could be based on company name, or something generic
> sudo adduser professor

Change to the app user
> sudo su - professor

Enable ssh

Enable ssh access using key pairs

Make sure in /home/professor
> pwd

Create the file to store the public key
> mkdir .ssh
> chmod 700 .ssh
> touch .ssh/authorized_keys
> chmod 600 .ssh/authorized_keys

Copy in the public key (pem) for this user
> vi .ssh/authorized_keys
> # cat >> .ssh/authorized_keys # append pasted in text, ctrl c

Note: The public key should be in the format
ssh-rsa ABC…123== rsa-key-20200110

Putty on Windows will store the format as
---- BEGIN SSH2 PUBLIC KEY ----
Comment: "rsa-key-20200110"
ABC…123
---- END SSH2 PUBLIC KEY ----

You can use PuttyGen, open the private key, and view the proper format
or do some simple text editing of the surrounding delimiters.

From another shell, you should now be able to
> ssh -i professor.pem ec2host

Permissions

Add professor to nginx group, to view logs etc
> sudo usermod -a -G nginx professor

Add nginx to professor group as app dirs will be owned by professor
> sudo usermod -a -G professor nginx

Make app dirs (-p = recursive)
The application directory can be named for the application, an abbreviation, internal code/name, etc
> sudo mkdir -p /data/prod/fry/www/html
> sudo mkdir -p /data/dev/fry/www/html
> sudo mkdir -p /data/qa/fry/www/html

Change perms to professor (nginx) (-R recursive)
> sudo chown -R professor:professor /data/prod/fry
> sudo chown -R professor:professor /data/dev/fry
> sudo chown -R professor:professor /data/qa/fry

Keep data and prod/dev/qa owned by root, but accessible to professor
> sudo chown root:professor /data/prod
> sudo chown root:professor /data/dev
> sudo chown root:professor /data/qa
> sudo chown root:professor /data

Configure

Organize nginx sites in a new dir sites.d
Note: Inspired by Debian configuration
> sudo mkdir /etc/nginx/sites.d

Add sites.d to nginx conf
> sudo vi /etc/nginx/nginx.conf
    include /etc/nginx/conf.d/*.conf;
    include /etc/nginx/sites.d/*.conf;

Add sites conf to sites.d
Configure prod/dev/qa in same file, or separate files
Note: This is just a modification of the default nginx config, you may have to adjust it per your framework or application
> sudo vi /etc/nginx/sites.d/fry.domain.com.conf
server {
        listen 80;
        server_name fry.domain.com;

        root   /data/prod/fry/www/html/;  

        access_log /var/log/nginx/fry.domain.com_access_log;
        error_log  /var/log/nginx/fry.domain.com_error_log error;

        location / {
               # modify based on framework
               try_files $uri $uri/ /index.php?$query_string;
        }

        # include php; replace if framework requires
        # index index.php index.html index.htm;
        # location ~ \.php$ { }
        include /etc/nginx/default.d/php.conf;      
}

server {
        listen 80;
        server_name fry-dev.domain.com;

        root   /data/dev/fry/www/html/; 

        access_log /var/log/nginx/fry-dev.domain.com_access_log;
        error_log  /var/log/nginx/fry-dev.domain.com_error_log error;

        location / {
               # modify based on framework
               try_files $uri $uri/ /index.php?$query_string;
        }

        # include php; replace if framework requires
        # index index.php index.html index.htm;
        # location ~ \.php$ { }
        include /etc/nginx/default.d/php.conf;      
}

server {
        listen 80;
        server_name fry-qa.domain.com;

        root   /data/qa/fry/www/html/;   

        access_log /var/log/nginx/fry-qa.domain.com_access_log;
        error_log  /var/log/nginx/fry-qa.domain.com_error_log error;

        location / {
               # modify based on framework
               try_files $uri $uri/ /index.php?$query_string;
        }

        # include php; replace if framework requires
        # index index.php index.html index.htm;
        # location ~ \.php$ { }
        include /etc/nginx/default.d/php.conf;      
}

Configure default ec2 to go to a dev site
> sudo vi /etc/nginx/sites.d/ec2.conf
server {
        listen 80;
        server_name ec2-1-2-3-4.us-east-9.compute.amazonaws.com;

        # point aws ec2 to a dev location
        root   /data/dev/fry/www/html/; 

        access_log /var/log/nginx/fry-dev.domain.com_access_log;
        error_log  /var/log/nginx/fry-dev.domain.com_error_log error;

        location / {
               # modify based on framework
               try_files $uri $uri/ /index.php?$query_string;
        }

        # include php; replace if framework requires
        # index index.php index.html index.htm;
        # location ~ \.php$ { }
        include /etc/nginx/default.d/php.conf;      
}


Support long AWS EC2 server names, using a new config
> sudo vi /etc/nginx/conf.d/http.conf
server_names_hash_bucket_size  128;

Validate config before restart
> sudo nginx -t

Restart nginx
> sudo systemctl restart nginx

Remove prior test page, if any
> sudo rm /usr/share/nginx/html/info.php
              
Create a test php page
Assuming the default AWS EC2 page goes to the development dir (ec2.conf)
> sudo vi /data/dev/fry/www/html/info.php
<?php

echo date(DATE_RFC2822);
phpinfo();

Verify
http://ec2-1-2-3-4.us-east-9.compute.amazonaws.com/info.php

Application code can be deployed to separate environment-based directories as professor


-End of Document-
Thanks for reading

Monday, February 17, 2020

AWS RedHat install nginx and php


After creating and starting an EC2 instance, install nginx and the latest php.
This tutorial assumes you are using RedHat Enterprise, but it should apply to CentOS too. 

Setup

Note: To facilitate getting stuff done, and to minimize permission problems, disable selinux.
If you have utilized and configured used services with selinux successfully before, then keep enabled and configure it appropriately.

Temporarily disable selinux
> # sudo setenforce 0

Permanently disable selinux
> sudo vi /etc/selinux/config
SELINUX=disabled

Update OS
> sudo yum check-update
> sudo yum update -y

If the kernel was updated, reboot
> sudo reboot 

Note: Included is some information if you try to use Amazon Linux 2 as the AMI,
but it does seem to have fewer packages, related to php anyway.

amazon-linux-extras is a mechanism in Amazon Linux 2 to enable the consumption of new versions of application software on a stable operating system that is supported until June 30, 2023. Extras help alleviate the compromise between the stability of the OS and freshness of available software.

Enable Extra Packages for Enterprise Linux (EPEL) repo
Amazon Linux 2
> sudo amazon-linux-extras install epel

RedHat Enterprise (version 8)
> sudo yum install https://dl.fedoraproject.org/pub/epel/epel-release-latest-8.noarch.rpm

Also install remi repo to install php versions greater than the RedHat php versions
> sudo yum install http://rpms.remirepo.net/enterprise/remi-release-8.rpm

Install some extra utilities
> sudo yum install htop iftop iotop

Install nginx

Amazon Linux 2
> sudo amazon-linux-extras enable nginx1

See which version of nginx is available
> sudo yum info nginx
nginx 1.14.1

Install nginx
> sudo yum install nginx

Test the default install
Amazon Linux 2
> sudo service nginx start

RedHat Enterprise
> sudo systemctl start nginx

View you EC2 instance via its default url (find in the AWS EC2 Console)
http://ec2-1-2-3-4.us-east-9.compute.amazonaws.com

Enable nginx to run at boot
Amazon Linux 2
> sudo chkconfig nginx on

RedHat Enterprise
> sudo systemctl enable nginx

Additional actions for systemctl
> sudo systemctl start nginx      # start the server
> sudo systemctl stop nginx       # stop the server
> sudo systemctl restart nginx    # restart the server
> sudo systemctl reload nginx     # reload the server
> sudo systemctl status nginx     # get status of the server

Install php

Amazon Linux 2
> sudo amazon-linux-extras enable php7.3

Note: php-imap is not available in Amazon Linux 2 (as of 2020-01-10)

See versions of php avail
> sudo yum module list php
Remi's Modular repository for Enterprise Linux 8 - x86_64
Name            Stream           Profiles                                 Summary
php             remi-7.2         common [d], devel, minimal               PHP scripting language
php             remi-7.3         common [d], devel, minimal               PHP scripting language
php             remi-7.4 [e]     common [d] [i], devel, minimal           PHP scripting language

Red Hat Enterprise Linux 8 for x86_64 - AppStream from RHUI (RPMs)
Name            Stream           Profiles                                 Summary
php             7.2 [d]          common [d], devel, minimal               PHP scripting language
php             7.3              common [d], devel, minimal               PHP scripting language

Enable and install php 7.4
> # sudo dnf module reset php  # resets back to RedHat version
> sudo dnf module install php:remi-7.4

Install some common packages
> sudo yum install php-cli php-common php-fpm php-json php-mbstring php-xml \
php-pdo php-mysqlnd php-gd php-gmp php-xmlrpc php-pecl-mcrypt php-pecl-zip php-imap

Start php-fpm
> sudo systemctl start php-fpm

Enable php-fpm at boot
> sudo systemctl enable php-fpm
> sudo systemctl status php-fpm

Edit php-fpm to run with nginx user, replacing the httpd or apache user
> sudo vi /etc/php-fpm.d/www.conf
user = nginx
group = nginx

Restart the services
> sudo systemctl restart php-fpm
> sudo systemctl restart nginx    

Note, if there are multiple apps per EC2, consider a php-fpm pool per app ie replace www.conf with app1.conf, app2.conf etc

Create a test php page in the default web dir
> sudo vi /usr/share/nginx/html/info.php
<?php

phpinfo();

You should be able to view the info page and php info
http://ec2-1-2-3-4.us-east-2.compute.amazonaws.com/info.php

You should now have nginx and php installed and usable.
But you will probably want to configure your application code user and permissions, which will be a later post.

-End of Document-
Thanks for reading

Monday, January 27, 2020

AWS EC2 resize partition

While Amazon Web Services (AWS) provides allot of services and administrative capabilities thru their Console web application, you still have to do some things manually.

After creating a EC2 instance, you may find out that the Amazon Machine Image (AMI), ie install image, you used had a different OS/root partition size than the size you allocated in the AWS Console, which is where this tutorial comes into play.

If you are using an AMI which has the root partition as 8GB, and you have launched an EC2 instance with 16GB, you can resize the root partition.

Resize volume

Check the used partition size via lsblk, which lists information about all available or the specified block devices
> sudo lsblk
NAME MAJ:MIN RM SIZE RO TYPE MOUNTPOINT
nvme0n1     259:1 0 8G  0 disk
├─nvme0n1p1 259:2 0 1M  0 part
└─nvme0n1p2 259:3 0 8G  0 part /


First we will extend the partition, and then we will extend the file system

Install growpart to extend a partition in a partition table to fill the available space
> sudo yum install cloud-utils-growpart

Extend the partition, the first option is the volume ie nvme0n1, the second options is the partition number ie the 1 in p1
> sudo growpart /dev/nvme0n1 1

Verify
> sudo lsblk
NAME MAJ:MIN RM SIZE RO TYPE MOUNTPOINT
nvme0n1     259:1 0 16G 0 disk
├─nvme0n1p1 259:2 0 1M  0 part
└─nvme0n1p2 259:3 0 16G 0 part /

The 8GB partition now lists as 16GB
But the file system is still 8GB
> df -h 
Filesystem      Size  Used Avail Use% Mounted on
/dev/nvme0n1p2   8G  1.9G   8G  24% /

Now extend the file system
> sudo xfs_growfs /

Verify
> df -h 
Filesystem      Size  Used Avail Use% Mounted on
/dev/nvme0n1p2   16G  1.9G   16G  12% /

Your good to use your fully allocated partition now.


-End of Document-
Thanks for reading

Monday, January 13, 2020

AWS EC2 mount new volume

While Amazon Web Services (AWS) provides allot of services and administrative capabilities thru their Console web application, you still have to do some things manually.

After creating a EC2 instance, you may want to attach additional storage.  The additional storage can be used to host your application independent of the OS/root partition, allowing you to more easily migrate, backup, and manage your application and it's data.

After creating the additional storage and attaching the volume to your EC2 instance, you still need to tell the OS on the EC2 about the extra storage, which is where this tutorial comes into play.

Mount attached volume 

List partitions via lsblk, which lists information about all available or the specified block devices
> sudo lsblk
NAME MAJ:MIN RM SIZE RO TYPE MOUNTPOINT
nvme1n1     259:0 0 50G 0 disk         
<- no mount point
nvme0n1     259:1 0 16G 0 disk
├─nvme0n1p1 259:2 0 1M  0 part
└─nvme0n1p2 259:3 0 16G 0 part /

nvme0n1
Is the OS/root partition

nvme1n1   
Is the external attached volume

You can tell the partitions by the size, or the or by the index

Verify that there is no data on the partition
> sudo file -s /dev/nvme1n1

Response if no file system thus no data
/dev/nvme1n1: data

Response if the partition has already been formatted
/dev/nvme1n1: SGI XFS filesystem data

If no data, create a file system
> sudo mkfs -t xfs /dev/nvme1n1
 
Make the mount directory, which can be any name, but `data` is generic enough
> sudo mkdir /data

Mount the partition to the directory
> sudo mount /dev/nvme1n1 /data

Edit fstab to mount on boot
fstab defines your volumes and mount points at boot, so make a copy first
> sudo cp /etc/fstab /etc/fstab.orig

Find the UUID of device, which will be used in fstab to identity the volume
> sudo blkid

Edit fstab; Use your UUID; match existing entry spacing
the option nofail allows the boot sequence to continue even if the drive fails to mount
> sudo vi /etc/fstab
UUID=123ebf5a-8c9b-1234-1234-1234f6f6ff30 /data xfs defaults,nofail 0 2

To verify the fstab configuration works, without rebooting, unmount and then auto mount the volume
> sudo umount /data
> sudo mount -a

List partitions, and you will see your data directory, which you can now utilize
> sudo lsblk
NAME MAJ:MIN RM SIZE RO TYPE MOUNTPOINT
nvme1n1     259:0 0 50G 0 disk /data        
<- it worked
nvme0n1     259:1 0 16G 0 disk
├─nvme0n1p1 259:2 0 1M  0 part
└─nvme0n1p2 259:3 0 16G 0 part /

> ls -l /data


-End of Document-
Thanks for reading