Monday, June 29, 2020

Android Studio enable AMD Emulator

Android Studio is the official integrated development environment for Google's Android operating system, built on JetBrains' IntelliJ IDEA software and designed specifically for Android development. It is available for download on Windows, macOS and Linux based operating systems.
Source: https://en.wikipedia.org/wiki/Android_Studio

When you install Android Studio, there is an option to install the Intel Emulator (HAXM).
But if you do not have a Intel CPU, but instead have a AMD CPU, HAXM is not very useful.
So uncheck that.  But luckily, there is an option for AMD CPUs after installation.

Android Studio -> Tools -> SDK Manager
SDK Tools tab


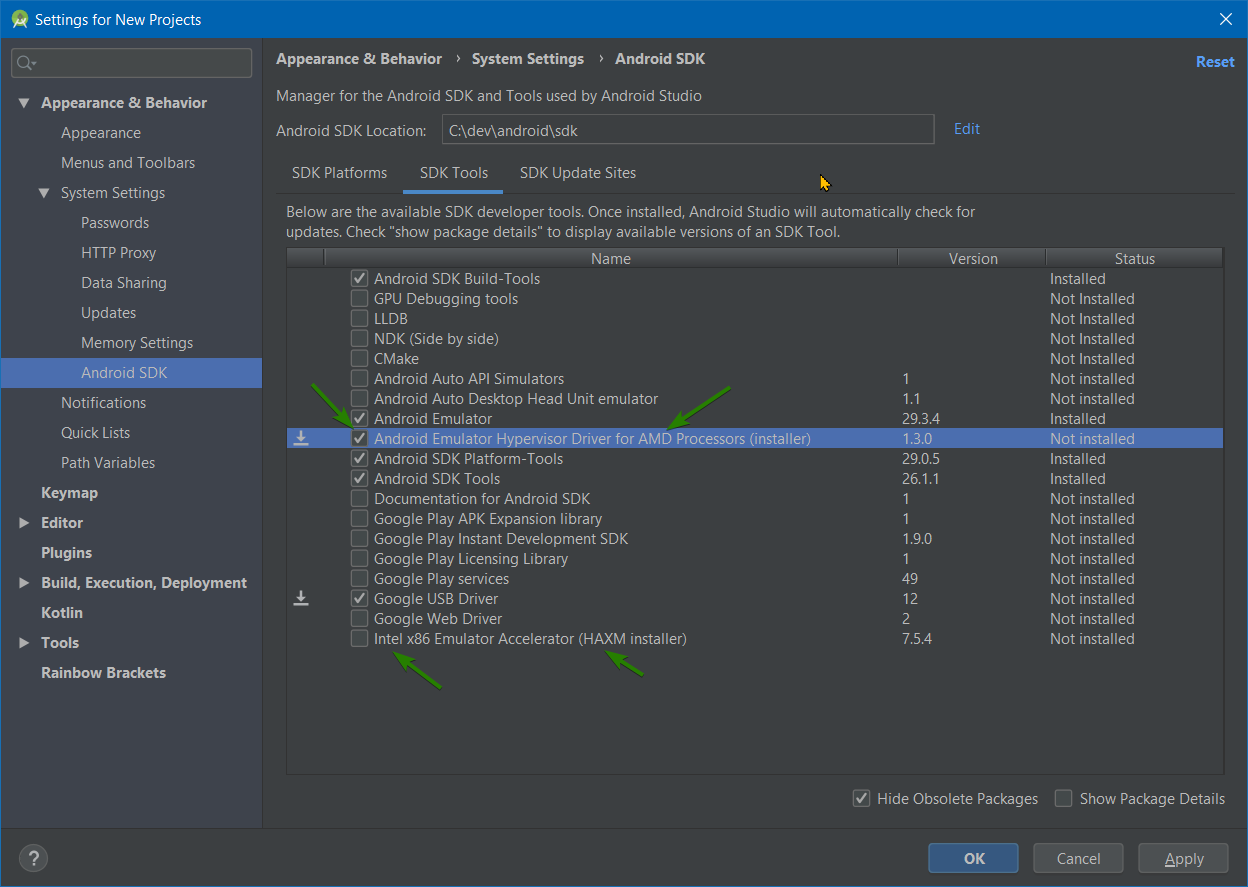
In the list, there is an option for the AMD Emulator
Android Emulator Hypervisor Driver for AMD Processors (installer)

Which "makes it possible to the emulator on AMD CPUs without needing to enable Hyper-V and with performance on par with HAXM"
Source: https://androidstudio.googleblog.com/2019/11/android-emulator-hypervisor-for-amd.html

You can also uncheck the
Intel x86 Emulator Accelerator (HXAM installer)
if you checked it during the initial install.

You may also want to check the
Google USB Driver 
if you want to later debug/test with an a phone connected via usb

Also, you will need to enable Windows Hypervisor Platform
Note: You do not have to install the full Hypervisor VM, so you can still use VirtualBox or such.

Control Panel -> Programs and Features-> Turn Windows features on or off (left side)
Scroll down, enable Windows Hypervisor Platform

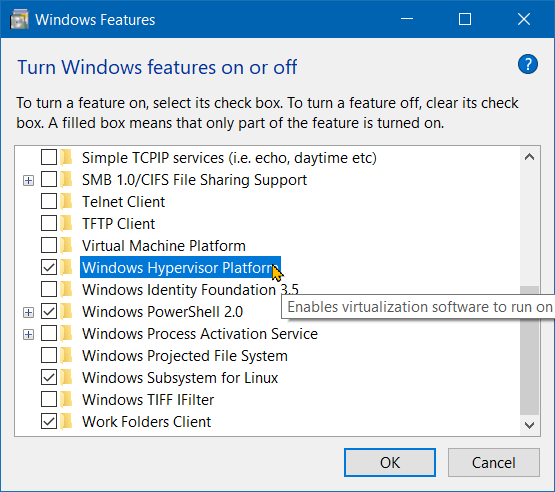
Even if not prompted to reboot on save, you need to reboot to enable the feature

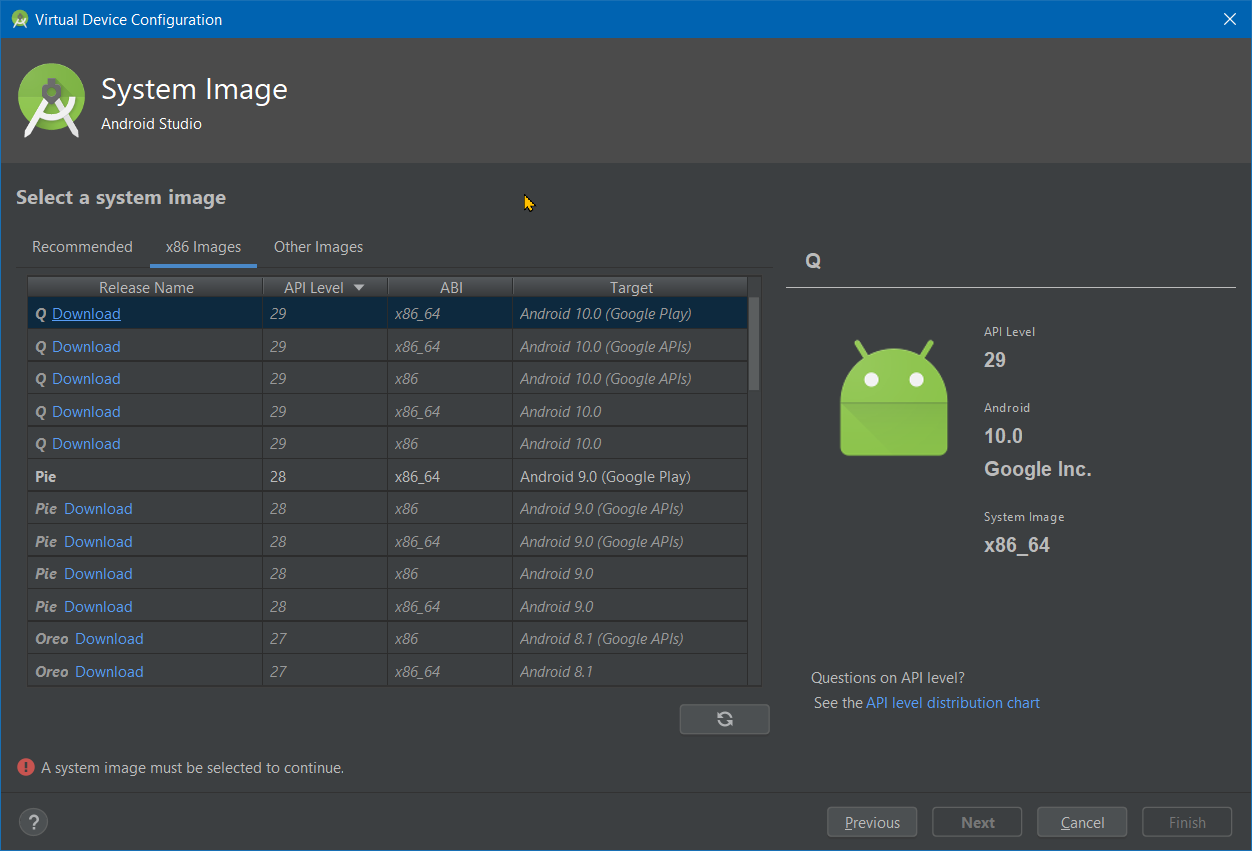
You should now be able to create and launch an Android Emulator
Tools -> AVD Manager
Select an x86_64 image with google play

Click Next and Finish
Note: You may still be prompted with an Intel HAXM dialog, probably a Android Studio bug.
Obviously Intel HAXM will fail to install/configure. But that is OK as the Android Emulator will still launch.
You should now have a usable Android Emulator, code away.


-End of Document-
Thanks for reading

Monday, June 8, 2020

Help Flutter find the Android SDK in a custom location

Flutter is a SDK for building high-performance, high-fidelity apps for iOS, Android, and web (tech preview) from a single codebase. The goal is to enable developers to deliver high-performance apps that feel natural on different platforms.

To build Android apps with Flutter, you will need to install the Android SDK. But if you install the Android SDK to a custom location, as you might to organize your tools, Flutter will not be able to find it and thus not work. The following resolves this issue:

The short version:
> cd c:\dev\git\flutter
> flutter doctor
> flutter config --android-sdk c:\dev\android\sdk
> flutter doctor --android-licenses
> flutter doctor

The long version:

Assuming you have followed the Flutter installation instructions
Source: https://flutter.dev/docs/get-started/install/windows

You should have the Flutter SDK extracted or git cloned in a directory, such as
> c:\dev\git\flutter

And updated the environment Path to include
c:\dev\git\flutter

And installed Android Studio, which will install the Android SDK.
The default install location is usually
c:\Users\[user]\AppData\Local\Android\sdk
But you may want a shorter and more accessible location such as
c:\dev\android\sdk
Which is what causes Flutter to be flustered to not find the Android SDK

After all those downloads and installs,
You should run flutter doctor, which validates your installation
> cd c:\dev\git\flutter
> flutter doctor

Well, the first error is Flutter cannot find the Android SDK.

If you installed the Android SDK into a custom location, such as
c:\dev\android\sdk

You will need to tell Flutter about its location,
which is not in the installation instructions.

But some internet searching yielded flutter has an option to update its config
> flutter config --android-sdk c:\dev\android\sdk
Source: https://github.com/flutter/flutter/issues/15114#issuecomment-431793370

Running flutter doctor again yields
> flutter doctor

I guess if you run a Flutter project or run the emulator you may get the license prompts then, but might as well accept them now.

> flutter doctor --android-licenses
Make sure you thoroughly read them, and dispute them if you do not agree, yup.

Running flutter doctor again yields
> flutter doctor

So all good.
Flutter knows where the Android SDK is installed.

Note: While IntelliJ IDEA Ultimate Edition can also be used for Flutter and Android development, Android Studio is gracefully made by IntelliJ so the interfaces are similar, with Android Studio obviously being more targeted toward Android development. Also most tutorials, internet how/what searches will reference Android Studio.

-End of Document-
Thanks for reading