Showing posts with label Security. Show all posts

Monday, September 28, 2020

Create a SFTP only user

If you want to allow a user to upload files securely to a site, and they do not need shell access or know how to use shell, you can grant them SFTP only access.  SFTP, which stands for SSH File Transfer Protocol, or Secure File Transfer Protocol, is a separate protocol packaged with SSH that works in a similar way over a secure connection.  To an end user, SFTP works the same as FTP.  You login, browse directories, and upload/download files, but more securely.

While FTPS adds a layer to the FTP protocol, SFTP is a different protocol based on the network protocol SSH (Secure Shell). Unlike both FTP and FTPS, SFTP uses only one connection and encrypts both authentication information and data files being transferred.

To add a SFTP only user to Red Hat Enterprise 8 (RHEL8)
Note, of course, should work for other Linux flavors too

1) Create your user appuser1
> sudo useradd -s /sbin/nologin appuser1

Verify
> grep /etc/passwd appuser1

While the SSH server will be configured to prevent shell access,
setting /sbin/nologin as shell adds another layer to not allow the user to SSH and get shell access

You can optionally create a group of sftp only users
> groupadd sftponly

And add you user to it
> sudo usermod -a -G sftponly appuser1

Note, make sure to add -a to append groups, else you will end up setting to only that one group

Verify
> grep /etc/groups appuser1


2) Update the SSH server to only allow your SFTP user and/or group
> sudo vim /etc/ssh/sshd_config

Find Subsystem SFTP, and, if needed, change it to
Subsystem sftp  internal-sftp

> sudo vim /etc/ssh/sshd_config
# override default of no subsystems
#Subsystem sftp /usr/libexec/openssh/sftp-server # default
Subsystem sftp  internal-sftp # must use for sftp 'jail'; similar to default

If you do not change the Subsystem SFTP, your SFTP client may report
"Cannot initialize SFTP protocol. Is the host running a SFTP server?"
and you may see errors in
/var/log/secure
Accepted password for wpsite1 from 172.30.0.160 port 52436 ssh2
pam_unix(systemd-user:session): session opened for user wpsite1 by (uid=0)
pam_unix(sshd:session): session opened for user wpsite1 by (uid=0)
pam_unix(sshd:session): session closed for user wpsite1
https://winscp.net/eng/docs/message_cannot_initialize_sftp_protocol


Toward the bottom, add
> sudo vim /etc/ssh/sshd_config

# web user 
Match User appuser1
    ChrootDirectory /var/www/html 
    ForceCommand internal-sftp
    AllowTcpForwarding no
    X11Forwarding no

While you can and should use SSH keys, you can also add
PasswordAuthentication yes 
for only specific users, groups or ips

# app1 user on vpn network
Match User appuser1 Address 10.10.0.0/16
    PasswordAuthentication yes
    ChrootDirectory /data 
    ForceCommand internal-sftp
    AllowTcpForwarding no
    X11Forwarding no

# app1 users
Match Group sftponly
    ChrootDirectory /var/www/html 
    ForceCommand internal-sftp
    AllowTcpForwarding no
    X11Forwarding no

3) create the directory where the SFTP user will be restricted to, also know as chroot or 'jail' directory
This directory, as specified by ChrootDirectory, must be a root-owned directory that is not writable by any other user or group.

So if your website is in /var/www/html
> ls -ld /var/www/html
drwxr-xr-x 2 root root /var/www/html

You can use that directory for your SFTP user chroot directory

To create another directory
> sudo mkdir /data
> sudo chmod 755 /data
> ls -ld /data
drwxr-xr-x 2 root root /data


If the permissions for configured ChrootDirectory are not correct, you will see errors in
/var/log/secure
Accepted password for appuser1 from 10.10.0.2 port 52331 ssh2
pam_unix(systemd-user:session): session opened for user appuser1 by (uid=0)
pam_unix(sshd:session): session opened for user appuser1 by (uid=0)
fatal: bad ownership or modes for chroot directory "/home/appuser1" [postauth]
pam_unix(sshd:session): session closed for user appuser1
pam_unix(systemd-user:session): session closed for user appuser1
https://serverfault.com/a/660180/523393


4) Restart SSH
> sudo systemctl restart sshd

Note, if you configuration is incorrect, you will not be bounced from your current SSH session.
!But do fix and test the configuration before exiting!
"bouncing sshd is smart enough to permit existing ssh connections to merrily continue unabated "
https://askubuntu.com/a/462971/708501

5) Verify
Test you new user SFTP login .. should work
Test you new user SSH login .. should not work
Test your existing SSH login .. should still work

You have now created a limited SFTP user. 

-End of Document-
Thanks for reading
Monday, September 14, 2020

FTPS using vsftpd

If you want to allow a user to upload files securely to a site, you can grant them FTPS access.

FTPS (also known FTP-SSL, and FTP Secure) is an extension to the commonly used File Transfer Protocol (FTP) that adds support for the Transport Layer Security (TLS) and, formerly, the Secure Sockets Layer (SSL) cryptographic protocols.
https://en.wikipedia.org/wiki/FTPS

 While SFTP should be used instead, sometimes apps or users require using FTP.

While FTPS adds a layer to the FTP protocol, SFTP is a different protocol based on the network protocol SSH (Secure Shell). Unlike both FTP and FTPS, SFTP uses only one connection and encrypts both authentication information and data files being transferred.
https://www.keycdn.com/support/ftps-vs-sftp


To add a FTPS only user to Red Hat Enterprise 8 (RHEL8)
Note, of course, this should work for other Linux flavors too

1) Create your user appuser1
> sudo useradd -s /sbin/nologin appuser1

Setting /sbin/nologin as shell prevents the user from using SSH and get shell access

2) Install a FTP server, vsftpd
> sudo yum install vsftpd

3) Update the vsftpd config
> sudo vim /etc/vsftpd/vsftpd.conf

Enable local users
..
# Uncomment this to allow local users to log in.
# When SELinux is enforcing check for SE bool ftp_home_dir
local_enable=YES
..
# Allow virtual users to use the same privileges as local users
virtual_use_local_privs=YES

# Setup the virtual users config folder
user_config_dir=/etc/vsftpd/user_config/
..

More logging
..
# more verbose logging, including connections and commands
xferlog_std_format=NO
log_ftp_protocol=YES
vsftpd_log_file=/var/log/vsftpd/vsftpd.log
dual_log_enable=YES
..

Restrict users to a dir
..
# restricted to users home dir /etc/passwd
chroot_local_user=YES
..

Your ISP or router may block the default port 21, so use another port such as 2121
FTP requires another port for data, hence 2120
..
# port 21 blocked by .. modem or router
listen_port=2121
ftp_data_port=2120 # just to match
..

Enable a whitelisted access list
..
# /etc/pam.d/vsftpd tried to use file /etc/vsftpd/ftpusers, default deny, but had to comment out
pam_service_name=vsftpd

# default, do not allow these users, but allow anyone else
# userlist_enable=YES
# userlist_file=/etc/vsftpd/user_list

# allow only these users
userlist_enable=NO
userlist_file=/etc/vsftpd/sci_user_list
userlist_deny=NO
..

Enable passive mode.
In an active mode connection, when the client makes the initial connection and sends PORT, the server initiates the second connection back. In a passive connection, the client connects and sends the PASV command, which functions as a request for a port number to connect to.  Passive mode solves the problem of an FTP client's firewall blocking incoming connections.
..
pasv_enable=YES
pasv_min_port=2124
pasv_max_port=2148
pasv_address=[your public ip]
..

Set the paths to your existing web SSL certs
..
# path of the SSL certificate
# using web certs
rsa_cert_file=/etc/ssl/site.crt
rsa_private_key_file=/etc/ssl/site.key
# enable SSL
ssl_enable=YES
allow_anon_ssl=NO
force_local_data_ssl=YES
force_local_logins_ssl=YES
# TSL is more secure than SSL so enable ssl_tlsv1_2.
ssl_tlsv1=YES
ssl_sslv2=NO
ssl_sslv3=NO
require_ssl_reuse=NO
ssl_ciphers=HIGH
# enable SSL debugging
debug_ssl=YES
..

4) Update pam.d/vsftp authentication
> sudo vim /etc/pam.d/vsftp
#%PAM-1.0
session    optional     pam_keyinit.so    force revoke
# prevented login with valid user
# auth       required pam_listfile.so item=user sense=deny file=/etc/vsftpd/ftpusers onerr=succeed
# /sbin/nologin is not a valid shell, so ignore check
# auth       required pam_shells.so
auth       include  password-auth
account    include  password-auth
session    required     pam_loginuid.so
session    include  password-auth

5) Create the directory where the SFTP user will be restricted to, also know as chroot or 'jail' directory.  This directory must be root-owned directories that are not writable by any other user or group.
Note, enabled via vsftpd.conf chroot_local_user=YES

So if your website is in /var/www/html
> ls -ld /var/www/html
drwxr-xr-x 2 root root /var/www/html

You can use that directory for your SFTP user chroot directory

To create another directory
> sudo mkdir /data
> sudo chmod 755 /data
> ls -ld /data
drwxr-xr-x 2 root root /data

Change the users home directory to the chroot directory
> usermod -d /var/www/html appuser1
> usermod -d /data appuser1

6) add custom config per user
which allows the ftp user to create files as another user
> sudo vim /etc/vsftpd/user_config/appuser1

# also set users home dir in /etc/password
local_root=/var/www/html
write_enable=YES

# create new files as
guest_enable=YES
guest_username=appweb1

7) Restart vsftpd
> sudo systemctl restart vsftpd

8) Update your firewall
If you are using Amazon EC2, configure your Security Group, adding the ports
TCP 2120-2148.  These are the ports vsftpd is listening on and passive mode responding on

9) Test using a FTP client, such as FileZilla
https://filezilla-project.org/
Note, don't forget to change the default port 21 to what you configured
vsftpd.conf listen_port=2121
And enable encryption

Require explicit FTP over TLS

You have now created a limited FTPS user.

-End of Document-
Thanks for reading

Monday, August 17, 2020

Valid local self signed certs for web development

While developing web sites/applications locally, to facilitate development, you often use a local host name, such as 127.0.0.1, localhost, site.local, example.test, or sub.company.local. While you can access the site/application using normal HTTP, sometimes the application is configured for secure HTTP i.e. HTTPS or you always want to force HTTPS no matter the environment (dev/qa/prod).

However, ‘made up’ local host names such as example.test, site.local, site.dev etc can not use an external ssl certificate, as they cannot be accessed remotely to verify authenticity by a certificate authority (CA). So typically one would create a self signed certificate. But over time, browsers have restricted the acceptance of self signed certificates, resulting in a less friendly or impossible developer workflow. So the next step would be to add your own CA to your local environment, but that can be tedious and error prone. Luckily, there is a utility which greatly simplifies the process, for linux, macos, and even windows -mkcert

“Using certificates from real certificate authorities (CAs) for development can be dangerous or impossible (for hosts like example.test, localhost or 127.0.0.1), but self-signed certificates cause trust errors. Managing your own CA is the best solution, but usually involves arcane commands, specialized knowledge and manual steps.

mkcert automatically creates and installs a local CA in the system root store, and generates locally-trusted certificates. mkcert does not automatically configure servers to use the certificates, though, that's up to you.”
To creating a usable self signed ssl certificate using Windows, Nginx, and Laragon (a portable LAMP stack):
Download the latest mkcert for your OS (Windows in this case)
mkcert-v1.4.1-windows-amd64.exe

Copy the file to a new dir
C:/laragon/bin/mkcert/
And rename to a generic mkcert.exe

Note, assuming you installed/extracted Laragon to C:/laragon

In a command window with Administrator Privileges (Run as Admin)
> cd C:\laragon\etc\ssl

Specify the destination of the CA cert
> mkdir C:\laragon\etc\ssl\mkcert

Set an temporary environment variable for mkcert to read
> setx CAROOT "C:\laragon\etc\ssl\mkcert"

By default, it would have be in you user directory
> C:\Users\<user>\AppData\Local\mkcert

Close the command window and re-open it so the environment variable can be read
In linux you might source ~/.bash_profile .. but windows
Test that the environment variable is indeed set
> cd C:\laragon\etc\ssl\
> echo %CAROOT%
C:\laragon\etc\ssl\mkcert

Create and install your local CA
> ..\..\bin\mkcert\mkcert -install 

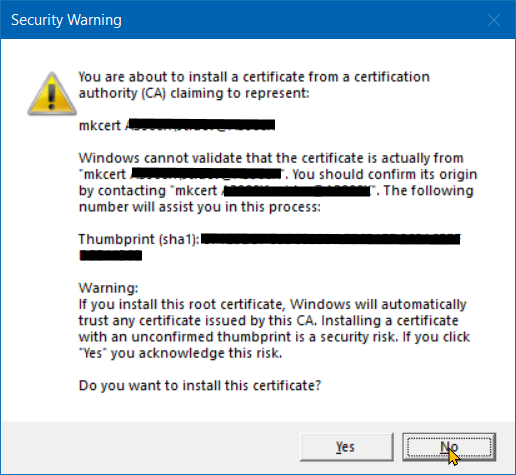
You will be shown a prompt warning you that you are doing what you want to do, add a local CA
After reading, ClickYes

Note, by default the CA key will be named rootCA-key.pem and the CA cert will be named rootCA.pem. The names are hard coded in the project source main.go, if you want to compile the project.

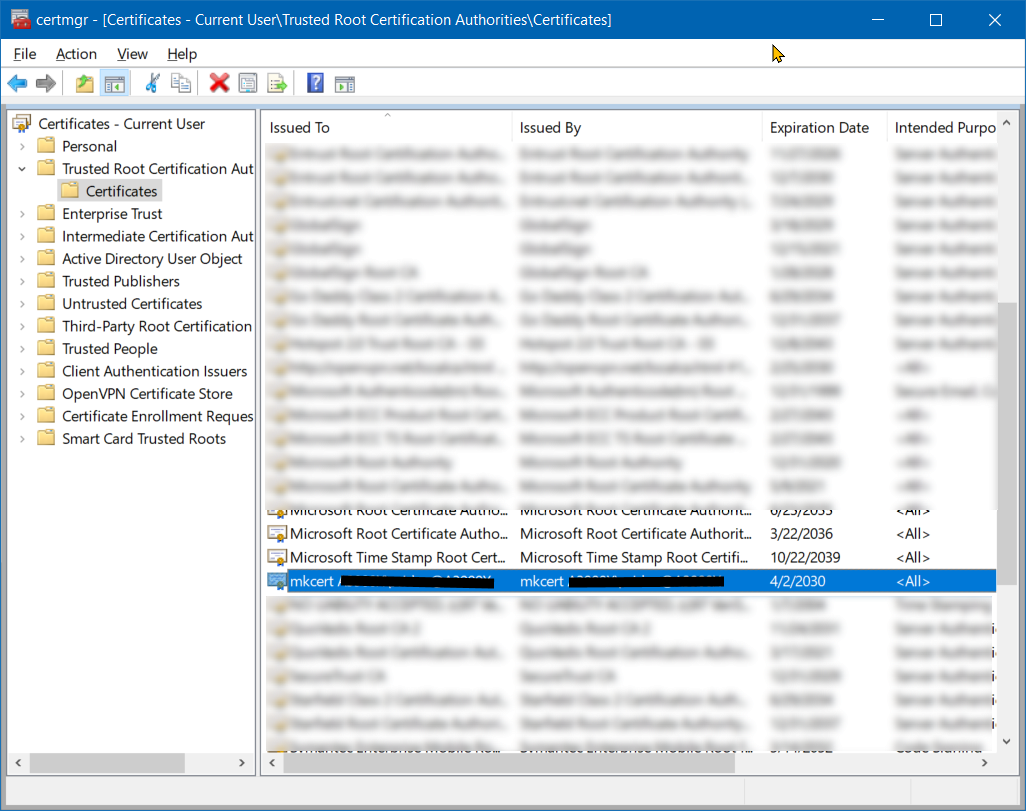
You can view the CA via the Certificate Manager
Start Menu -> Run -> certmgr
Or
Laragon -> Menu -> Nginx -> Certificate Manager
Note, while Laragon does have its own CA which it can add, it does not seem to work with recent browser updates.

Click to Trusted Root Certification Authority -> Certificates
Scroll to find mkcert Computer\User@Computer
Note, you can delete it if you want by Right Clicking on and select Delete

Now generate the SSL certificate, which will be signed by the CA you just added
> cd C:\laragon\etc\ssl
> ..\..\bin\mkcert\mkcert site.local "*.site.local"
Would create the SSL key and cert in C:\laragon\etc\ssl as
site.local+1-key.pem and site.local+1.pem 

Rename the files, or specify names when creating:
> ..\..\bin\mkcert\mkcert -key-file company.localhost.key -cert-file company.localhost.crt company.localhost *.company.localhost
Which would match
company.localhost
site1.company.localhost
site2.company.localhost

Or more generically
> ..\..\bin\mkcert\mkcert -key-file dev.localhost.key -cert-file dev.localhost.crt dev.localhost *.dev.localhost
Which would match
dev.localhost
site1.dev.localhost
site2.dev.localhost

Note, most browsers do not support wildcards 2 levels deep ie don't use just localhost or test

Note, Chrome redirects use of the .dev tld to HTTPS, as Google now owns the official .dev tld. While using any domain name which you override in your /etc/hosts file should be ok, it is best to use a domain you actually own. But if that is not practical, .test, .local, .localhost are the often provided alternatives.

Edit you Nginx or Apache config to add the SSL cert and key, and reload

Using the default website in Laragon as a working example
C:\laragon\etc\nginx\sites-enabled\00-default.conf

    listen 8443;
    Server_name site1.dev.localhost;

    # Enable SSL
    ssl_certificate "C:/laragon/etc/ssl/dev.localhost.crt";
    ssl_certificate_key "C:/laragon/etc/ssl/dev.localhost.key";
    ssl_session_timeout 5m;
    ssl_protocols TLSv1 TLSv1.1 TLSv1.2;
    ssl_ciphers ALL:!ADH:!EXPORT56:RC4+RSA:+HIGH:+MEDIUM:+LOW:+SSLv3:+EXP;
    ssl_prefer_server_ciphers on;

Note, if you are using Skype, you may not be able to run a webserver on port 443, so choose another port, such as 8443.

Assuming you have added your local host name to /etc/hosts or
C:\Windows\system32\drivers\etc\hosts 
127.0.0.1       site1.dev.localhost

Viewing https://site1.dev.localhost
Should result in a valid SSL cert.

Enjoy your HTTPS, and develop away.

To install reinstall on a computer, or reinstall after deleting the mkcert CA
Copy the full Laragon dir, or the rootCA.pem at least

Set an temporary environment variable for mkcert to read
> setx CAROOT "C:\laragon\etc\ssl\mkcert"
Close the command window, re-open

Create and install your local CA
> ..\..\bin\mkcert\mkcert -install 

Re-enjoy your HTTPS, and develop away.

-End of Document-
Thanks for reading

Monday, July 20, 2020

Require AWS MFA and still allow a user to change their password on initial login

MFA stands for Multifactor authentication, or Multi-factor authentication.
Multifactor authentication (MFA) is a security system that requires more than one method of authentication from independent categories of credentials to verify the user's identity for a login or other transaction.
Source: https://searchsecurity.techtarget.com/definition/multifactor-authentication-MFA

Note, MFA is also refereed to as 2FA or Two Factor Authentication

If you want to 'force' MFA for your users in AWS, you can follow the AWS tutorial:
'Enable Your Users to Configure Their Own Credentials and MFA Settings'
https://docs.aws.amazon.com/IAM/latest/UserGuide/tutorial_users-self-manage-mfa-and-creds.html
which creates a custom Policy and assigns it to a Group and then a User.

Users with this Group will be 'forced' to add MFA before they can access resources.
'Forced' is a misnomer though. Once logged in, it may appear that you can do stuff, but most pages show non friendly errors that you do not have access, and what Policy to add to enable access. So IAM admin friendly, but not user friendly. Once you have enabled and logged in using MFA, you will able to access resources. So 'told to' or 'resigned to' would be a better Policy description. It would be nice if there was an official AWS Policy to force MFA and the only screen you saw upon login was that. But oh well, the Tutorial does 'work',  so that's all good.

But, what if when you create the user, you required the user to change their password on initial login.
The Policy listed in the AWS tutorial does not allow the user to change their password if they have not enabled MFA. So a chicken egg problem.  Or an angry user if devops didn't test first, or a frustrated devops if they did test first.

To allow a user to change their password on initial Login, edit the Policy supplied by AWS.
Simply add the iam:ChangePassword permission to the DenyAllExceptListedIfNoMFA list.
  ...
  "DenyAllExceptListedIfNoMFA",
    "Effect": "Deny",
      "NotAction": [
        ...
        "iam:ChangePassword"
        ...


So now a new user can login, change their password, see a bunch of pages which they can't do anything with (uhg), go to their Security Credentials and enable MFA, logout, login with MFA and then be able to get to work.

-End of Document-
Thanks for reading

Monday, April 20, 2020

AWS RDS MySQL User Creation

When you create a AWS RDS MySQL instance, you will be asked to also create a master username/password.  The master RDS user acts like the root user of all it's databases, with full access to SQL commands such as DROP and CREATE.  While you can use this root user within your applications, you should create an application specific database user with limited privileges, which will prevent harm from accidental and malicious use.

Note: AWS (Amazon Web Services) RDS (Relational Database Service) is a managed service, and it doesn't provide SYS access (SUPER privileges)

View permissions of root user

Show grants for RDS MySQL root user ie master username

SQL: 
SHOW GRANTS FOR 'professor';

Result:
GRANT SELECT, INSERT, UPDATE, DELETE, CREATE, DROP, RELOAD, PROCESS, REFERENCES, INDEX, ALTER, SHOW DATABASES, CREATE TEMPORARY TABLES, LOCK TABLES, EXECUTE, REPLICATION SLAVE, REPLICATION CLIENT, CREATE VIEW, SHOW VIEW, CREATE ROUTINE, ALTER ROUTINE, CREATE USER, EVENT, TRIGGER ON *.* TO `professor`@`%` WITH GRANT

Create new application user

Create a new user to be used by just the application

SQL:
CREATE USER 'express_app'@'%' IDENTIFIED BY '20charRandomPwd';

Note: The username should be related to the application, and the password does not need to be readable as it will only be used within the application configuration.

Grant permissions

For application users, remove:
CREATE, DROP, RELOAD, PROCESS, REFERENCES, INDEX, ALTER, SHOW DATABASES, CREATE TEMPORARY TABLES, LOCK TABLES, CREATE VIEW, SHOW VIEW, CREATE ROUTINE, ALTER ROUTINE, CREATE USER, EVENT

Leaving the basics:
SELECT, INSERT, UPDATE, DELETE, EXECUTE, REPLICATION SLAVE, REPLICATION CLIENT, TRIGGER


SQL:
GRANT SELECT, INSERT, UPDATE, DELETE, EXECUTE, REPLICATION SLAVE, REPLICATION CLIENT, TRIGGER ON *.* TO `express_app`@`%` WITH GRANT OPTION;

Note: If using multiple databases in a RDS instance, then grant access only to the required databases ie ON `planet.*` TO `express_app` 

You can now use the newly created, and restricted, database user express_app in your application.


-End of Document-
Thanks for reading

Friday, November 2, 2018

HTTP Security Headers

When you view a website page or make a request against an application api, HTTP headers allow the client and the server to pass additional information with the request, page content, or the response.
Typical HTTP headers sent are Host, Accept-Language, etc, while typical HTTP headers received are Content-Type, Server, Content-Security-Policy, etc

You can view HTTP Headers using the browsers developer tools in Chrome or Firefox.

HTTP Security Headers are a subset of HTTP headers which can help increase the security of your web application and website. In many cases they are easy to implement and only require a slight web server configuration or application change. 

For the additional security to be realized, the browser must support the HTTP Security Headers, which most modern browsers do.  Can I Use and Mozilla are both good sites to see what features browsers support.

HTTP Security Headers to implement:

Access-Control-Allow-Origin Mozilla
Indicates whether the response can be shared with requesting code from the given origin.

Possible values:
*
- allow requesting code from any origin to access the resource

https://example.com/
- one domain

Recommended:
*
To allow Cross-origin resource sharing


X-XSS-Protection Mozilla
Stops pages from loading when they detect reflected cross-site scripting (XSS) attacks
Non standard, deprecated by Content-Security-Policy, but maybe useful for older browsers

Possible values:
0
- disables XSS filtering; never use!
1
- enable XSS filtering, sanitize, usually default in browsers
1; mode=block
- enable, block rendering of page

Recommended:
1
To silently filter XSS and not server as a simple test bed for XSS attacks


X-Content-Type-Options Mozilla
Prevents browser from MIME-type sniffing a response away from the declared ie trust the web server.

Possible values:
nosniff
- prevents browser from MIME-type sniffing a response away from the declared content-type.

Recommended:
nosniff

Good additional information on attacks mitigated (MIME Confusion Attack, Unauthorized Hotlinking) stackoverflow


X-Frame-Options Mozilla
Indicate whether or not a browser should be allowed to render a page in a <frame>, <iframe> or <object>
Non standard, deprecated by Content-Security-Policy, but useful for older browsers

Possible values:
deny
- no framessameorigin
- allow frame from origin
allow-from https://example.com/
- one domain

Recommended:
If you have no iframes, then deny
If you want your content iframed in by multiple websites, then do not send this header


Strict-Transport-Security Key CDN
Restricts web browsers to access web servers solely over HTTPS; header only has effect when requested over HTTPS

Possible values:
max-age
- defines the time in seconds for which the web server should only deliver through HTTPS.
includeSubDomains
- optional, apply to subdomains
preload
- optional, the site owner can submit their website to the preload list which is a list of sites hardcoded into Chrome as being HTTPS only; Additional details serverfault

Recommended:
If your site and all resources (images, javascript, css, etc) are available over HTTPS, as they should be, then enable; If you have mixed content, HTTP and HTTPS, then do not use this header
Given that browser will cache this header for your site, to test implementation, bump max-age up incrementally over time eg 300s=5min, 86400s=1day, 63072000s=2years required for preload
Strict-Transport-Security: max-age=300; includeSubDomains

Good additional information on why to use it stackoverflow, and what to be careful of stackoverflow


Referrer-Policy ScottHelme
Determine what information about the origin the user came from is sent to the destination site
Possible values:
no-referrer
- not referrer sent
no-referrer-when-downgrade
- do not send the referrer header when navigating from HTTPS to HTTP
same-origin
- only set the referrer header on requests to the same origin
origin
- set the referrer header to the origin, stripping any path information
strict-origin
- same as origin, but do not send HTTPS request on HTTP
origin-when-cross-origin
- send the full URL to requests to the same origin but only send the origin when requests are cross-origin
strict-origin-when-cross-origin
- same as origin-when-cross-origin, but do not send when navigating from HTTPS to HTTP
unsafe-url
- always send the referrer; do not use!

Recommended:
no-referrer-when-downgrade
To prevent any HTTPS info (referrer url) being sent over HTTP


Content-Security-Policy Key CDN Mozilla
Content-Security-Policy (CSP) is an added layer of security that helps to detect and mitigate certain types of attacks, including Cross Site Scripting (XSS) and data injection attacks.  It replaces several of the above X- headers, but support depends on browser and browser versions, so you should still the above headers.

CSP makes it possible for server administrators to reduce or eliminate the vectors by which XSS can occur by specifying the domains that the browser should consider to be valid sources of executable scripts. A CSP compatible browser will then only execute scripts loaded in source files received from those white listed domains, ignoring all other script.

Note: While searching for CSP policy values, remember CSP version 2 is currently defined, and CSP version 3 is in the works.  Across the versions, policy values have been added and removed, thus support depends on browsers and browser's versions. 

An example Content-Security-Policy:
Content-Security-Policy "base-uri 'self'; object-src 'none'"

Possible policy keys:
default-src
- default policy for all resources type that are not defined (fallback)
script-src
- which scripts the protected resource can execute
object-src
- from where the protected resource can load plugins (flash, java, etc)
style-src
- which styles (CSS) the user applies to the protected resource
img-src
- from where the protected resource can load images
media-src
- from where the protected resource can load video and audio
frame-src
- from where the protected resource can embed frames
frame-ancestors
- valid parents that may embed a page using <frame>, <iframe>, <object>, <embed>, or <applet>
font-src
- from where the protected resource can load fonts
connect-src
- which URIs the protected resource can load using script interfaces
form-action
- which URIs can be used as the action of HTML form elements
script-nonce
- script execution by requiring the presence of the specified nonce (cryptographic number used once) on script elements
report-uri
- Specifies a URI to which the user agent sends reports about policy violation

Deprecated keys (you may run across in searches, but don't use)
reflected-xss
- instructs a user agent to activate or deactivate any heuristics used to filter or block reflected cross-site scripting attacks, equivalent to the effects of the non-standard X-XSS-Protection header
referrer
- determine what information about the origin the user came from is sent to the destination site

Possible values: blobfolio
*
– wildcard, i.e. anything goes
'none'
– load no resources
'self'
– same-origin is OK
data:
– data-URI, such as a base64-encoded image
https:
– any resource over HTTPS
domain.com, *.domain.com, https://domain.com
– domain.com (any protocol), all subdomains of domain.com (any protocol), domain.com (SSL) respectively

For scripts and stylesheets specifically, there are a few additional magic values:
'unsafe-eval'
– allow scripts to run eval().
'unsafe-inline'
– allow all inline scripts and/or styles.
'nonce-XXX'
– allow inline or linked assets with the nonce stackoverflow

For more options and information refer to Mozilla

Recommended values:
A minimal CSP which should not break stuff is:
Content-Security-Policy base-uri 'self'; object-src 'none'
This ensures your base uri is not change via html injection, and that your site does not allow flash or applets
Adding CSP does require you know your application or websites resources, which may be non trivial.
Adding CSP can break you application or website, by preventing resources from loading.
For example,  object-src 'none' disable embedded pdfs in Chrome.
Testing, as always, is important.  To facilitate testing, consider adding one policy at a time.

Example Content-Security-Policy of a few domains:
google.com
header not set
amazon.com
header not set
aws.amazon.com
header not set
mail.google.com
script-src 'unsafe-inline' 'unsafe-eval' https: http:;object-src 'none';base-uri 'self';report-uri /cspreport
securityheaders.com
default-src 'self'; script-src 'self' cdnjs.cloudflare.com; img-src 'self'; style-src 'self' 'unsafe-inline' fonts.googleapis.com cdnjs.cloudflare.com; font-src 'self' fonts.gstatic.com cdnjs.cloudflare.com; form-action 'self'; report-uri https://scotthelme.report-uri.com/r/default/csp/enforce
msn.com
default-src 'self' data: 'unsafe-inline' 'unsafe-eval' https: blob:; media-src 'self' https: blob:; worker-src 'self' https: blob:; block-all-mixed-content; connect-src 'self' data: 'unsafe-inline' 'unsafe-eval' https: blob: https://*.trouter.io:443 https://*.trouter.skype.com:443 wss://*.trouter.io:443 wss://*.trouter.skype.com:443;
stackoverflow.com
upgrade-insecure-requests

Given that CSP is non trivial and policies can break the app, consider adding
report-uri "/csp-report-violation"
or use the free service report-uri
report-uri "https://report-uri.io/"
and view the results in developer tools and/or log the results
{"csp-report": {
    "document-uri": "https://example.com/signup.html",
    "referrer": "",
    "blocked-uri": "http://example.com/css/style.css",
    "violated-directive": "style-src cdn.example.com",
    "original-policy": "default-src 'none'; style-src cdn.example.com; report-uri /_/csp-reports",
    "disposition": "report"
}}

To test your changes, load you application or website in a browser and view the developer tools network tab and review the headers.
For nicer graphical view, with a warm fuzzy grade system, which others might use, visit
securityheaders.io


Examples of how to add the HTTP Security Headers

PHP:
header("X-Content-Type-Options: nosniff");
header("X-XSS-Protection: 1");
header("X-Frame-Options: sameorigin");
header("Strict-Transport-Security: max-age=31536000s; includeSubDomains");
header("Referrer-Policy: no-referrer-when-downgrade");
header("Access-Control-Allow-Origin: *");
header("Content-Security-Policy: base-uri 'self'; object-src 'none'");

PHP framework/library:
$response->headers->set('X-Content-Type-Options', 'nosniff');
$response->headers->set('X-XSS-Protection', '1');
$response->headers->set('X-Frame-Options', 'sameorigin');
$response->headers->set('Strict-Transport-Security', 'max-age=31536000s; includeSubDomains');
$response->headers->set('Referrer-Policy', 'no-referrer-when-downgrade');
$response->headers->set('Access-Control-Allow-Origin', '*');
$response->headers->set('Content-Security-Policy', "base-uri 'self'; object-src 'none'");

Apache config/.htaccess:
Header set X-Content-Type-Options nosniff
Header set X-XSS-Protection 1
Header set X-Frame-Options sameorigin
Header set Strict-Transport-Security max-age=31536000s; includeSubDomains
Header set Referrer-Policy no-referrer-when-downgrade
Header set Access-Control-Allow-Origin *
Header set Content-Security-Policy "base-uri 'self'; object-src 'none'"

nginx config
add_header X-Content-Type-Options nosniff
add_header X-XSS-Protection 1
add_header X-Frame-Options sameorigin
add_header Strict-Transport-Security max-age=31536000s; includeSubDomains
add_header Referrer-Policy no-referrer-when-downgrade
add_header Access-Control-Allow-Origin *
add_header Content-Security-Policy "base-uri 'self'; object-src 'none'"

-End of Document-

Thanks for reading