Friday, September 13, 2019

NodeJS Forever

The purpose of NodeJS Forever is to keep a child process (such as your node.js web server) running continuously and automatically restart it when it exits unexpectedly. Forever basically allows you to run your NodeJS application as a process.
Reference: https://stackoverflow.com/a/32944853

A simple CLI tool for ensuring that a given script runs continuously (i.e. forever)
https://github.com/foreversd/forever#readme


A simple example to start and manage Forever
> forever start -a --minUptime 1000 --spinSleepTime 2000 --uid yourapp-stg yourapp.js

-a                        append to logs
--minUptime       1000     wait a second before considering restart
--spinSleepTime 2000    wait two seconds before restarting
--uid                   name the forever process

List all running Forever processes
> forever list
info:    Forever processes running
data:    uid   command       script                          forever pid   id          logfile                            uptime
data:    [0]   yourapp-stg   /usr/bin/node start.js   1668             23197   /home/yourapp/.forever/yourapp.log     0:1:20:14.94

You can restart and stop by name or uid.
Note: uid is incremental, so it may not always be the same number.

> forever restart yourapp-stg
> forever restart 0

> forever stop yourapp-stg
> forever stop 0

And since you may not want to type or remember all these options, create some helper shell scripts

> start-yourapp.sh
#!/bin/bash
forever start -a --minUptime 1000 --spinSleepTime 2000 --uid yourapp-stg yourapp.js

> restart-yourapp.sh
#!/bin/bash
forever restart yourapp-stg


While forever will keep your NodeJS process running, it will not start on reboot.
One simple method to ensure your NodeJS runs on reboot, is to add crontab entry to your forever process.

Create a crontab entry as the user your app runs as
> crontab -e

@reboot /bin/sh /home/yourapp/crontab-reboot.sh

And create the reboot script
> crontab-reboot.sh
#!/bin/bash

# export path to NodeJS, Forever
export PATH=/usr/local/bin:$PATH

# cd to location of script
cd /home/yourapp || exit

# run script, in this case Forever
forever start -a --minUptime 1000 --spinSleepTime 2000 --uid yourapp start.js

So now you application will run .. Forever .. yup.

-End of Document-
Thanks for reading

Saturday, July 27, 2019

MongoDB 4.0 on Ubuntu 18.04 bionic


MongoDB is a cross-platform document-oriented database program. 
Classified as a NoSQL database program, MongoDB uses JSON-like documents with schema. 
Source: Wikipedia

MongoDB 4.0 was released on 2018-08-06

New 'wow' features of MongoDB 4.0:

  • multi-document ACID transactions
  • data type conversions
  • 40% faster shard migrations
  • non-blocking secondary replica reads

And some other niceties:
  • native visualizations with MongoDB Charts
  • Compass aggregation pipeline builder
  • Stitch serverless platform
  • SHA-2 authentication
  • Mobile database
  • HIPAA compliance to the MongoDB Atlas database service
  • free community monitoring service
  • Kubernetes integration

While the new features in MongoDB 4.0 are great, 
the latest Ubuntu version 18.04 official repository still installs MongoDB version 3.6

To get the current version of MongoDB
> mongo --version

To install MongoDB version 4.0, you need to install from MongoDB's repository.

Instructions to install MongoDB 4.0 and some hurdles I encountered follow:

1) Add the MongoDB repo
> sudo vi /etc/apt/sources.list.d/mongodb-org-4.0.list  
deb [arch=amd64] https://repo.mongodb.org/apt/ubuntu bionic/mongodb-org/4.0 multiverse  

2) Add MongoDB the repo key
> sudo apt-key adv --keyserver hkp://keyserver.ubuntu.com:80 --recv 9DA31620334BD75D9DCB49F368818C72E52529D4

3) Update your system
> sudo apt-get update

4) Install MongoDB 4.0
> sudo apt-get install mongodb-org

5) Status and restart MongoDB
> sudo systemctl status mongod
> sudo systemctl restart mongod

Hurdles:
If MongoDB does not start, there may be some issues with removing the prior MongoDB version.

Errors I encountered:
error processing archive /var/cache/apt/archives/mongodb-org-server_4.0.10_amd64.deb (--unpack):
error trying to overwrite '/usr/bin/mongod', which is also in package mongodb-server-core 1:3.6.3-0ubuntu1.1
error trying to overwrite '/usr/bin/mongos', which is also in package mongodb-server-core 1:3.6.3-0ubuntu1.1
error trying to overwrite '/usr/bin/bsondump', which is also in package mongo-tools 3.6.3-0ubuntu1

Some potential fixes
> sudo apt --fix-broken install
This by it self did not help

Remove prior MongoDB and other unused packages
> sudo apt autoremove
This did fix the issue and allow me to run MongoDB 4.0

To get version of MongoDB
> mongo --version

Also, if you accidentally tried to get the version from the daemon
> mongodb --version  
MongoDB will start as your user, often sudo/root,
which may cause some MongoDB files to be created as root.

You may have to reset user/group permissions
> sudo chown -R mongodb:mongodb /data/mongodb/


-End of Document-
Thanks for reading

Monday, June 17, 2019

Clear out old MSMQ messages

Microsoft Message Queuing or MSMQ is a message queue implementation developed by Microsoft and deployed in its Windows Server operating systems.

MSMQ is essentially a messaging protocol that allows applications running on separate servers/processes to communicate in a failsafe manner. A queue is a temporary storage location from which messages can be sent and received reliably, as and when conditions permit. This enables communication across networks and between computers, running Windows, which may not always be connected. By contrast, sockets and other network protocols assume that direct connections always exist.

Source: Wikipedia

If everything is working, messages are added to the queue by one application, and then typically read and removed from the queue by another application.

However, sometimes messages will get 'stuck' in the queue. While this is sometimes due to networking or application changes, the queue may back up if the receiving application is not running or running slower than normal.

Once the underlying problem has been fixed, depending on your application, the receiving application may never be able to catch up with the quantity of messages currently in the queue plus those still being added.

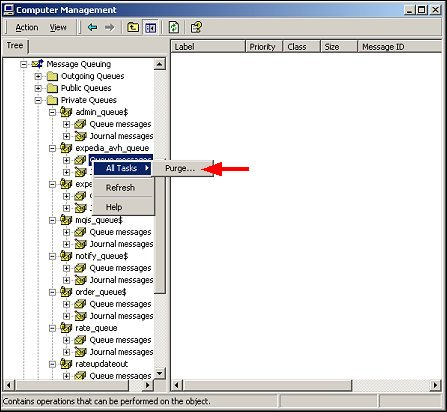
While you can purge the full queue:
Computer Management -> Services and Applications -> Message Queuing
Select your private queue, right click, All Tasks -> Purge


You may want to only purge the "old" messages.
Depending on your application, "old" could be seconds, minutes or hours.

The following PowerShell script will iterate over your private queues and remove "old" messages.
You can set the definition of "old" and you can preview the messages without removing.

###
# remove old messages for all local msmq queues
# msmq = microsoft messaging queuing
#
# 20190530 122800
#   add options $showMsg and $dryRun
# 20190521 122800
#   initial
#

#
# config
#
[System.Reflection.Assembly]::LoadWithPartialName("System.Messaging") | Out-Null
$utf8 = new-object System.Text.UTF8Encoding
$now = Get-Date
# remove messages older than
# $old = $now.AddDays(-1)
$old = $now.AddMinutes(-10)
# show details of message to be removed
$showMsg = 1
# run without removing
$dryRun = 1

#
# run
#

# get queues
$queuePaths = Get-MsmqQueue -QueueType Private | Select -Property QueueName;
if ($dryRun)
{
    echo "dry run; would be "
}
echo "removing old messages for all local msmq queues"
echo ""
echo "nbr queues: $($queuePaths.Length); checking messages older than $($old)"
$queueCounts = Get-MsmqQueue -QueueType Private | Format-Table -Property QueueName,MessageCount;
echo $queueCounts
echo ""
pause
foreach ($queuePath in $queuePaths)
{
    # for proper permissions, prepend .\
    $localQueuePath = ".\$($queuePath.QueueName)"
    echo "queue: $localQueuePath"
   $queue = New-Object System.Messaging.MessageQueue $localQueuePath
   
    # to read ArrivedTime property
    $queue.MessageReadPropertyFilter.SetAll()
   
    # get snapshot of all messages, but uses memory, and slower
   # $msgs = $queue.GetAllMessages()
    # echo "  $($msgs.Length) messages"
    # get cursor to messages in queue
    $msgs = $queue.GetMessageEnumerator2()
   
    # add a message so can test
    # $queue.Send("<test body>", "test label")
    # pause
    $removed = 0
   # foreach ($msg in $msgs)
    while ($msgs.MoveNext([timespan]::FromSeconds(1)))
   {          
       $msg = $msgs.Current
      if ($msg.ArrivedTime -and $msg.ArrivedTime -lt $old)      
      {
           if ($showMsg)
           {
               echo "--------------------------------------------------"
               echo "ArrivedTime: $($msg.ArrivedTime)"
               echo "BodyStream:"
               if ($msg.BodyStream)
               {
                   echo $utf8.GetString($msg.BodyStream.ToArray())
               }
               echo "Properties:"
               echo $msg | Select-Object
               echo ""
           }
         
           try {
               if (!$dryRun)
               {
                   # receive ie remove message by id from queue
                   $queue.ReceiveById($msg.Id, [timespan]::FromSeconds(1))
               }
               $removed++
           } catch [System.Messaging.MessageQueueException] {
               $errorMessage = $_.Exception.Message
               # ignore timeouts              
               if (!$errorMessage.ToLower().Contains("timeout"))
               {
                   throw $errorMessage
               }
           }
      }
   }
    if ($dryRun)
    {
       echo "dry run; would have "
    }
    echo "removed $removed messages from $localQueuePath"
    echo ""
}

pause
#
###

View on GitHub

-End of Document-
Thanks for reading

Saturday, April 6, 2019

Handle HTTP 302 response from proxy in Angular

HTTP 302 responses, aka redirects, are not available to Angular as xmlHttpRequest does not support returning redirects; the browser acts before you can do anything about it.


If the response is an HTTP redirect:

If the origin of the URL conveyed by the Location header is same origin with the XMLHttpRequest origin and the redirect does not violate infinite loop precautions, transparently follow the redirect while observing the same-origin request event rules.
refernce: stackoverflow


To act upon  a 302 response, 

You could check for specific data responses, or worse, override the status code 302 with a status code that is returned, such as 403, and act upon that.


X-Redirect header

However, a more generic solution is to add a custom redirect header, such as `X-Redirect` and act upon that. The value of `X-Redirect` should be the url you want to redirect to eg https://other.url.com/page

An $http example:
$http.get(orig_url).then(function(response) {
        // do stuff
    }, function (response) {
        var headers = response.headers();
        if ('x-redirect' in headers)
        {
            document.location.href = headers['x-redirect'];
        }
        return response;
    }
}

For a more global solution, you could also use a HTTP Interceptor:
app.factory('myHttpInterceptor', function ($q, myCache) {
    return {
        request: function (config) {
            return config;
        },
        response: function(response){
            var headers = response.headers();
            if ('x-redirect' in headers)
            {
                document.location.href = headers['x-redirect'];
            }    
            return response;
        },
        responseError: function(rejection) {    
            switch(rejection.status)
            {
                case 302:
                    // this will not occur, use the custom header X-Redirect instead
                    break;
                case 403:
                    alert.error(rejection.data, 'Forbidden');
                    break;
            }
            return $q.reject(rejection);
        }
    };
});

You can set the custom header server side.
For example, if you are using PHP Symfony:

$response = new Response('', 204);
$response->headers->set('X-Redirect', $this->generateUrl('other_url'));
return $response;

-End of Document-
Thanks for reading

Saturday, March 9, 2019

Install zeroMQ in PHP

ZeroMQ is a high-performance asynchronous messaging library, aimed at use in distributed or concurrent applications. It provides a message queue, but unlike message-oriented middleware, a ZeroMQ system can run without a dedicated message broker.
Wikipedia  ZeroMQ
 
Steps to install zeroMQ in PHP 5.3, PHP 7.1, and 7.2 on Windows
Most likely you want your PHP version, x64, and Thread Safe
but you may have a x32 version of PHP
$ php -i | grep Architecture  
Architecture => x64
  • for PHP 5.3
download 5.3 Thread Safe (TS) x86
extract and copy the dlls

copy libzmq.dll into
C:\wamp\bin\php\php5.3.4
there is no libsodium.dll in PHP 5.3

copy php_zmq.dll into
C:\wamp\bin\php\php5.3.4\ext

add the extension to your php.ini,
usually with the other Dynamic Extensions
extension=php_zmq.dll
  • for PHP 7.1
download 7.1 Thread Safe (TS) x64
extract and copy the dlls

copy libzmq.dll and libsodium.dll into
C:\laragon\bin\php\php-7.1.20-Win32-VC14-x64
there is an extra dll libsodium.dll for PHP 7.1

copy php_zmq.dll into
C:\laragon\bin\php\php-7.1.20-Win32-VC14-x64\ext

add the extension to your php.ini, usually with the other Dynamic Extensions
extension=php_zmq.dll
  • for PHP 7.2
download 7.2 Thread Safe (TS) x64
extract and copy the dlls

copy libzmq.dll into
C:\laragon\bin\php\php-7.2.11-Win32-VC15-x64
there is no libsodium.dll after PHP 7.1

copy php_zmq.dll into
C:\laragon\bin\php\php-7.2.11-Win32-VC15-x64\ext

add the extension to your php.ini, usually with the other Dynamic Extensions
extension=zmq
  • verify by viewing php info
$ php -i | grep zmq  
zmq  
libzmq version => 4.1.3

-End of Document-
Thanks for reading