Saturday, December 15, 2018

ngrok - expose a local server to the internet


ngrok provides introspected tunnels to localhost.
ngrok is a reverse proxy that creates a secure tunnel from a public endpoint to a locally running web service.

Which translates to
"I want to expose a local server to the internet"
http://anyonecanaccess -> http://localhost

  • Why would you want to use ngrok?

ngrok can be necessary for development and testing external services, such as Single Sign On, SAML, external APIs, Cloud solutions, etc
While you could pay for a domain and forward that to your development environment, that tends to be cost prohibitive and not overly practical given the nature of development and testing vms, containers, services, etc.  Especially in a company environment where you do not have access to the routers/firewalls.

You can also use ngrok to quickly demo a local feature before deploying.

  • How to use ngrok

To use ngrok, download and extract it to a directory
https://ngrok.com/download
C:/dev/ngrok

From a command prompt,
such as microsofts cmd or a more feature rich ConsoleZ

> ngrok http 80

Session Status         online
Session Expires        7 hours, 4 minutes
Version                2.2.8
Region                 United States (us)
Web Interface          http://127.0.0.1:4040
Forwarding             http://24f98db7.ngrok.io -> localhost:80
Forwarding             https://24f98db7.ngrok.io -> localhost:80  

Assuming you already have a web based application running on port 80 ie
http://localhost
you can access your local development environment via
http://24f98db7.ngrok.io
The '24f98db7' part is randomly generated every time you start an ngrok instance.

The free version doesn't require an account and allows for basic http/tcp tunnels, which tends to be sufficient for development.  But the publicly exposed url is limited to 8 hours.  You can also create a free account for more resources if needed.

The paid versions of ngrok allow for End-to-End TLS Tunnels, Reserved domains, Reserved TCP addresses, more connections / minute, more tunnels/ngrok process, etc.

If your local development application runs on a custom local domain name such as myawesomeapp.local, you can use that with ngrok instead of localhost

> ngrok http myawesomeapp.local:80

Session Status                online
Session Expires               7 hours, 4 minutes
Version                       2.2.8  
Region                        United States (us)      
Web Interface                 http://127.0.0.1:4040
Forwarding                    http://8316dcb8.ngrok.io -> myawesomeapp.local:80
Forwarding                    https://8316dcb8.ngrok.io -> myawesomeapp.local:80      

Note: Unlike .local, .test, and .example, .dev is not on a list of specially protected names.
in 2017, Chrome forces connections to all domains ending in .dev (as well as .foo) to use HTTPS
reference: theregister goole dev network

You can also add basic password protection to your exposed application

> ngrok http -auth "user:password" myawesomeapp.local:80

To stop ngrok just press ctrl + c

ngrok away

-End of Document-
Thanks for reading

Friday, November 2, 2018

HTTP Security Headers

When you view a website page or make a request against an application api, HTTP headers allow the client and the server to pass additional information with the request, page content, or the response.
Typical HTTP headers sent are Host, Accept-Language, etc, while typical HTTP headers received are Content-Type, Server, Content-Security-Policy, etc

You can view HTTP Headers using the browsers developer tools in Chrome or Firefox.

HTTP Security Headers are a subset of HTTP headers which can help increase the security of your web application and website. In many cases they are easy to implement and only require a slight web server configuration or application change. 

For the additional security to be realized, the browser must support the HTTP Security Headers, which most modern browsers do.  Can I Use and Mozilla are both good sites to see what features browsers support.

HTTP Security Headers to implement:

Access-Control-Allow-Origin Mozilla
Indicates whether the response can be shared with requesting code from the given origin.

Possible values:
*
- allow requesting code from any origin to access the resource

https://example.com/
- one domain

Recommended:
*
To allow Cross-origin resource sharing


X-XSS-Protection Mozilla
Stops pages from loading when they detect reflected cross-site scripting (XSS) attacks
Non standard, deprecated by Content-Security-Policy, but maybe useful for older browsers

Possible values:
0
- disables XSS filtering; never use!
1
- enable XSS filtering, sanitize, usually default in browsers
1; mode=block
- enable, block rendering of page

Recommended:
1
To silently filter XSS and not server as a simple test bed for XSS attacks


X-Content-Type-Options Mozilla
Prevents browser from MIME-type sniffing a response away from the declared ie trust the web server.

Possible values:
nosniff
- prevents browser from MIME-type sniffing a response away from the declared content-type.

Recommended:
nosniff

Good additional information on attacks mitigated (MIME Confusion Attack, Unauthorized Hotlinking) stackoverflow


X-Frame-Options Mozilla
Indicate whether or not a browser should be allowed to render a page in a <frame>, <iframe> or <object>
Non standard, deprecated by Content-Security-Policy, but useful for older browsers

Possible values:
deny
- no framessameorigin
- allow frame from origin
allow-from https://example.com/
- one domain

Recommended:
If you have no iframes, then deny
If you want your content iframed in by multiple websites, then do not send this header


Strict-Transport-Security Key CDN
Restricts web browsers to access web servers solely over HTTPS; header only has effect when requested over HTTPS

Possible values:
max-age
- defines the time in seconds for which the web server should only deliver through HTTPS.
includeSubDomains
- optional, apply to subdomains
preload
- optional, the site owner can submit their website to the preload list which is a list of sites hardcoded into Chrome as being HTTPS only; Additional details serverfault

Recommended:
If your site and all resources (images, javascript, css, etc) are available over HTTPS, as they should be, then enable; If you have mixed content, HTTP and HTTPS, then do not use this header
Given that browser will cache this header for your site, to test implementation, bump max-age up incrementally over time eg 300s=5min, 86400s=1day, 63072000s=2years required for preload
Strict-Transport-Security: max-age=300; includeSubDomains

Good additional information on why to use it stackoverflow, and what to be careful of stackoverflow


Referrer-Policy ScottHelme
Determine what information about the origin the user came from is sent to the destination site
Possible values:
no-referrer
- not referrer sent
no-referrer-when-downgrade
- do not send the referrer header when navigating from HTTPS to HTTP
same-origin
- only set the referrer header on requests to the same origin
origin
- set the referrer header to the origin, stripping any path information
strict-origin
- same as origin, but do not send HTTPS request on HTTP
origin-when-cross-origin
- send the full URL to requests to the same origin but only send the origin when requests are cross-origin
strict-origin-when-cross-origin
- same as origin-when-cross-origin, but do not send when navigating from HTTPS to HTTP
unsafe-url
- always send the referrer; do not use!

Recommended:
no-referrer-when-downgrade
To prevent any HTTPS info (referrer url) being sent over HTTP


Content-Security-Policy Key CDN Mozilla
Content-Security-Policy (CSP) is an added layer of security that helps to detect and mitigate certain types of attacks, including Cross Site Scripting (XSS) and data injection attacks.  It replaces several of the above X- headers, but support depends on browser and browser versions, so you should still the above headers.

CSP makes it possible for server administrators to reduce or eliminate the vectors by which XSS can occur by specifying the domains that the browser should consider to be valid sources of executable scripts. A CSP compatible browser will then only execute scripts loaded in source files received from those white listed domains, ignoring all other script.

Note: While searching for CSP policy values, remember CSP version 2 is currently defined, and CSP version 3 is in the works.  Across the versions, policy values have been added and removed, thus support depends on browsers and browser's versions. 

An example Content-Security-Policy:
Content-Security-Policy "base-uri 'self'; object-src 'none'"

Possible policy keys:
default-src
- default policy for all resources type that are not defined (fallback)
script-src
- which scripts the protected resource can execute
object-src
- from where the protected resource can load plugins (flash, java, etc)
style-src
- which styles (CSS) the user applies to the protected resource
img-src
- from where the protected resource can load images
media-src
- from where the protected resource can load video and audio
frame-src
- from where the protected resource can embed frames
frame-ancestors
- valid parents that may embed a page using <frame>, <iframe>, <object>, <embed>, or <applet>
font-src
- from where the protected resource can load fonts
connect-src
- which URIs the protected resource can load using script interfaces
form-action
- which URIs can be used as the action of HTML form elements
script-nonce
- script execution by requiring the presence of the specified nonce (cryptographic number used once) on script elements
report-uri
- Specifies a URI to which the user agent sends reports about policy violation

Deprecated keys (you may run across in searches, but don't use)
reflected-xss
- instructs a user agent to activate or deactivate any heuristics used to filter or block reflected cross-site scripting attacks, equivalent to the effects of the non-standard X-XSS-Protection header
referrer
- determine what information about the origin the user came from is sent to the destination site

Possible values: blobfolio
*
– wildcard, i.e. anything goes
'none'
– load no resources
'self'
– same-origin is OK
data:
– data-URI, such as a base64-encoded image
https:
– any resource over HTTPS
domain.com, *.domain.com, https://domain.com
– domain.com (any protocol), all subdomains of domain.com (any protocol), domain.com (SSL) respectively

For scripts and stylesheets specifically, there are a few additional magic values:
'unsafe-eval'
– allow scripts to run eval().
'unsafe-inline'
– allow all inline scripts and/or styles.
'nonce-XXX'
– allow inline or linked assets with the nonce stackoverflow

For more options and information refer to Mozilla

Recommended values:
A minimal CSP which should not break stuff is:
Content-Security-Policy base-uri 'self'; object-src 'none'
This ensures your base uri is not change via html injection, and that your site does not allow flash or applets
Adding CSP does require you know your application or websites resources, which may be non trivial.
Adding CSP can break you application or website, by preventing resources from loading.
For example,  object-src 'none' disable embedded pdfs in Chrome.
Testing, as always, is important.  To facilitate testing, consider adding one policy at a time.

Example Content-Security-Policy of a few domains:
google.com
header not set
amazon.com
header not set
aws.amazon.com
header not set
mail.google.com
script-src 'unsafe-inline' 'unsafe-eval' https: http:;object-src 'none';base-uri 'self';report-uri /cspreport
securityheaders.com
default-src 'self'; script-src 'self' cdnjs.cloudflare.com; img-src 'self'; style-src 'self' 'unsafe-inline' fonts.googleapis.com cdnjs.cloudflare.com; font-src 'self' fonts.gstatic.com cdnjs.cloudflare.com; form-action 'self'; report-uri https://scotthelme.report-uri.com/r/default/csp/enforce
msn.com
default-src 'self' data: 'unsafe-inline' 'unsafe-eval' https: blob:; media-src 'self' https: blob:; worker-src 'self' https: blob:; block-all-mixed-content; connect-src 'self' data: 'unsafe-inline' 'unsafe-eval' https: blob: https://*.trouter.io:443 https://*.trouter.skype.com:443 wss://*.trouter.io:443 wss://*.trouter.skype.com:443;
stackoverflow.com
upgrade-insecure-requests

Given that CSP is non trivial and policies can break the app, consider adding
report-uri "/csp-report-violation"
or use the free service report-uri
report-uri "https://report-uri.io/"
and view the results in developer tools and/or log the results
{"csp-report": {
    "document-uri": "https://example.com/signup.html",
    "referrer": "",
    "blocked-uri": "http://example.com/css/style.css",
    "violated-directive": "style-src cdn.example.com",
    "original-policy": "default-src 'none'; style-src cdn.example.com; report-uri /_/csp-reports",
    "disposition": "report"
}}

To test your changes, load you application or website in a browser and view the developer tools network tab and review the headers.
For nicer graphical view, with a warm fuzzy grade system, which others might use, visit
securityheaders.io


Examples of how to add the HTTP Security Headers

PHP:
header("X-Content-Type-Options: nosniff");
header("X-XSS-Protection: 1");
header("X-Frame-Options: sameorigin");
header("Strict-Transport-Security: max-age=31536000s; includeSubDomains");
header("Referrer-Policy: no-referrer-when-downgrade");
header("Access-Control-Allow-Origin: *");
header("Content-Security-Policy: base-uri 'self'; object-src 'none'");

PHP framework/library:
$response->headers->set('X-Content-Type-Options', 'nosniff');
$response->headers->set('X-XSS-Protection', '1');
$response->headers->set('X-Frame-Options', 'sameorigin');
$response->headers->set('Strict-Transport-Security', 'max-age=31536000s; includeSubDomains');
$response->headers->set('Referrer-Policy', 'no-referrer-when-downgrade');
$response->headers->set('Access-Control-Allow-Origin', '*');
$response->headers->set('Content-Security-Policy', "base-uri 'self'; object-src 'none'");

Apache config/.htaccess:
Header set X-Content-Type-Options nosniff
Header set X-XSS-Protection 1
Header set X-Frame-Options sameorigin
Header set Strict-Transport-Security max-age=31536000s; includeSubDomains
Header set Referrer-Policy no-referrer-when-downgrade
Header set Access-Control-Allow-Origin *
Header set Content-Security-Policy "base-uri 'self'; object-src 'none'"

nginx config
add_header X-Content-Type-Options nosniff
add_header X-XSS-Protection 1
add_header X-Frame-Options sameorigin
add_header Strict-Transport-Security max-age=31536000s; includeSubDomains
add_header Referrer-Policy no-referrer-when-downgrade
add_header Access-Control-Allow-Origin *
add_header Content-Security-Policy "base-uri 'self'; object-src 'none'"

-End of Document-

Thanks for reading


Saturday, September 8, 2018

Mr. Roboto er Robocopy

Robocopy, or "Robust File Copy", is a command-line directory and/or file replication command
From the source directory, find all shortcuts, and copy the shortcut contents to a destination directory [Wikipedia]

The most basic example
Copies files from Directory_A to Directory_B
> robocopy C:\Directory_A C:\Directory_B

Some info about Robocopy defaults:
It will only copy a file if the source and destination have different time stamps or different file sizes.
Also, data, attributes, and time stamps are copied. ACL permissions, owner information,
and auditing information are ignored. You can modify this behavior with the /copy flag.
Also note that the paths don't have a trailing backslash.

The following flurry of options will mirror files form a source directory to a destination directory, recursively, with status, summary and a log

> robocopy /b /e /xa:s /xjd /sl /a-:hs /mt /fp /mir /mt:2 /log:"C:/dev/transfer.log" /eta /tee /v /l "C:/dev/source" "D:/backup/dev/source"     

And a translation of the options:
/b      - backup mode (there's a /zb option for restart mode, but it's a whole lot slower); overwrite acls
/e      - copies subdirectories (including empty directories) in addition to files
/xa:s   - exclude system files
/xjd    - exclude junction points
/sl     - copy symbolic links as links
/a-:hs  - remove hidden/system attributes from files
/fp     - full path of files in output
/mir    - MIRror a directory tree (equivalent to /e plus /purge)
/mt[:n] - Do multi-threaded copies with n threads (default 8)
/log:transfer.log - redirect output to file
/eta    - time remaining
/tee    - duplicate log to console window
/v      - verbose output + skipped
/l      - list files only (and not copy, delete, or time stamp)

Remove the option /l when ready to run

Note that the option /sl allows symbolic links to be copied, which is useful if you are using npm for node modules management or your git repository has symbolic links.

The options /eta, /tee, /v can be removed to minimize output to the console

You can also place the command within a bat file to run on double click, or some other event.

backup.bat:

echo "R: ramdrive -> C: backup"

robocopy /b /e /xa:s /xjd /sl /a-:hs /mt /fp /mir /mt:2 /log:"C:/backup/robocopy/transfer.log" /eta /tee /v /l "R:/code" "C:/backup/code" 


pause


Microsoft documentation of Robocopy and other possible arguments

-End of document-
Thanks for reading
Monday, July 23, 2018

PowerShell script to copy files based on shortcuts

From the source directory, find all shortcuts, and copy the shortcut contents to a destination directory

PowerShell is a task automation and configuration management framework from Microsoft, consisting of a command-line shell and associated scripting language. Wikipedia

# Get all shortcuts
$shortcuts = gci "$srcDir\*.lnk"

cgi = Get-ChildItem  Microsoft
Gets the items and child items in one or more specified locations.

# skip existing dirs
if (Test-Path "$destPath") {

Test-Path Microsoft
Determines whether all elements of a path exist.

# copy
copy-item -Path "$srcPath" -Destination "$destRecreatePath" -Force -Recurse -Container -Exclude $exclude

copy-item Microsoft
Copies an item from one location to another.
But alas, without any indication of progress.

So, from some help on Stack Overflow
# xcopy prompts for is this a file/dir, no progress
# robocopy asks for admin perms on ntfs/audit attribs
# copy copies with progress %
# /z   : Copies networked files in restartable mode.
cmd /c copy /z $srcFile $destFile

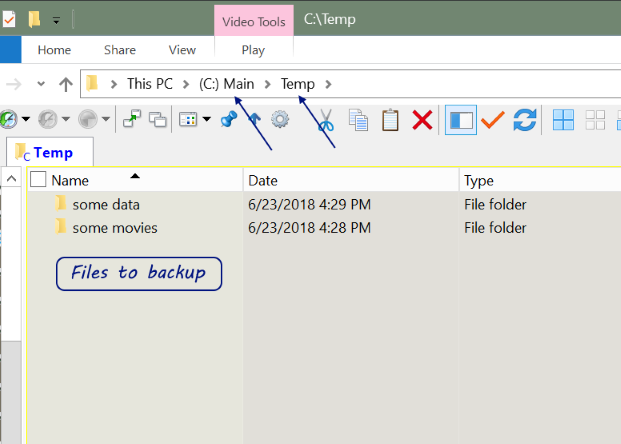
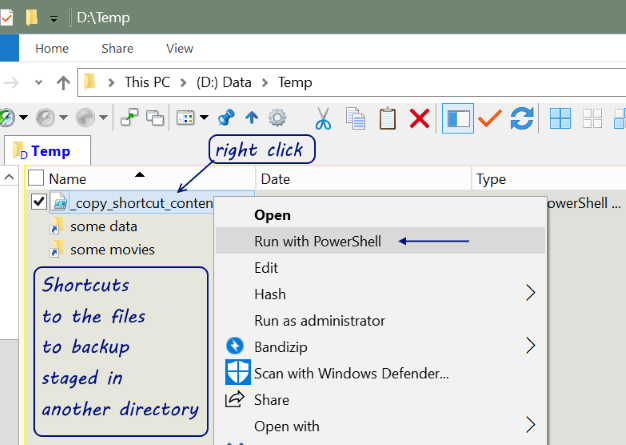
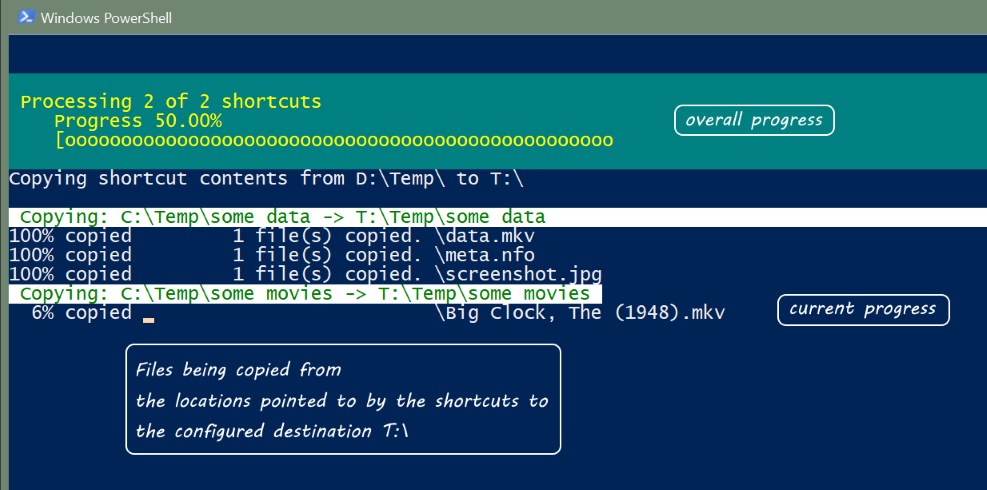
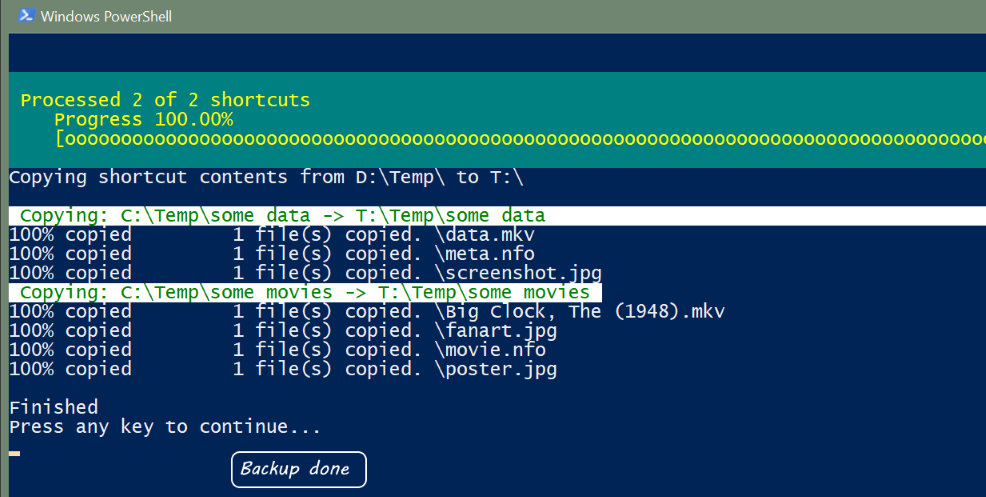
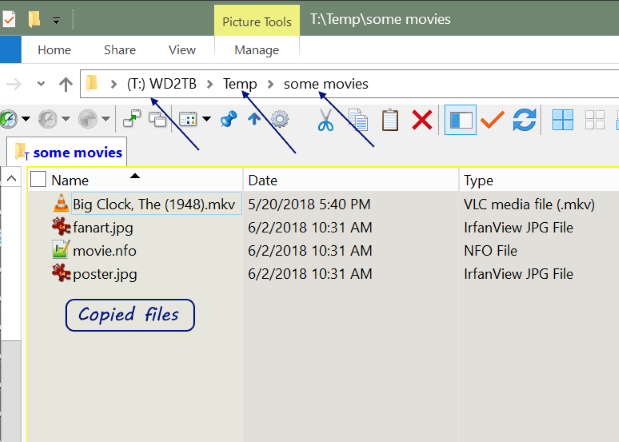
Some screenshots of the full script in action


And the full source is on GitHub


End of document. Thanks for reading.

Monday, July 2, 2018

A proper wrapper for console.log with correct line number?

While writing a simple JavaScript 'class', I wanted to toggle console.logs on for development and off for production.  Normally I would create a method to wrap console.log with a debug flag, such as:

function Awesome() {
   this.debug = true;

   this.log = function(msg) {
       if (this.debug) {
           console.log(msg);    // line 6
       }
   };
   
   this.log('test');            // outputs line 6
   
   this.doStuff = function() {
       this.log('doing stuff'); // outputs line 6
   };
}

But the line number logged is always from within the log wrapper, this.log(),
which is not overly useful.
After some searching, I ran across this StackOverflow thread
Basically, instead of using a logging wrapper, use a function alias.

function Awesome() {
   this.debug = true;
   
   if (this.debug && window.console && console.log && console.warn && console.error) {
       this.console = {
           'log': window.console.log,
           'warn': window.console.warn,
           'error': window.console.error
       };
   } else {
       this.console = {
           'log': function(){},
           'warn': function(){},
           'error': function(){}
       };
   }
   
   this.console.log('test');            // outputs line 18
   
   this.doStuff = function() {
       this.console.log('doing stuff'); // outputs line 21
   };
}    

So now Awesome is awesome with logging showing the original line number,
which is helpful for debugging.

Of course, this.console could be renamed to anything, such as this.log, this.out, etc.
And you could add the log to the window namespace so it could be used by other functions, such as window.debug or window.log, etc

End of document. Thanks for reading.

Monday, June 25, 2018

Portable DBeaver

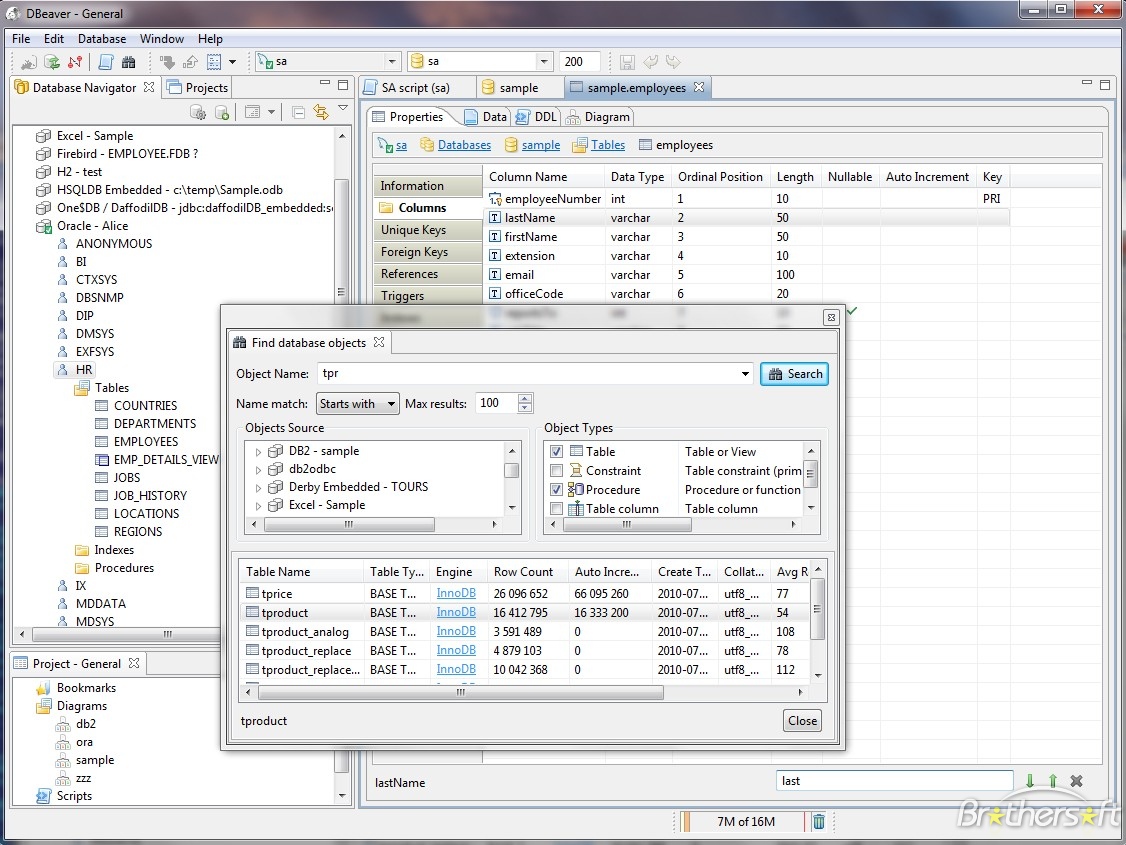
DBeaver is a most excellent Universal SQL Client
https://dbeaver.jkiss.org

“Free multi-platform database tool for developers, SQL programmers, database administrators and analysts. Supports all popular databases: MySQL, PostgreSQL, MariaDB, SQLite, Oracle, DB2, SQL Server, Sybase, MS Access, Teradata, Firebird, Derby, etc.”

You can also buy and support DBeaver, or if you need more features, at
https://dbeaver.com

“Best multi-platform database tool for developers, database administrators and analysts. Supports all popular relational databases: MySQL, PostgreSQL, SQLite, Oracle, DB2, SQL Server, MariaDB, Sybase, Teradata, Netezza, etc. Supports NoSQL databases: MongoDB, Cassandra, Redis, Apache Hive, etc.”

Note: If you can, install the latest executable DBeaver, which will give you the option to keep the program auto updated.

But if due to your company’s security policies, you are not be able to update to the latest required DBeaver or even install the DBeaver executable (exe), you can often download and use the portable versions of programs, often distributed as zip, tar, or gz files.

Or maybe you just want a portable and easy to backup version of the DBeaver.

Download the latest version of DBeaver
DBeaver
https://dbeaver.jkiss.org/download/

Be sure to download the appropriate OS version and the zip file


Extract either download to a directory, such as
C:\Portable\DBeaver

Note: BandiZip is a good free archive (zip) program

To run DBeaver, you must have a Java JRE installed or a portable copy.
Note: This Blog post will show you how to create a portable copy of the Java JRE
Portable Java


If using a portable version of the Java JRE,
Edit the DBeaver configuration file to tell DBeaver where your portable version of Java JRE is located.

Open the file
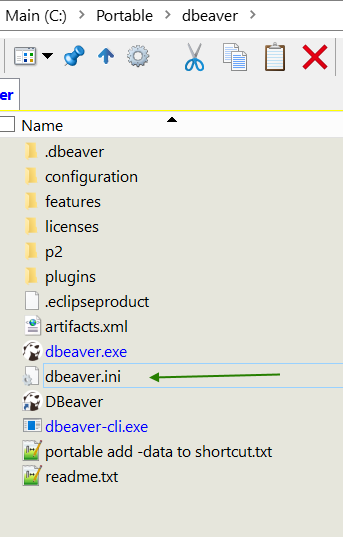
C:\Portable\DBeaver\dbeaver.ini


Note: Notepad++ is a good free text editor, which can also be used portable
just download the zip or 7z version.

Add -vm and path to jvm lines in between the -showsplash and -vmargs lines
Make sure -vm is on one line, and the path to jvm.dll on the next line

..
-showsplash
-vm
C:\Portable\jre-10.0.1\bin\client\jvm.dll
-vmargs
..

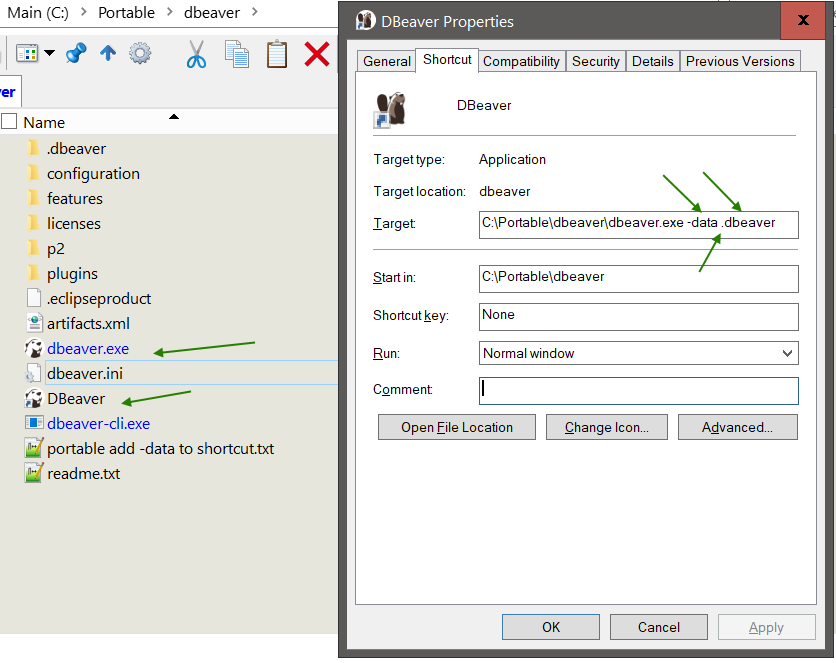
Create a shortcut to the DBeaver executable, which is in
C:\Portable\DBeaver\


Add to the shortcut the parameter
-data .dbeaver


This will create the DBeaver configuration in the same directory as the dbeaver.exe
C:\Portable\DBeaver\.dbeaver

Else, the DBeaver configuration will be created in your users home directory

Save and close and try to run DBeaver

DBeaver should be up and running.

Query away!


Additional Information

Your company policies may prevent the auto downloads of required Java database drivers, which are often distributed as jar files (compressed java files)

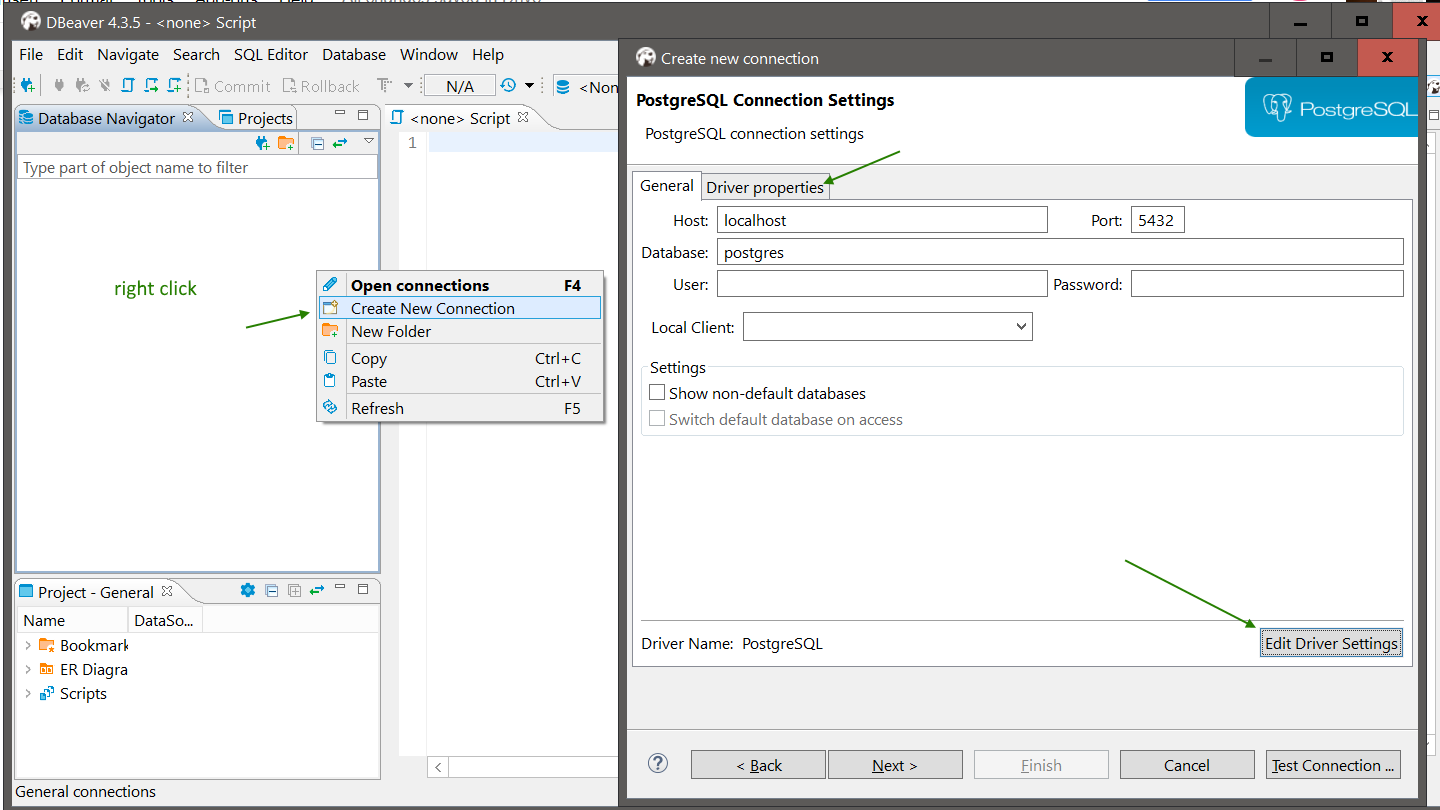
Try to create a new database connection
Right click on the Database Navigation pane
Choose Create New Connection


Choose a database to connect to,
in this example PostgreSQL (Postgres) was chosen

Click either Driver properties or Edit Driver Settings

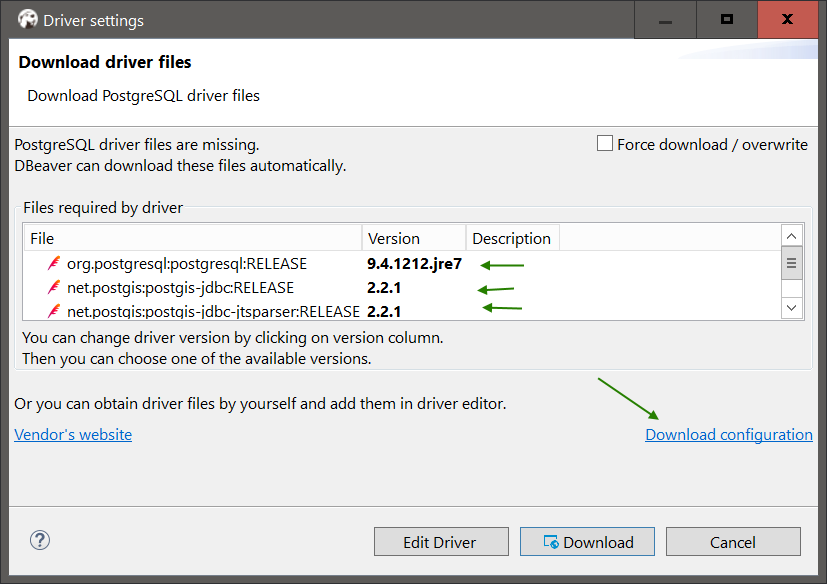
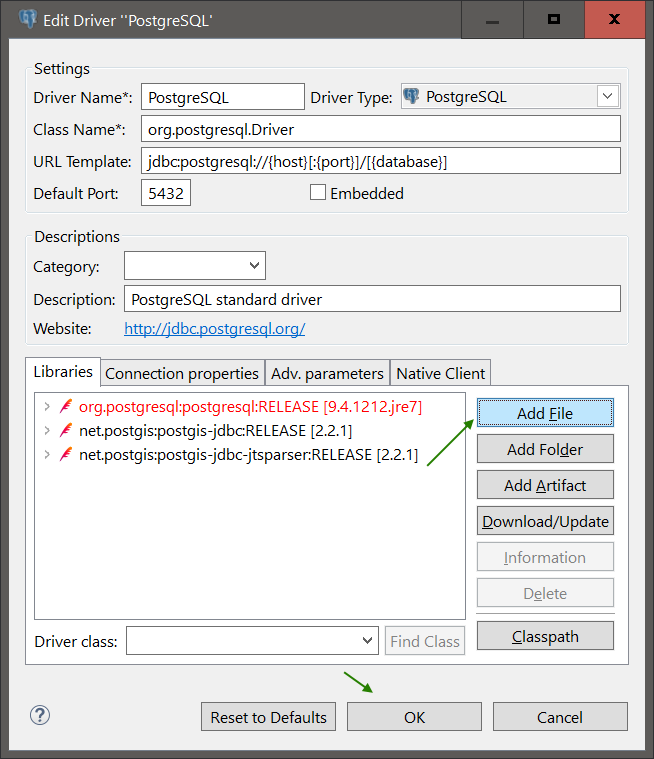
If you are missing drivers or DBeaver cannot auto download them, DBeaver will notify you and the drivers will be in red


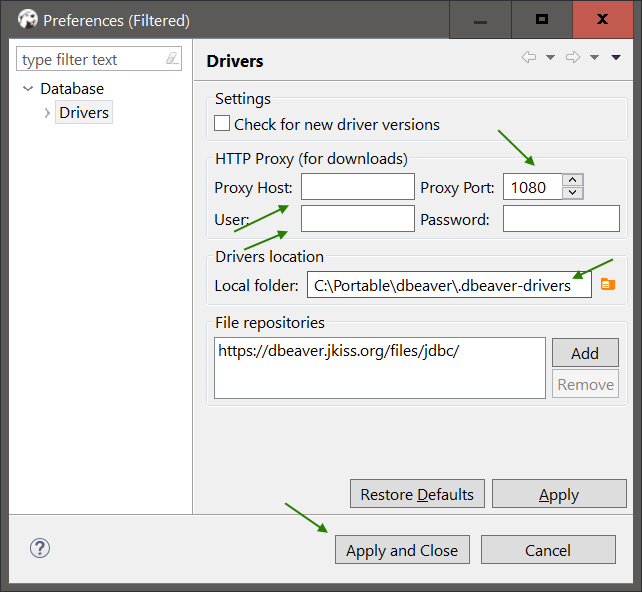
You can try setting the download proxy, if you have that information


If not, you can try to download the drivers directly.

For Postrgres, download the driver jar files from
https://jdbc.postgresql.org/download.html (42.2.2)
https://mvnrepository.com/artifact/net.postgis/postgis-jdbc-jtsparser/2.2.1 (2.2.1)
https://mvnrepository.com/artifact/net.postgis/postgis-jdbc/2.2.1 (2.2.1)

Note: These urls were found by searching for the driver name and version listed by DBeaver

Then click Add File for each jar file.
And also remove the prior entries.


That should get you Querying

End of document. Thanks for reading.

Monday, May 28, 2018

Portable Netbeans

NetBeans IDE is a free and open source integrated development environment.
“Quickly and easily develop desktop, mobile and web applications
with Java, JavaScript, HTML5, PHP, C/C++ and more.”

Netbeans IDE is often just called Netbeans.

Note: If you can, install the latest executable Netbeans IDE, which will give you the option to keep the program auto updated.

But if due to your company’s security policies, you are not be able to update to the latest required NetBeans or even install the NetBeans executable (exe), you can often download and use the portable versions of programs, often distributed as zip, tar, or gz files.

Or maybe you just want a portable and easy to backup version of the NetBeans.

Download the latest version of Netbeans.

Note: Netbeans used to be developed by Oracle, but is currently moving to Apache.
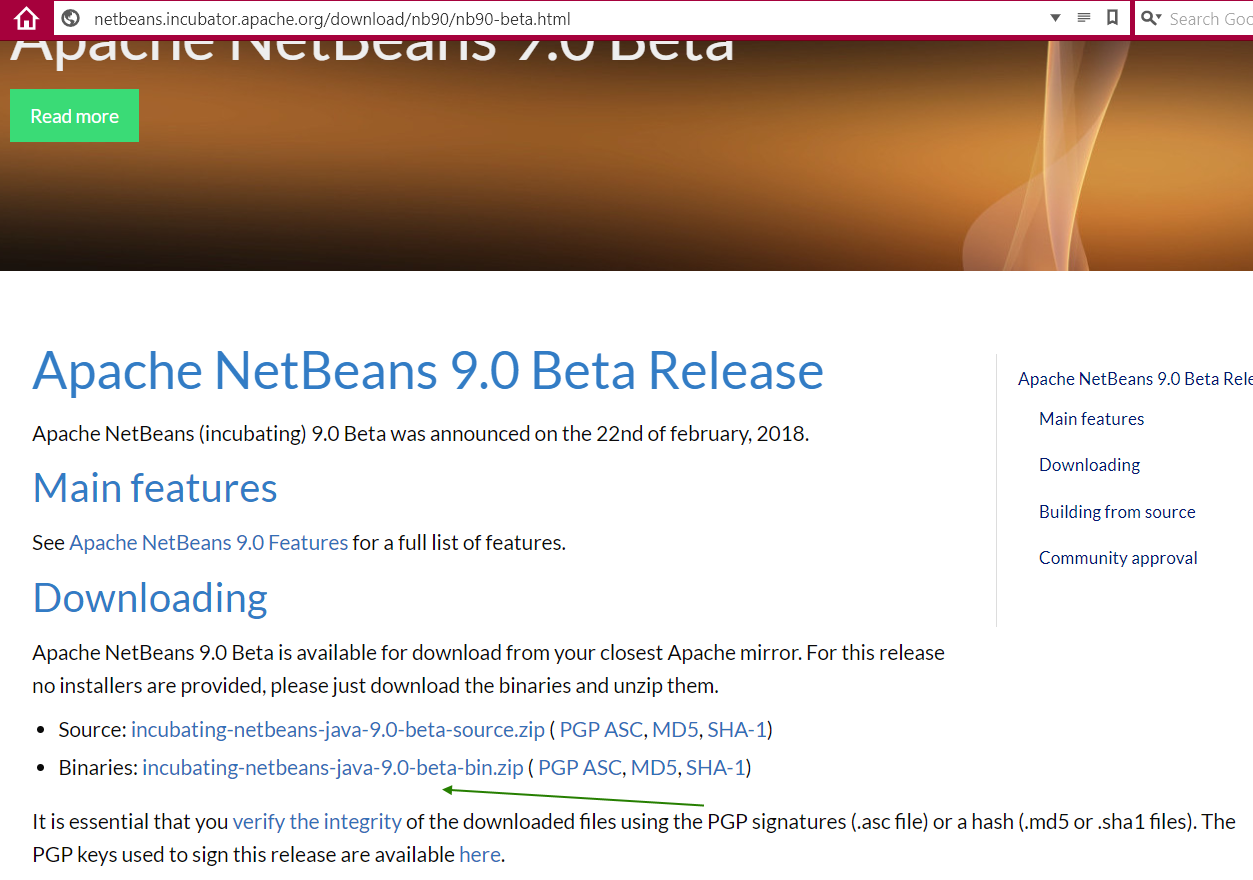
Either download the latest stable version from Oracle, or the latest beta from Apache (as of this post)

Netbeans 8.2 (Oracle)
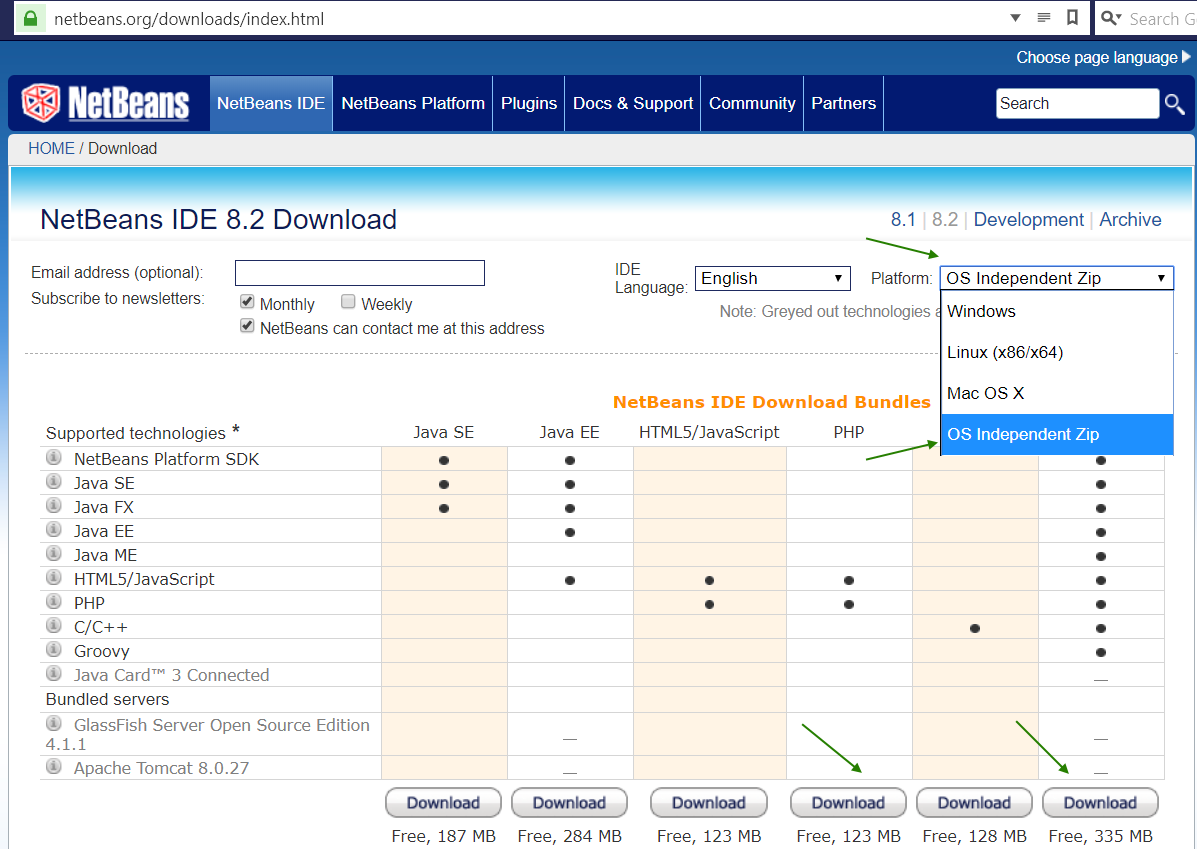
https://netbeans.org/downloads/

Be sure to switch the Platform dropdown to OS Independent Zip
Then download the appropriate environment
If in doubt, All will suffice.


Netbeans Beta 9.0 (Apache)
http://netbeans.incubator.apache.org/download/nb90/nb90-beta.html
http://netbeans.incubator.apache.org


Extract either download to a directory, such as
C:\Portable\Netbeans

Note: BandiZip is a good free archive (zip) program
To run Netbeans, you must have a Java JRE installed or a portable copy.
Note: This Blog post will show you how to create a portable copy of the Java JRE
Portable Java


If using a portable version of the Java JRE,
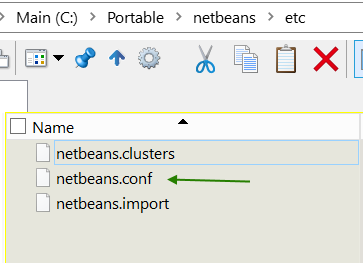
Edit the Netbeans configuration file to tell Netbeans where your portable version of Java JRE is located.

Open the file
C:\Portable\Netbeans\etc\netbeans.conf


Note: Notepad++ is a good free text editor, which can also be used portable
just download the zip or 7z version.


Find the string (CTRL F or scroll and read)
#netbeans_jdkhome="/path/to/jdk"

And change it to where you installed/extracted the Java JRE
Such as
netbeans_jdkhome="C:\Portable\jre1.8.0_161"
Or
netbeans_jdkhome="C:\Portable\jre-10.0.1"

Note the removal of the comment tag #

Save and close and try to run Netbeans

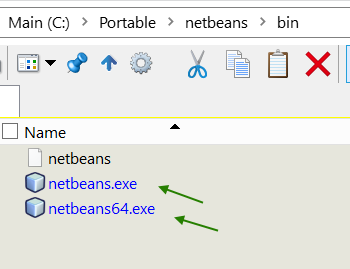
Create a shortcut to the Netbeans executable, which is in
C:\Portable\Netbeans\bin\


Choose netbeans64.exe if you are using a 64bit OS (most likely)
else choose netbeans.exe

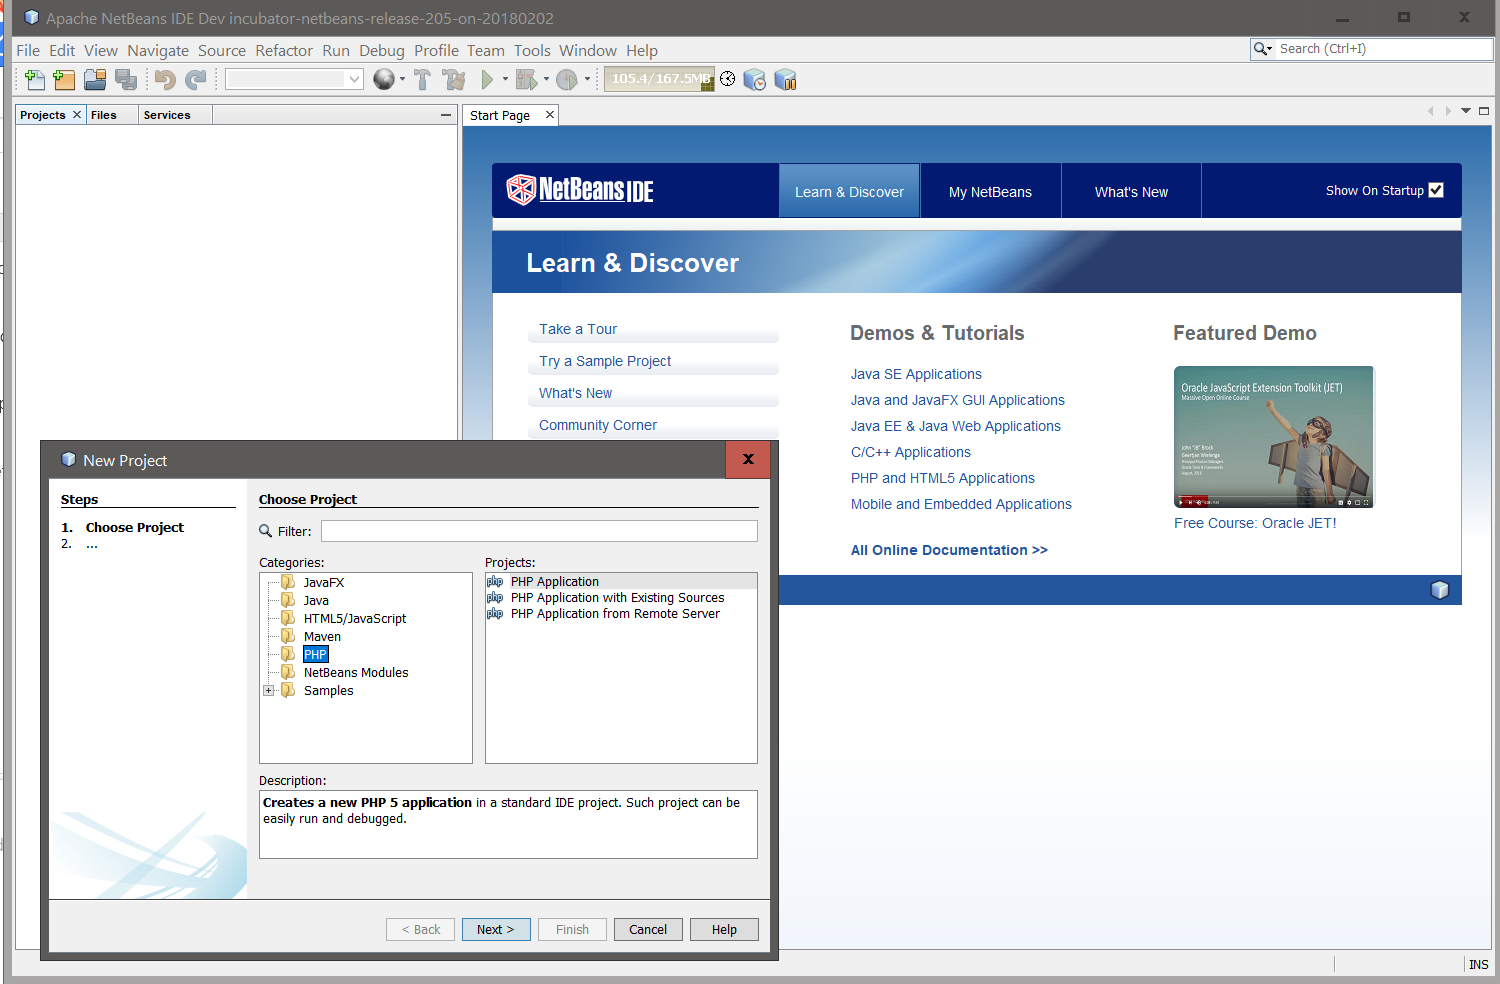
Netbeans should be up and running.

Program away!


Additional information

If your company policy locks down your installation options, more than likely you are on ‘less than optimal’ hardware. If your laptop or desktop only has 4gb memory, this change can help the performance of Netbeans

Edit the Netbeans configuration file again
C:\Portable\Netbeans\etc\netbeans.conf

Find the string
netbeans_default_options

Place a comment mark # in front of it, so you can reset the configuration if need be
#netbeans_default_options

And create a new entry
netbeans_default_options="-J-client -J-Xss8m -J-Xms256m -J-Dapple.awt.graphics.UseQuartz=true -J-Dsun.java2d.dpiaware=true -J-Dsun.zip.disableMemoryMapping=true -J-Djava.net.preferIPv4Stack=true -J-XX:+UseConcMarkSweepGC -J-XX:+CMSClassUnloadingEnabled -J-XX:+CMSPermGenSweepingEnabled"

-J-Xss8m -J-Xms256m allows Netbeans to start up a little faster, and caps it’s memory usage.

Further details of options
https://performance.netbeans.org/howto/jvmswitches/

Additional ideas
https://stackoverflow.com/questions/229763/how-to-improve-netbeans-performance

With two semi-obvious ones being
Disable the Netbeans plugins you are not using.
Close the projects you are not working on (Netbeans keeps an index on every project opened)

End of document. Thanks for reading.