Friday, January 15, 2021

Cypress configuration and organization

Cypress is a next generation front end testing tool built for the modern web.

Instead of using an external listener, such as Selenium, which can be 'flaky' at times waiting for responses, Cypress has been built to run in the browser so it can more accurately monitor and react to requests.  More information can be found at Cypress.io 

The following will install Cypress, give some configuration and organization recommendations, and show how to persist sessions.  Writing the tests is up to you! (Write your first test)


Install

In the base of your application, make a tests directory, and a cypress directory, as you may have or end up using other test suites

> mkdir tests/cypress

> cd tests/cypress


Simple npm install

> npm install cypress --save-dev


run Cypress

> npx cypress open


Official docs Install Cypress


Organization

While the install of Cypress creates an example skeleton directory 

test/cypress/cypress

It is recommended to create your own directory 'just in case' a npm update decides to do 'something' with those skeleton directories.


create an app or unique name under 

tests/cypress/[app_abbrev]

You can copy from 

tests/cypress/cypress

or create the directories:

  • integration 

where you write and run tests  

  • fixtures 

static data for testing

  • plugins 

enable you to modify or extend Cypress

  • screenshots 

if taken, storage

  • support

loaded automatically before your test files ie global tests configuration

    • commands

additional grouping of common executed test steps

    • callbacks

additional grouping of callbacks which can modify the behaviors of tests


Configuration

Under 

tests/cypress

create three config files,

cypress.json

cypress.env.json

cypress.env.json.example


cypress.json contains global configuration related to Cypress

Add your [app_abbrev] location to the config:

{

    "fixturesFolder": "[app_abbrev]/fixtures",

    "integrationFolder": "[app_abbrev]/integration",

    "pluginsFile": "[app_abbrev]/plugins",

    "screenshotsFolder": "[app_abbrev]/screenshots",

    "supportFile": "[app_abbrev]/support"

}


cypress.env.json contains environment dependent configuration, such as user names for logins

You should create and maintain

cypress.env.json.example 

with the available config options too

An example config:

{

    "web_base_url": "http://app.dev.localhost:8088/",

    "login_username": "yourtestuser@dev.localhost",

    "login_password": "randchars"

}


Note, while Cypress does have a baseUrl config option that can be added to cypress.json, doing so does not allow the url to change per environment/developer/tester.  If you are using a defined centralized test environment, or defined containers, then this should not be an issue.  But to allow the url the app uses during testing to vary between environment/developer/tester, you can add and use your own base url by adding it to cypress.env.json

So instead of 

Cypress.config().baseUrl

You would use

Cypress.env("web_base_url")


Support

The index.js in support is called on every run of a test.  

This is where you can add global tests configuration and behaviors

Note, for easier maintenance, try to keep functionality to one file.


Update

tests/cypress/[app_abbrev]/support/index.js

to contain

import './commands/login_ui';


import './callbacks/stop_on_failure';

import './callbacks/preserve_session';


Support Commands

An example of a common executed test step may be to log in to your app.


Login UI

support/commands/login_ui.js

Create and add the minimal steps to log into your app, which may look similar to:

// https://on.cypress.io/custom-commands

Cypress.Commands.add("login_ui", (email, password) => {

    // minimal info to login via ui

    cy.visit(Cypress.env("web_base_url"));

    cy.url().should("include", "[app_abbrev]");


    let el = cy.get('#login_form [name="username"]');

    el.type(Cypress.env("login_username"));


    el = cy.get('#login_form [name="password"]');

    el.type(Cypress.env("login_password"));


    el = cy.get('#login_submit');

    el.click();

});


Note, instead of using your apps ui to log in for every test, you should create a token or api access to expedite the test


Now you can call the command using one consistent statement


describe("Select that Awesome Thing Test", () => {

    describe("Can Login", () => {

        it("Can login", () => {

            cy.login_ui(Cypress.env("login_username"), Cypress.env("login_password"));

        });

    });

});


Support Callbacks/Behaviors


Stop on Failure:

support/callbacks/stop_on_failure.js

When on step of a test fails, it will often cause the next steps to fail.  

So fail early so the problem can be found quicker.

Create and add

// after each test

// stop test after first failure

afterEach(function () {

    if (this.currentTest.state === 'failed') {

        Cypress.runner.stop()

    }

});


Preserve Sessions:

support/callbacks/preserve_session.js

All tests are supposed to be isolated, so Cypress will often clean up your cookies.

While it would be nice if the cleanup happens after the first test, or the last test in a suite, the clean up will happen after a few tests, which can log you out of your app and make it seem like your app or the test are broken.

To persists your session, which is often stored in a session cookie, create and add:

// once before all tests

// preserve session cookie so don't get 'randomly' logged out after several specs

before(function () {

    Cypress.Cookies.defaults({

        preserve: ['your_sessionid_name']

    });

});


Package.json

While you can run Cypress via

> npx cypress open


You can also add a more common alias to your package.json

  "scripts": {

    "test": "npx cypress open"

  },

And run Cypress via

> npm run test


.gitignore
Update your .gitignore
/tests/cypress/node_modules
/tests/cypress/cypress
/tests/cypress/cypress.env.json


Hopefully the above information helps you setup and use Cypress in a more enjoyable and useful fashion.


-End of Document-

Thanks for reading


Wednesday, December 16, 2020

AWS S3 Lifecycle delete rules

By putting a cleanup Lifecycle rule in place on your S3 buckets, you may be able to potentially save costs and increase LIST performance.

"Incomplete Multipart Uploads – S3’s multipart upload feature accelerates the uploading of large objects by allowing you to split them up into logical parts that can be uploaded in parallel.  If you initiate a multipart upload but never finish it, the in-progress upload occupies some storage space and will incur storage charges. However, these uploads are not visible when you list the contents of a bucket and (until today’s release) had to be explicitly removed.


Expired Object Delete Markers – S3’s versioning feature allows you to preserve, retrieve, and restore every version of every object stored in a versioned bucket. When you delete a versioned object, a delete marker is created. If all previous versions of the object subsequently expire, an expired object delete marker is left. These markers do not incur storage charges. However, removing unneeded delete markers can improve the performance of S3’s LIST operation."


Source: https://aws.amazon.com/blogs/aws/s3-lifecycle-management-update-support-for-multipart-uploads-and-delete-markers/


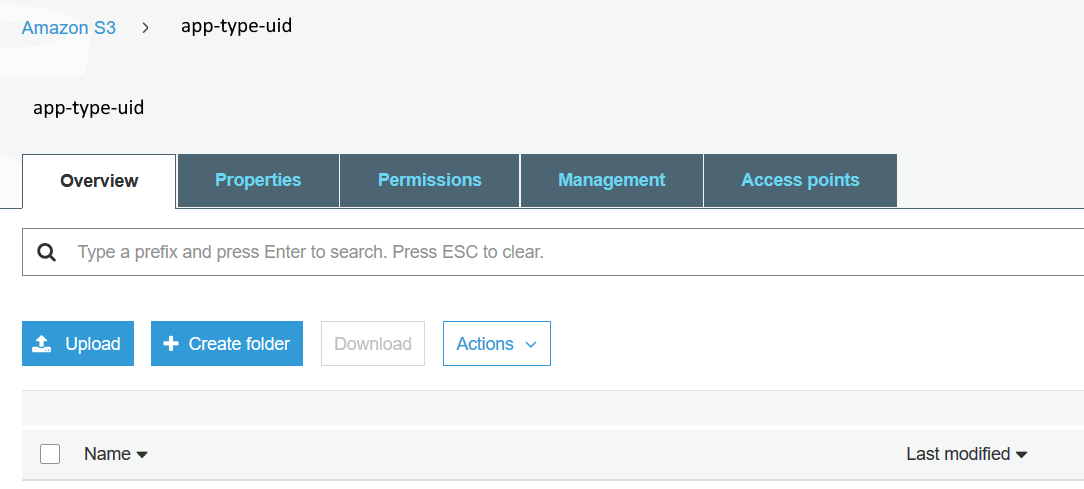
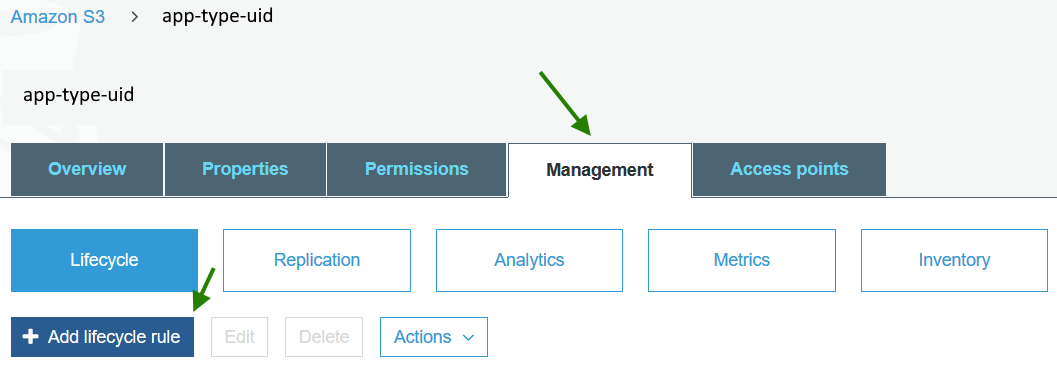
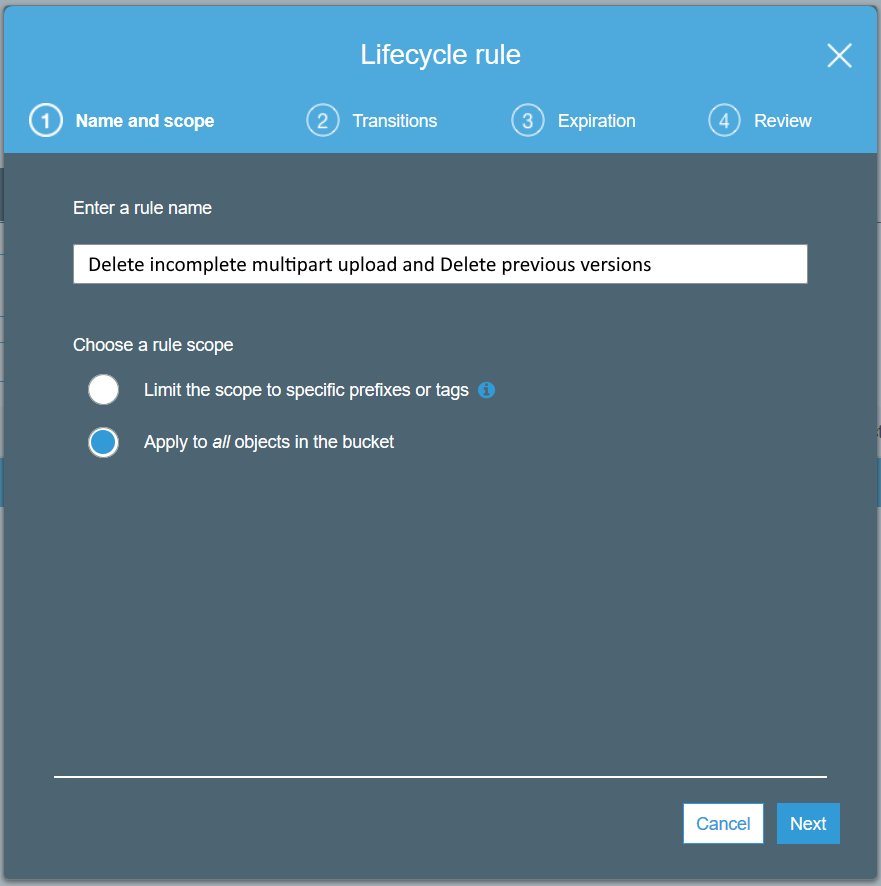
To add a cleanup Lifecycle rule:


  • Log into the Amazon S3 web console

  • Select your S3 bucket


  • Select Management

  • Select Add lifecycle rule


  • Enter a name such as 

'Delete incomplete multipart upload and Delete previous versions'


  • Skip Transitions for now

Transitions allow you to move storage to slower locations at a reduced cost

https://docs.aws.amazon.com/AmazonS3/latest/dev/lifecycle-transition-general-considerations.html


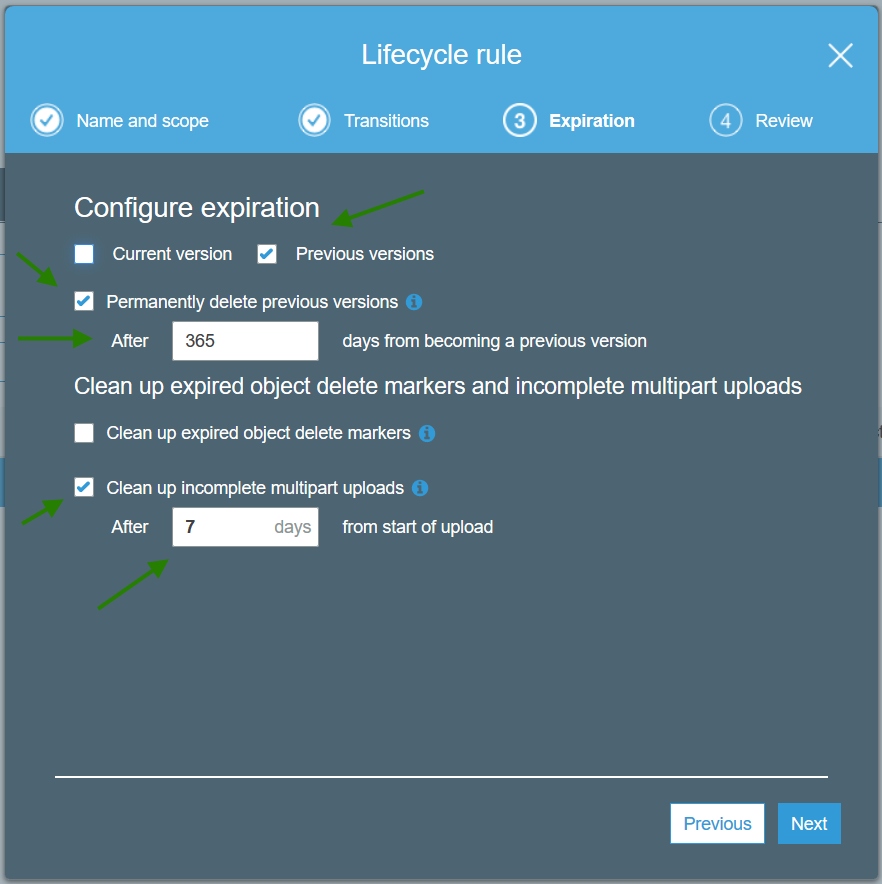
  • Expiration

    • Delete Previous versions after 365 days

You can choose shorter periods such as 7 days or 30 days if you don’’t have a use case for retrieving prior S3 versions.

You will still have the current version, which is usually all you want, but deleting previous versions can help with costs and S3 LIST performance.

    • Clean up incomplete multipart uploads after 7 days

If you do not have any automated processes that may re-try uploads, you could choose 1 day


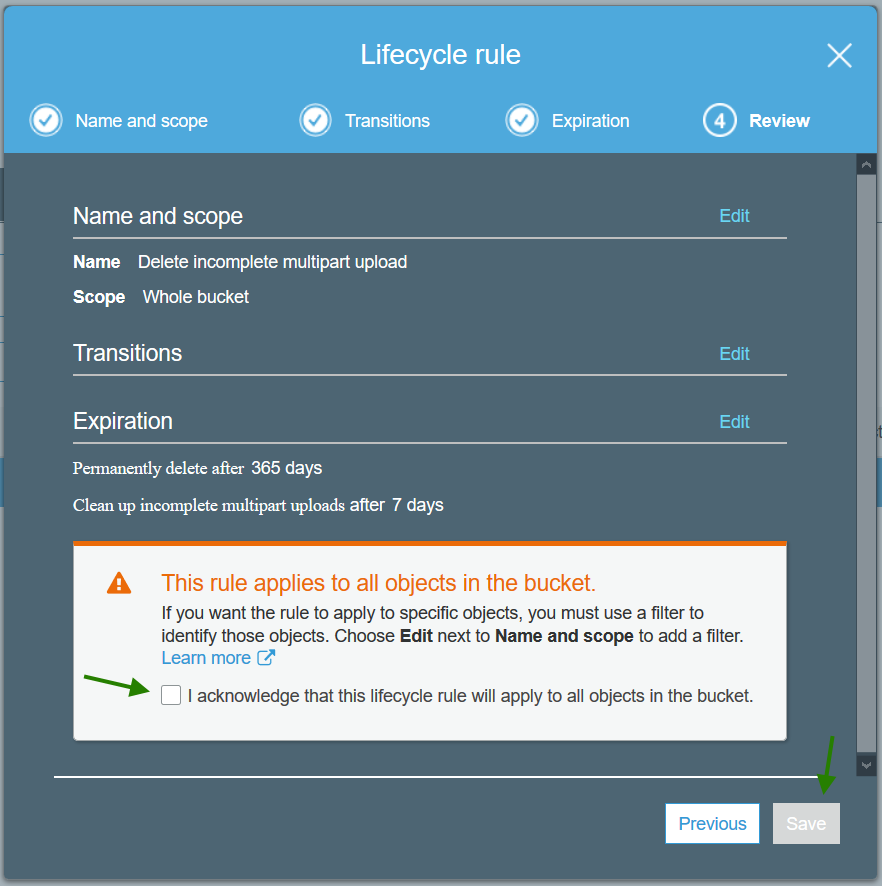
  • Review

Agree to the 'scary' this applies to all objects in bucket

Note, if you have S3 objects (uploads) which require different policies, you may find it easier to manage by creating a S3 bucket per policy.


You now have some basic cleanup of your S3 bucket(s) configured.


-End of Document-
Thanks for reading
Monday, November 16, 2020

PHP code quality using Code Sniffer

about
PHP CodeSniffer is an essential development tool that ensures your code remains clean and consistent. It can also help prevent some common semantic errors made by developers.   It is a set of two PHP scripts; the main phpcs script that tokenizes PHP, JavaScript and CSS files to detect violations of a defined coding standard, and a second phpcbf script to automatically correct coding standard violations. 


goal
More consistent indentation, spacing, and formatting.
So your team will have less conflicts from git, and a more consistent code base to maintain and grow.


install
install via composer
> php composer.phar require --dev squizlabs/php_codesniffer:3.*

or edit your composer.json and add
    "require-dev": {
        "squizlabs/php_codesniffer": "3.*"
    }

and then 
> composer install

configure
create a config file where you composer.json is located
phpcs.xml

example of PHP CodeSniffer's phpcs.xml

But that is overly verbose.  A simpler config using PSR12 as a base rule, plus adding in your app dirs, excluding some shared libs/dirs, and some rules exclusions due to your app might be:

<?xml version="1.0"?>
<ruleset name="PHP_CodeSniffer">
    <description>PHP Code Sniffer configuration file.</description>
    <!-- https://github.com/squizlabs/PHP_CodeSniffer -->

    <!-- check all these dirs/files -->
    <file>app</file>
    <file>bin</file>
    <file>cfg</file>
    <file>src</file>

    <!-- but don't check these -->
    <exclude-pattern>composer$</exclude-pattern>
    <exclude-pattern>public$</exclude-pattern>

    <!-- phpcs argument options -->
    <arg name="basepath" value="./"/>
    <arg name="colors"/>
    <arg name="tab-width" value="4"/>
    <arg name="extensions" value="php,js,css"/>
    <!-- how many files to check at once -->
    <arg name="parallel" value="10"/>

    <!-- base rule: set to PSR12-->
    <!-- https://www.php-fig.org/psr/psr-12/ -->
    <!-- https://github.com/squizlabs/PHP_CodeSniffer/wiki/Customisable-Sniff-Properties -->
    <rule ref="PSR12">
<!-- add any exclusions here -->
    </rule>

    <!-- Don't hide tokenizer exceptions -->
    <rule ref="Internal.Tokenizer.Exception">
        <type>error</type>
    </rule>

    <!-- require 4 spaces, css -->
    <rule ref="Squiz.CSS.Indentation">
        <properties>
            <property name="indent" value="4" />
        </properties>
    </rule>

    <!-- lines can be lineLimit chars long (warnings), errors at absoluteLineLimit chars -->
    <rule ref="Generic.Files.LineLength">
        <properties>
            <!-- 120 is PSR12; cannot be 0; large for sql, arrays -->
            <property name="lineLimit" value="360"/>
            <!-- 0 to not show as error -->
            <property name="absoluteLineLimit" value="0"/>
        </properties>
    </rule>

    <!-- ban some functions -->
    <rule ref="Generic.PHP.ForbiddenFunctions">
        <properties>
            <property name="forbiddenFunctions" type="array">
                <element key="sizeof" value="count"/>
                <element key="delete" value="unset"/>
                <element key="print" value="echo"/>
                <element key="is_null" value="null"/>
                <element key="create_function" value="null"/>
            </property>
        </properties>
    </rule>

</ruleset>


results
A large amount of the corrections will probably be a mix of tabs vs spaces (use 4 spaces).
If auto correct a whole file, recheck it for unintended indentation (and fix), and functionality.
Only auto correct what you will verify and test ie not the whole app.
Commit auto corrects separately from fixes, so can see fixes in git diffs easier.

Your team should now have less conflicts from git, and a more consistent code base to maintain and grow.


-End of Document-
Thanks for reading
Monday, October 26, 2020

Git Feedback Branches

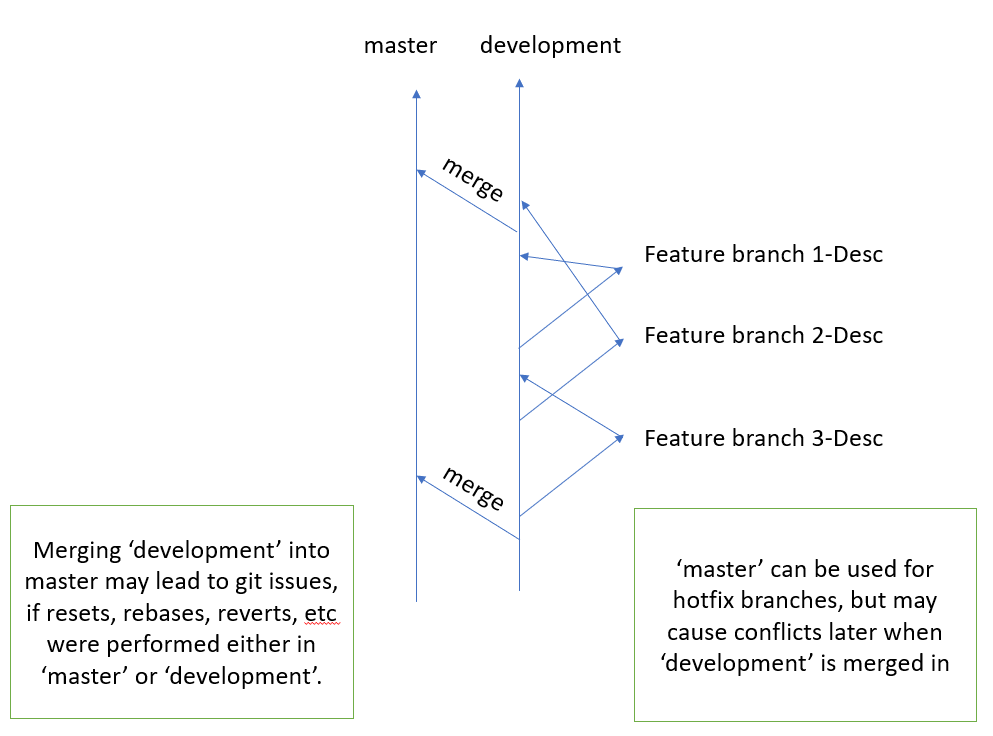
Most Git workflows do not address picking what is released. Once a feature branch has been merged back to 'development', it is in the release pipe, pending QA and Business validation. Once in 'development', code/branches cannot easily or arbitrarily be plucked out to go directly to production as the code is often intermingled with other branches. But the code changes in 'development' can be manually re-coded (Git patches help) into a hotfix branch from 'master'/'production' with the risk of not being QA-ed.

The 'Git single branch strategy' primarily removes the pain point of the conflicts between 'master' and 'development', while providing a clearer history of production releases, and an easier rollback with switching branches.

Generally picking what to release is largely mitigated by how, and the order in which Tickets are chosen. However, the release pipe can be slowed down by a Ticket/branch needing time to fix, or be validated by QA or Business. To remove the blocking branch, depending on the changes, the feature could be hidden, or removed if a small change, or more likely wait for the fix(es) and QA.
Hopefully the upfront choosing of Tickets and quality of specifications somewhat mitigates the blockers.

Some Git strategies to mitigate blockers in the release pipe, which are caused by Tickets that often require feedback once seen.

 1) Put less in the release pipe: (Less is more)
If limit releases to one branch per release, then there is no re-picking once in 'development'. Basically the other feature branches would queue up waiting to be picked and for merge to 'development' and QA-ed. Which leads to the pros and cons of Staging branches.

 2) Staging branches:
Another process to maybe help with picking branches for release is to not merge feature branches back to 'development' until picked. The feature branches could be deployed to their own directory (devsite.com/branch/123-shortdesc) be QA-ed, reviewed by Business, then if ok, merged to 'development'. Then when decided to go to production, everything currently in 'development' is QA-ed again, fixes added via branch updates or a new branch, and then released via 'master'/'production'.
Note, if after being merged to 'development', production release decisions change, well, then we are back to the same problem of doing hotfixes, or hiding not ready functionality, or waiting for the fixes.
Also this approach can be a burden on the developers: fixes enhancements, code cleanups, won't be seen or utilized until the branch is picked, and those fixes/enhancements might be required or desired for another branch, thus duplication of code which probably means conflicts later. Before merging the feature branch to 'development', 'development' would need to be merged back to the feature branch to handle any changes or conflicts in the branch, so the developer can test again before merging to 'development'. And as the code won't be fresh on the developers mind, there is a higher risk of mistakes to be made during the merge to 'development'.

pros:
  • able to preview branches before release
  • able to choose branches for release
cons:
  • more work for Business and/or QA as the merged branches in ‘development’ still need to be reviewed
  • if decisions change to remove a branch or hotfix a branch to production before qa, same problems
  • more burden on developers, potential conflicts, developing the branch twice: once orig, then later (days, weeks) when picked
  • dev-ops + some app work to make 'their own directory' happen

Committing often, merging often seems to be better for code quality.

3) Feedback branches, Preview branches: (A hybrid of Staging branches)
For branches which require Business or early QA feedback, after development is done, but before QA or merging to 'development', push the branch to a preview location (devsite.com/branch/123-shortdesc). There it can be previewed for one or two days, before being merged to 'development' and moved to QA; required feedback branches should not be held for a long time, else the cons of Staged branches may become apparent. The branches that require feedback should be marked as such before development. Every branch should not be marked as requires feedback, only a few should be.

pros:
  • able to preview branches marked as feedback before release
  • should reduce fixes needed when in 'development' for QA
  • as only a day or two delay, no large time incurred burden on developers
cons:
  • does not allow changing order of released branches
  • more work for Business and/or QA as the merged branches in ‘development’ still need to be reviewed
  • if decisions change to remove a branch or hotfix a branch to production before QA, same problems
  • dev-ops work + some app work to make 'preview location' happen


Hopefully some useful Git strategies when dealing with Tickets that often require feedback once seen.

-End of Document-
Thanks for reading
Monday, October 19, 2020

Git single branch strategy

A common Git workflow has two main branches, 'development' and 'master'. With the common workflow of creating feature branches from ‘development’, merging the feature branch back to ‘development’, and then for a release to production, merging 'development' to 'master'. Non-trivial conflicts can occur during the merge to 'master' when same/similar changes are made in both 'master' and 'development', or 'development' has had some necessary reverts or other changes.

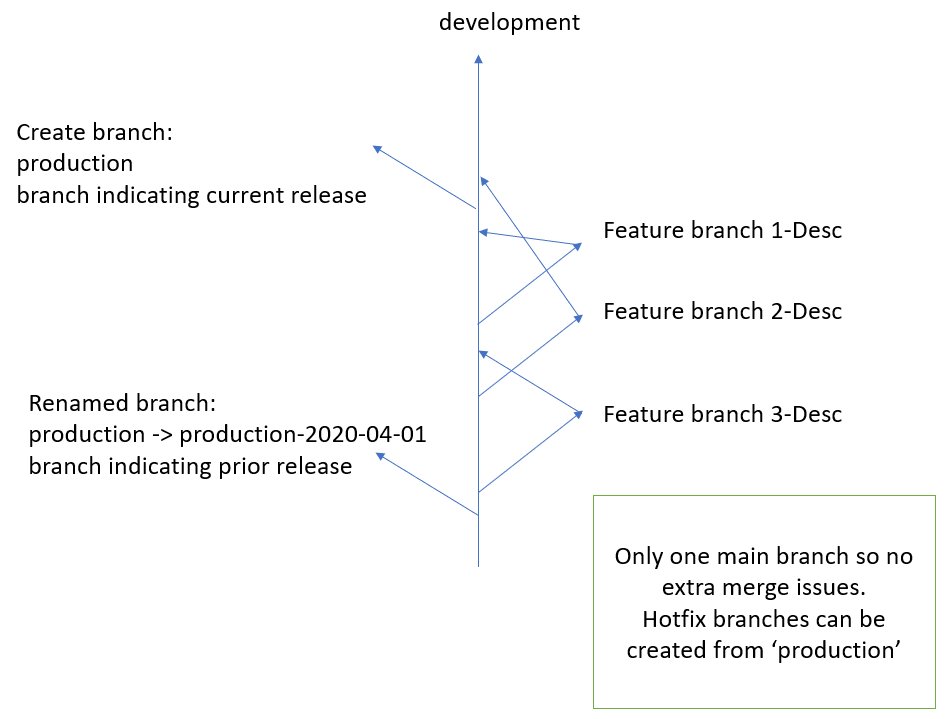
Instead of having two main or long lived branches, another idea for a Git workflow is to use only one main branch, then create a branch for production pulls.
aka 'trunk-based development workflow' or 'single branch strategy'

Think of the one main branch as the 'development' branch
  • flow for development would be the same:
    • branch from 'development' for a Ticket, merge request to 'development' when done
  • when want to do a release to production, instead of a merge request to 'master'
    • create a new 'production' branch at the last or desired 'development' commit
  • when want to do another release to production
    • rename current 'production' to 'production-date' ie 'production-20200531'
    • create a new 'production' branch at the last or desired 'development' commit
  • 'master' branch would then be unused and eventually removed
    • current purpose of 'master' is: 
      • release this code, which will be the purpose of 'production'
  • 'development' is never merged into 'production'
  • overtime, like feature branches, old 'production-date' branches can be deleted


pros:
  • never any conflicts between 'master' eg 'production' and 'development', as only one main branch
  • hotfixes can be applied to current 'production' branch without worry of later conflicts
  • 'production-date' can be used as a rollback for code in case a release is non usable/broken and code related
cons:
  • no 'master' branch; but 'production' and 'development' are more explicit
  • no merge request to 'master'; 'production' and 'production-*' can be marked as a protected branches in GitLab
  • slightly different
GitLab CI/CD:
  • should still work at creation of 'production',
  • and maybe the renaming of 'production-date' and creation of 'production' could be part of the GitLab CI/CD
Tags:
An alternative to creating 'production' branches would be to create 'production' tags. If a hotfix is needed, then create a branch from the tag. But just keeping everything a branch simplifies: GitLab CI/CD, Git UIs, merge request for hotfix, etc

And yes, the one branch to rule them all could be named the default Git repo branch name of ‘master’. Or 'sam', or whatever your group agrees upon, and you can tell others.


-End of Document-
Thanks for reading
Monday, September 28, 2020

Create a SFTP only user

If you want to allow a user to upload files securely to a site, and they do not need shell access or know how to use shell, you can grant them SFTP only access.  SFTP, which stands for SSH File Transfer Protocol, or Secure File Transfer Protocol, is a separate protocol packaged with SSH that works in a similar way over a secure connection.  To an end user, SFTP works the same as FTP.  You login, browse directories, and upload/download files, but more securely.

While FTPS adds a layer to the FTP protocol, SFTP is a different protocol based on the network protocol SSH (Secure Shell). Unlike both FTP and FTPS, SFTP uses only one connection and encrypts both authentication information and data files being transferred.

To add a SFTP only user to Red Hat Enterprise 8 (RHEL8)
Note, of course, should work for other Linux flavors too

1) Create your user appuser1
> sudo useradd -s /sbin/nologin appuser1

Verify
> grep /etc/passwd appuser1

While the SSH server will be configured to prevent shell access,
setting /sbin/nologin as shell adds another layer to not allow the user to SSH and get shell access

You can optionally create a group of sftp only users
> groupadd sftponly

And add you user to it
> sudo usermod -a -G sftponly appuser1

Note, make sure to add -a to append groups, else you will end up setting to only that one group

Verify
> grep /etc/groups appuser1


2) Update the SSH server to only allow your SFTP user and/or group
> sudo vim /etc/ssh/sshd_config

Find Subsystem SFTP, and, if needed, change it to
Subsystem sftp  internal-sftp

> sudo vim /etc/ssh/sshd_config
# override default of no subsystems
#Subsystem sftp /usr/libexec/openssh/sftp-server # default
Subsystem sftp  internal-sftp # must use for sftp 'jail'; similar to default

If you do not change the Subsystem SFTP, your SFTP client may report
"Cannot initialize SFTP protocol. Is the host running a SFTP server?"
and you may see errors in
/var/log/secure
Accepted password for wpsite1 from 172.30.0.160 port 52436 ssh2
pam_unix(systemd-user:session): session opened for user wpsite1 by (uid=0)
pam_unix(sshd:session): session opened for user wpsite1 by (uid=0)
pam_unix(sshd:session): session closed for user wpsite1
https://winscp.net/eng/docs/message_cannot_initialize_sftp_protocol


Toward the bottom, add
> sudo vim /etc/ssh/sshd_config

# web user 
Match User appuser1
    ChrootDirectory /var/www/html 
    ForceCommand internal-sftp
    AllowTcpForwarding no
    X11Forwarding no

While you can and should use SSH keys, you can also add
PasswordAuthentication yes 
for only specific users, groups or ips

# app1 user on vpn network
Match User appuser1 Address 10.10.0.0/16
    PasswordAuthentication yes
    ChrootDirectory /data 
    ForceCommand internal-sftp
    AllowTcpForwarding no
    X11Forwarding no

# app1 users
Match Group sftponly
    ChrootDirectory /var/www/html 
    ForceCommand internal-sftp
    AllowTcpForwarding no
    X11Forwarding no

3) create the directory where the SFTP user will be restricted to, also know as chroot or 'jail' directory
This directory, as specified by ChrootDirectory, must be a root-owned directory that is not writable by any other user or group.

So if your website is in /var/www/html
> ls -ld /var/www/html
drwxr-xr-x 2 root root /var/www/html

You can use that directory for your SFTP user chroot directory

To create another directory
> sudo mkdir /data
> sudo chmod 755 /data
> ls -ld /data
drwxr-xr-x 2 root root /data


If the permissions for configured ChrootDirectory are not correct, you will see errors in
/var/log/secure
Accepted password for appuser1 from 10.10.0.2 port 52331 ssh2
pam_unix(systemd-user:session): session opened for user appuser1 by (uid=0)
pam_unix(sshd:session): session opened for user appuser1 by (uid=0)
fatal: bad ownership or modes for chroot directory "/home/appuser1" [postauth]
pam_unix(sshd:session): session closed for user appuser1
pam_unix(systemd-user:session): session closed for user appuser1
https://serverfault.com/a/660180/523393


4) Restart SSH
> sudo systemctl restart sshd

Note, if you configuration is incorrect, you will not be bounced from your current SSH session.
!But do fix and test the configuration before exiting!
"bouncing sshd is smart enough to permit existing ssh connections to merrily continue unabated "
https://askubuntu.com/a/462971/708501

5) Verify
Test you new user SFTP login .. should work
Test you new user SSH login .. should not work
Test your existing SSH login .. should still work

You have now created a limited SFTP user. 

-End of Document-
Thanks for reading
Monday, September 14, 2020

FTPS using vsftpd

If you want to allow a user to upload files securely to a site, you can grant them FTPS access.

FTPS (also known FTP-SSL, and FTP Secure) is an extension to the commonly used File Transfer Protocol (FTP) that adds support for the Transport Layer Security (TLS) and, formerly, the Secure Sockets Layer (SSL) cryptographic protocols.
https://en.wikipedia.org/wiki/FTPS

 While SFTP should be used instead, sometimes apps or users require using FTP.

While FTPS adds a layer to the FTP protocol, SFTP is a different protocol based on the network protocol SSH (Secure Shell). Unlike both FTP and FTPS, SFTP uses only one connection and encrypts both authentication information and data files being transferred.
https://www.keycdn.com/support/ftps-vs-sftp


To add a FTPS only user to Red Hat Enterprise 8 (RHEL8)
Note, of course, this should work for other Linux flavors too

1) Create your user appuser1
> sudo useradd -s /sbin/nologin appuser1

Setting /sbin/nologin as shell prevents the user from using SSH and get shell access

2) Install a FTP server, vsftpd
> sudo yum install vsftpd

3) Update the vsftpd config
> sudo vim /etc/vsftpd/vsftpd.conf

Enable local users
..
# Uncomment this to allow local users to log in.
# When SELinux is enforcing check for SE bool ftp_home_dir
local_enable=YES
..
# Allow virtual users to use the same privileges as local users
virtual_use_local_privs=YES

# Setup the virtual users config folder
user_config_dir=/etc/vsftpd/user_config/
..

More logging
..
# more verbose logging, including connections and commands
xferlog_std_format=NO
log_ftp_protocol=YES
vsftpd_log_file=/var/log/vsftpd/vsftpd.log
dual_log_enable=YES
..

Restrict users to a dir
..
# restricted to users home dir /etc/passwd
chroot_local_user=YES
..

Your ISP or router may block the default port 21, so use another port such as 2121
FTP requires another port for data, hence 2120
..
# port 21 blocked by .. modem or router
listen_port=2121
ftp_data_port=2120 # just to match
..

Enable a whitelisted access list
..
# /etc/pam.d/vsftpd tried to use file /etc/vsftpd/ftpusers, default deny, but had to comment out
pam_service_name=vsftpd

# default, do not allow these users, but allow anyone else
# userlist_enable=YES
# userlist_file=/etc/vsftpd/user_list

# allow only these users
userlist_enable=NO
userlist_file=/etc/vsftpd/sci_user_list
userlist_deny=NO
..

Enable passive mode.
In an active mode connection, when the client makes the initial connection and sends PORT, the server initiates the second connection back. In a passive connection, the client connects and sends the PASV command, which functions as a request for a port number to connect to.  Passive mode solves the problem of an FTP client's firewall blocking incoming connections.
..
pasv_enable=YES
pasv_min_port=2124
pasv_max_port=2148
pasv_address=[your public ip]
..

Set the paths to your existing web SSL certs
..
# path of the SSL certificate
# using web certs
rsa_cert_file=/etc/ssl/site.crt
rsa_private_key_file=/etc/ssl/site.key
# enable SSL
ssl_enable=YES
allow_anon_ssl=NO
force_local_data_ssl=YES
force_local_logins_ssl=YES
# TSL is more secure than SSL so enable ssl_tlsv1_2.
ssl_tlsv1=YES
ssl_sslv2=NO
ssl_sslv3=NO
require_ssl_reuse=NO
ssl_ciphers=HIGH
# enable SSL debugging
debug_ssl=YES
..

4) Update pam.d/vsftp authentication
> sudo vim /etc/pam.d/vsftp
#%PAM-1.0
session    optional     pam_keyinit.so    force revoke
# prevented login with valid user
# auth       required pam_listfile.so item=user sense=deny file=/etc/vsftpd/ftpusers onerr=succeed
# /sbin/nologin is not a valid shell, so ignore check
# auth       required pam_shells.so
auth       include  password-auth
account    include  password-auth
session    required     pam_loginuid.so
session    include  password-auth

5) Create the directory where the SFTP user will be restricted to, also know as chroot or 'jail' directory.  This directory must be root-owned directories that are not writable by any other user or group.
Note, enabled via vsftpd.conf chroot_local_user=YES

So if your website is in /var/www/html
> ls -ld /var/www/html
drwxr-xr-x 2 root root /var/www/html

You can use that directory for your SFTP user chroot directory

To create another directory
> sudo mkdir /data
> sudo chmod 755 /data
> ls -ld /data
drwxr-xr-x 2 root root /data

Change the users home directory to the chroot directory
> usermod -d /var/www/html appuser1
> usermod -d /data appuser1

6) add custom config per user
which allows the ftp user to create files as another user
> sudo vim /etc/vsftpd/user_config/appuser1

# also set users home dir in /etc/password
local_root=/var/www/html
write_enable=YES

# create new files as
guest_enable=YES
guest_username=appweb1

7) Restart vsftpd
> sudo systemctl restart vsftpd

8) Update your firewall
If you are using Amazon EC2, configure your Security Group, adding the ports
TCP 2120-2148.  These are the ports vsftpd is listening on and passive mode responding on

9) Test using a FTP client, such as FileZilla
https://filezilla-project.org/
Note, don't forget to change the default port 21 to what you configured
vsftpd.conf listen_port=2121
And enable encryption

Require explicit FTP over TLS

You have now created a limited FTPS user.

-End of Document-
Thanks for reading