Monday, January 27, 2020

AWS EC2 resize partition

While Amazon Web Services (AWS) provides allot of services and administrative capabilities thru their Console web application, you still have to do some things manually.

After creating a EC2 instance, you may find out that the Amazon Machine Image (AMI), ie install image, you used had a different OS/root partition size than the size you allocated in the AWS Console, which is where this tutorial comes into play.

If you are using an AMI which has the root partition as 8GB, and you have launched an EC2 instance with 16GB, you can resize the root partition.

Resize volume

Check the used partition size via lsblk, which lists information about all available or the specified block devices
> sudo lsblk
NAME MAJ:MIN RM SIZE RO TYPE MOUNTPOINT
nvme0n1     259:1 0 8G  0 disk
├─nvme0n1p1 259:2 0 1M  0 part
└─nvme0n1p2 259:3 0 8G  0 part /


First we will extend the partition, and then we will extend the file system

Install growpart to extend a partition in a partition table to fill the available space
> sudo yum install cloud-utils-growpart

Extend the partition, the first option is the volume ie nvme0n1, the second options is the partition number ie the 1 in p1
> sudo growpart /dev/nvme0n1 1

Verify
> sudo lsblk
NAME MAJ:MIN RM SIZE RO TYPE MOUNTPOINT
nvme0n1     259:1 0 16G 0 disk
├─nvme0n1p1 259:2 0 1M  0 part
└─nvme0n1p2 259:3 0 16G 0 part /

The 8GB partition now lists as 16GB
But the file system is still 8GB
> df -h 
Filesystem      Size  Used Avail Use% Mounted on
/dev/nvme0n1p2   8G  1.9G   8G  24% /

Now extend the file system
> sudo xfs_growfs /

Verify
> df -h 
Filesystem      Size  Used Avail Use% Mounted on
/dev/nvme0n1p2   16G  1.9G   16G  12% /

Your good to use your fully allocated partition now.


-End of Document-
Thanks for reading

Monday, January 13, 2020

AWS EC2 mount new volume

While Amazon Web Services (AWS) provides allot of services and administrative capabilities thru their Console web application, you still have to do some things manually.

After creating a EC2 instance, you may want to attach additional storage.  The additional storage can be used to host your application independent of the OS/root partition, allowing you to more easily migrate, backup, and manage your application and it's data.

After creating the additional storage and attaching the volume to your EC2 instance, you still need to tell the OS on the EC2 about the extra storage, which is where this tutorial comes into play.

Mount attached volume 

List partitions via lsblk, which lists information about all available or the specified block devices
> sudo lsblk
NAME MAJ:MIN RM SIZE RO TYPE MOUNTPOINT
nvme1n1     259:0 0 50G 0 disk         
<- no mount point
nvme0n1     259:1 0 16G 0 disk
├─nvme0n1p1 259:2 0 1M  0 part
└─nvme0n1p2 259:3 0 16G 0 part /

nvme0n1
Is the OS/root partition

nvme1n1   
Is the external attached volume

You can tell the partitions by the size, or the or by the index

Verify that there is no data on the partition
> sudo file -s /dev/nvme1n1

Response if no file system thus no data
/dev/nvme1n1: data

Response if the partition has already been formatted
/dev/nvme1n1: SGI XFS filesystem data

If no data, create a file system
> sudo mkfs -t xfs /dev/nvme1n1
 
Make the mount directory, which can be any name, but `data` is generic enough
> sudo mkdir /data

Mount the partition to the directory
> sudo mount /dev/nvme1n1 /data

Edit fstab to mount on boot
fstab defines your volumes and mount points at boot, so make a copy first
> sudo cp /etc/fstab /etc/fstab.orig

Find the UUID of device, which will be used in fstab to identity the volume
> sudo blkid

Edit fstab; Use your UUID; match existing entry spacing
the option nofail allows the boot sequence to continue even if the drive fails to mount
> sudo vi /etc/fstab
UUID=123ebf5a-8c9b-1234-1234-1234f6f6ff30 /data xfs defaults,nofail 0 2

To verify the fstab configuration works, without rebooting, unmount and then auto mount the volume
> sudo umount /data
> sudo mount -a

List partitions, and you will see your data directory, which you can now utilize
> sudo lsblk
NAME MAJ:MIN RM SIZE RO TYPE MOUNTPOINT
nvme1n1     259:0 0 50G 0 disk /data        
<- it worked
nvme0n1     259:1 0 16G 0 disk
├─nvme0n1p1 259:2 0 1M  0 part
└─nvme0n1p2 259:3 0 16G 0 part /

> ls -l /data


-End of Document-
Thanks for reading

Wednesday, December 4, 2019

HandBrake Configuration

Do you have a large collection of physical or digital media you wish was smaller and more portable in size, while still keeping viewing quality?  Try Handbrake!

HandBrake is a tool for converting video from nearly any format to a selection of modern, widely supported codecs.
Reasons you’ll love HandBrake:
  • Convert video from nearly any format
  • Free and Open Source
  • Multi-Platform (Windows, Mac and Linux)
Official Site: https://handbrake.fr/

Handbrake is a way to convert/re-encode the dvd/bluray files/structure from a physical disc or a file to another smaller file - at the cost of some time, and quality (usually not noticeable)

Note: Handbrake does not decrypt encrypted dvd/bluray discs

Some video encoding background:

What is video encoding?
Video encoding is the process of converting digital video files from one format to another. Encoding is also known as “transcoding” or “video conversion.” At the time of recording, the device gives the video file a particular format and other specifications. If the video owner wants to publish the video, s/he must consider the various devices on which the video might play. All of the videos we watch on our computers, tablets, and mobile phones have gone through an encoding process that converts the original source video so that it is viewable on various output formats. This is because many device and browser types only support specific video formats. Often, the goal of the video publisher is to ensure compatibility with a variety of common formats.
Source: help.ecoding.com

The basics of compression and quality is, pick 2 (maybe just 1)
  • Encodes fast
    • The faster the encode, usually the less quality and larger file size
  • High quality
    • The higher the quality, usually the longer the encode and the large the file size
  • Smallest file size possible
    • The smaller the file, usually the longer the encode and less quality (relatively)

File sizes:
dvds are about 3gb to 5gb
blurays are about 15gb to 40gb .. depending on the movie, audio, etc
Encoding can usually reduce the files sizes to less than half while maintaining a decent quality.
Note: There is no such thing as a smaller file but the same quality!  See above and pick one.

Suggested Handbrake Configuration:
After installing and launching, Handbrake is ready to encode your videos.
But first, let’s configure it for a perhaps more optimal experience, and learn a little more about the software
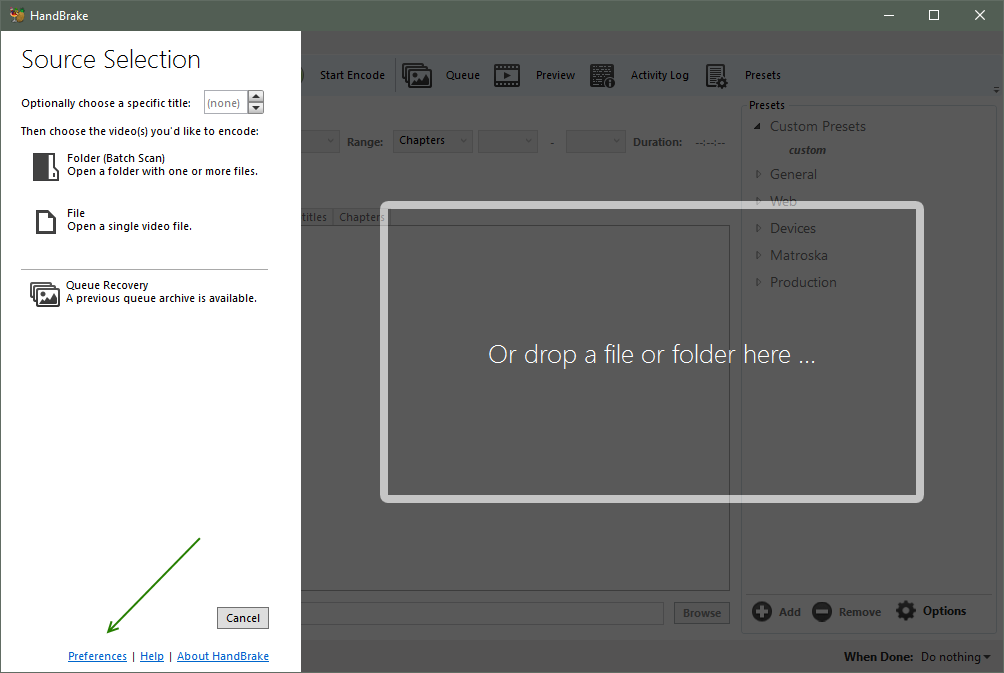


Click Preferences


General Preferences
  • You can leave Check for Updates enabled, if you wish
  • Check Always clear completed queue items after an encode completes
    • This is like auto removing your todo encodes
  • Check Show the encode status in the application title bar, if you wish
  • Check Reset to ‘Do nothing’ when the app is re-launched
    • You can set actions when your video is done encoding, such as shutdown
  • You can also enable sounds on completion


Output Files Preferences
  • Handbrake can auto name your encoded files to simplify some file management.
  • To have the output file be the same as the input, change the File Format to {source}
  • Also you can set your default destination, which will save you some clicking for each encode.
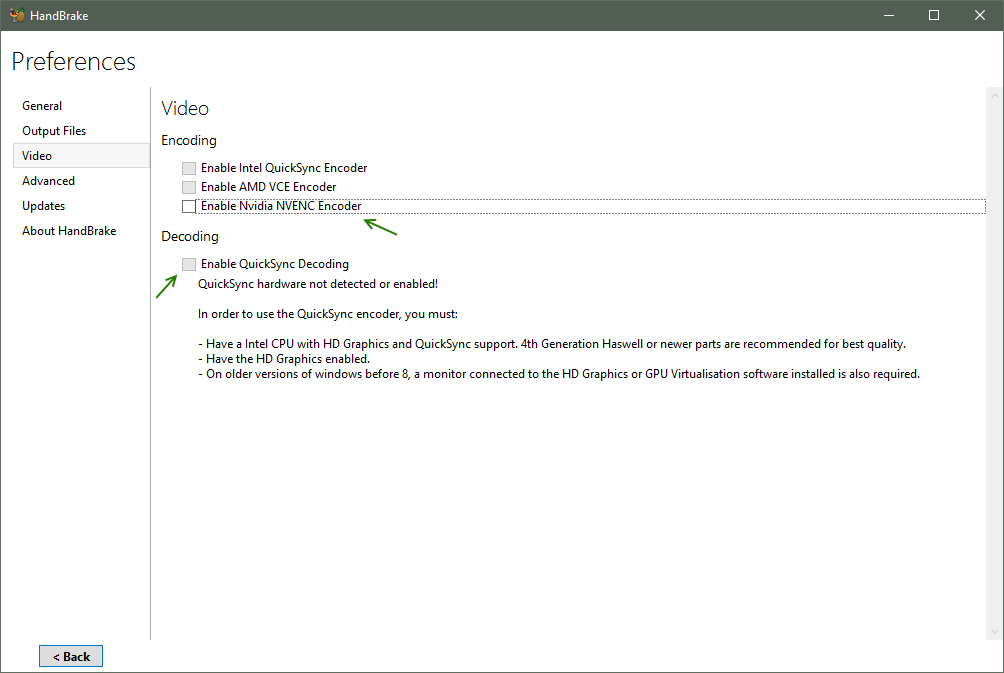

Video Preferences
  • Encoding
    • You can encode video files using your video card, if supported
      • Generally, video cards will encode files faster than cpus, but the quality will be slightly less and the file size will be slightly larger
    • You can also encode video files using your cpu
      • Generally, cpus will encode files in higher quality and smaller file sizes
      • If you have a 6 core or 8 core cpu, cpu encoding time could be  comparable to encoding using a video card
    • Recommendation is to uncheck all video card options thus encode files using your cpu, but of course, try both and see which you prefer.
  • Decoding
    • Decoding options enable hardware support for specific devices, such as a specific cpu or video card; If you play back a encoded video on a unsupported device, the quality and performance may be less.
    • Recommendation is to uncheck all decoding options


Advance Preferences
  • Raise the Priority Level of the Handbrake process to Above Normal.  Video encoding is an intensive process and you should not use your pc for other tasks at the same time; but of course you can, but encoding will take longer.
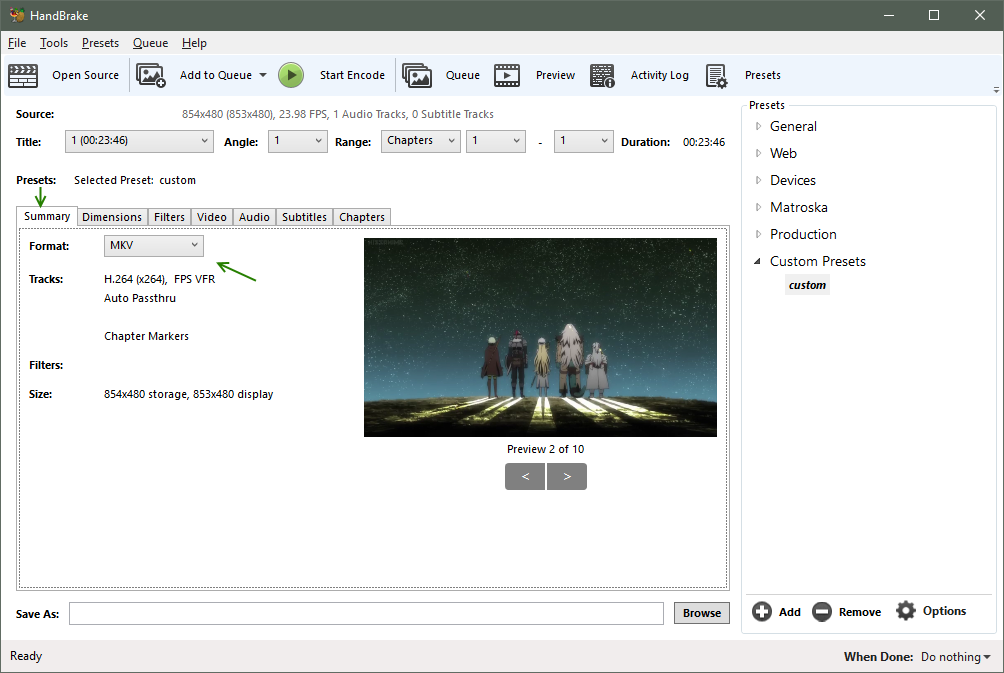

Summary
  • After loading a file or disc, you can the adjust the encoding options
  • While all these options can be saved to a preset, I will go through the important ones first
  • Format
    • Choose the file extension; mkv and mp4 are file containers for the video and audio streams
    • mp4 is supported by more devices (often older hardware players), but allows only one subtitle
    • mkv allows unlimited audio, subtitles, is easily editable - preferred extension
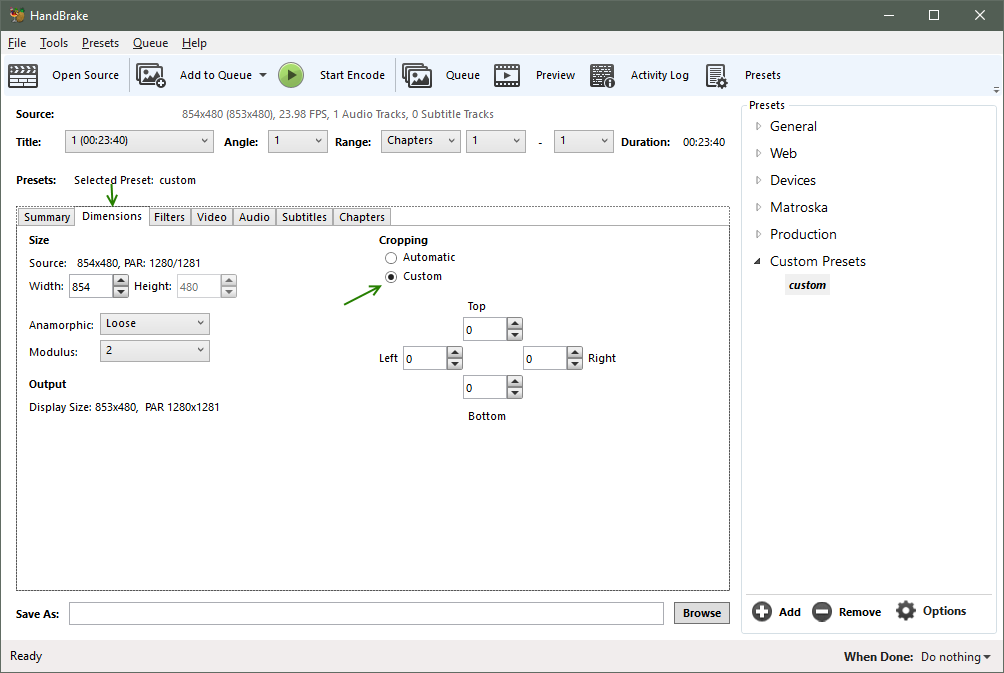

Dimensions
  • Width and Height will default to the width and height of your file.  You can reduce the width/height if you are trying to achieve a small file size.  Keeping the same width/height is preferred for video archive and for optimal quality.
  • Cropping - Handbrake can auto crop top/bottom and left/right black bars, so the video will appear to fill more of the screen on playback.  Note however, that some movies will play subtitles, or foreign languages, or other information in the black bars. So it is safer to just leave the video size as is.  Choose custom and enter 0 for all dimensions.


Filters
  • Filters allow you to maybe enhance the quality of a poor quality video, such as a video from vhs, or an old camcorder, or a bad internet stream.  But often, if your source is a dvd/bluray, you will want to turn off all filters and just take the video as is.


Video (lots of options here)
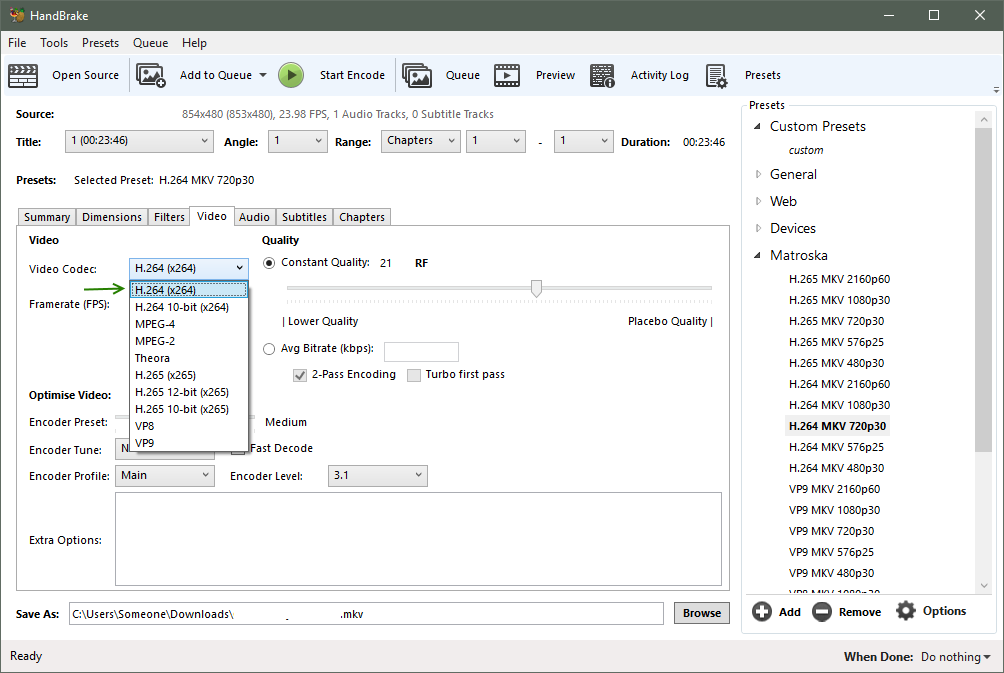

Video Codec
  • x264 has been around for a while and is optimized for video archival to produce a good balance of file size and quality.  Choose x264
  • x265 is relatively newer, and is optimized to stream video at a decent quality for a small bandwidth (file size).  At some point, x265 may also be good for video archival.
  • The other codecs are older or less popular, but may be required depending on the device you need to playback the videos.  Your playback device (pc, tv streamer, phone, etc) needs to support the video codec you are using. While you can try searching the internet for your devices supported codecs, it’s usually easier to just encode a video file and try.  x264 has wide support on new and old devices while x265 has wide support on ‘newer’ devices (last few years)


Quality 
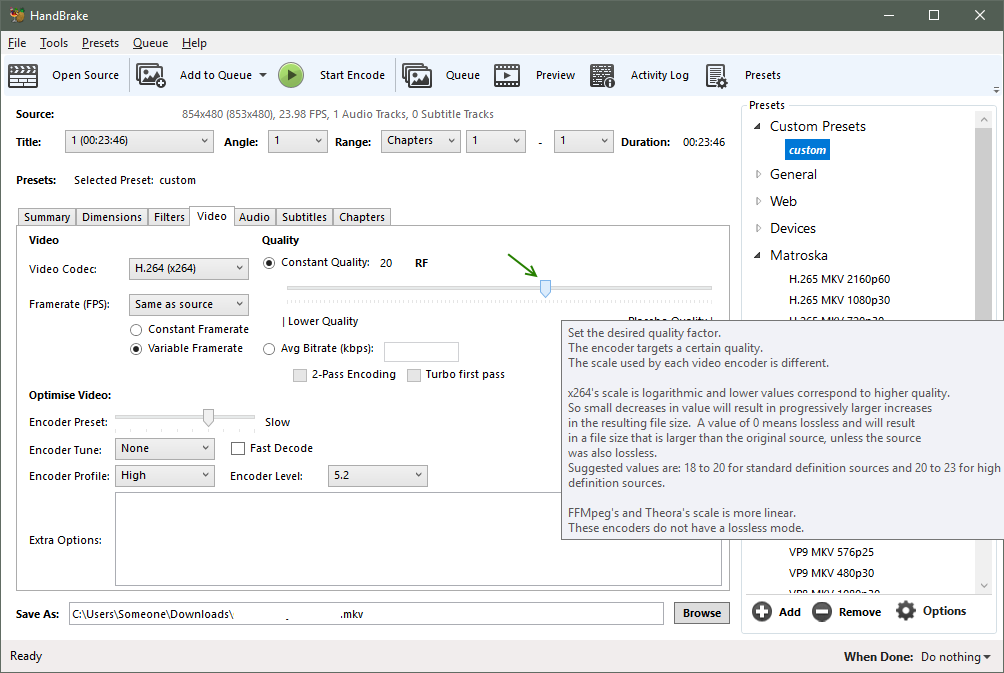
(everyone wants it!)
  • Constant Quality - Handbrake will try to keep a relatively constant quality throughout the video.  Simple scenes with little movement or variation will have a lower bitrate, but still look good since little is happening, while fast moving scenes or lots of variation will have a higher bitrate, averaging out to a optimal file size for a given quality.
    • Choose a Quality Rate Factor (RF) of 20
    • For testing other settings, such as subtitles or audio, choosing a much higher RF such as 40 will result in a blocky video, but it will encode much faster.
  • Average Bitrate - uses a fixed bitrate, independent of the scene, resulting in a larger file size for a relative quality.  Some older devices may require a fixed bitrate.

Handbrake documentation
https://handbrake.fr/docs/en/latest/workflow/adjust-quality.html
Recommended settings for x264 and x265 encoders:
  • RF 18-22 for 480p/576p Standard Definition1
  • RF 19-23 for 720p High Definition2
  • RF 20-24 for 1080p Full High Definition3
  • RF 22-28 for 2160p 4K Ultra High Definition4
Raising quality minus 1-2 RF may produce better results when encoding animated Sources (anime, cartoons). Lower quality settings may be used to produce smaller files. Drastically lower settings may show significant loss of detail.
Using higher than recommended quality settings can lead to extremely large files that may not be compatible with your devices. When in doubt, stick to the recommended range or use the default setting for the Preset you selected.


Framerate (FPS)
  • The framerate the encoded video will playback on.  Unless your playback device has a specific requirement, choose Same as source


Encoder Preset
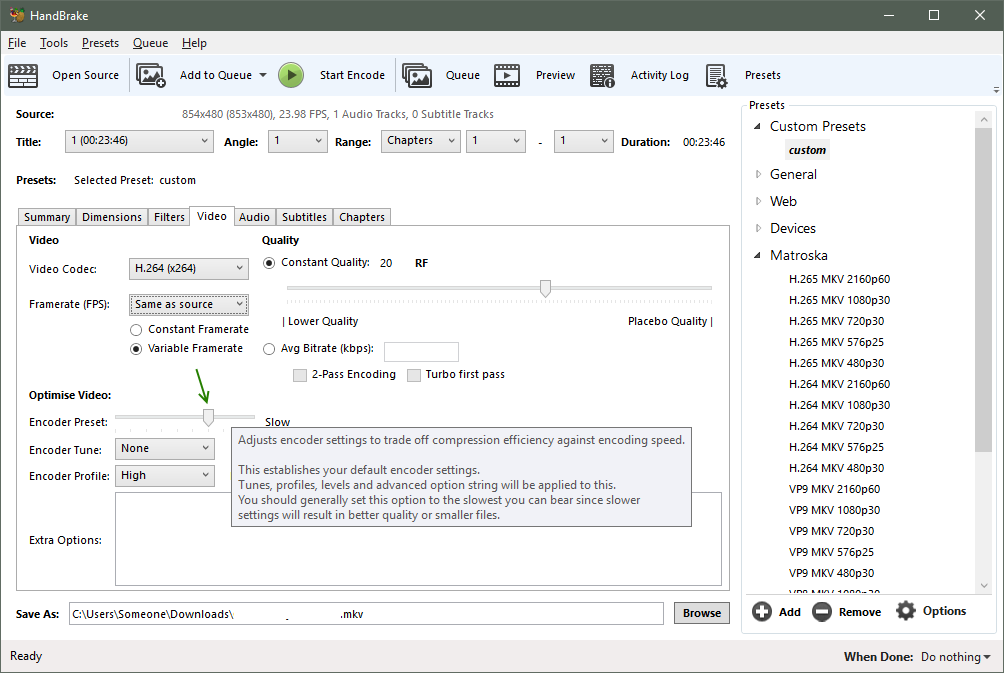
  • Determines how much time Handbrake spends analyzing a scene to optimize quality and size.
  • Choose Slow, for a good compromise of time and quality
  • Choose Faster if just testing subtitles or audio tracks

Encoder Profile and Level
  • Choose the highest values for video archivals; Only choose lower values if your playback device requires it
  • Encoder Profile - Choose High
  • Encode Level - Choose 5.2 (or highest number)


Audio
  • You can add or remove multiple audio tracks that your source video file contains.
  • Choose Auto Passthru to keep the audio quality
    • You can choose other encodings to save space and the cost of quality


Audio Defaults
  • You can set defaults for all new video files (Click Selection Behavior)
  • Select the languages you want
  • Select the audio codes you want
    • AC3 is the most common and widely supported
    • HD often increases the file size and requires supporting hardware for playback


Subtitles 
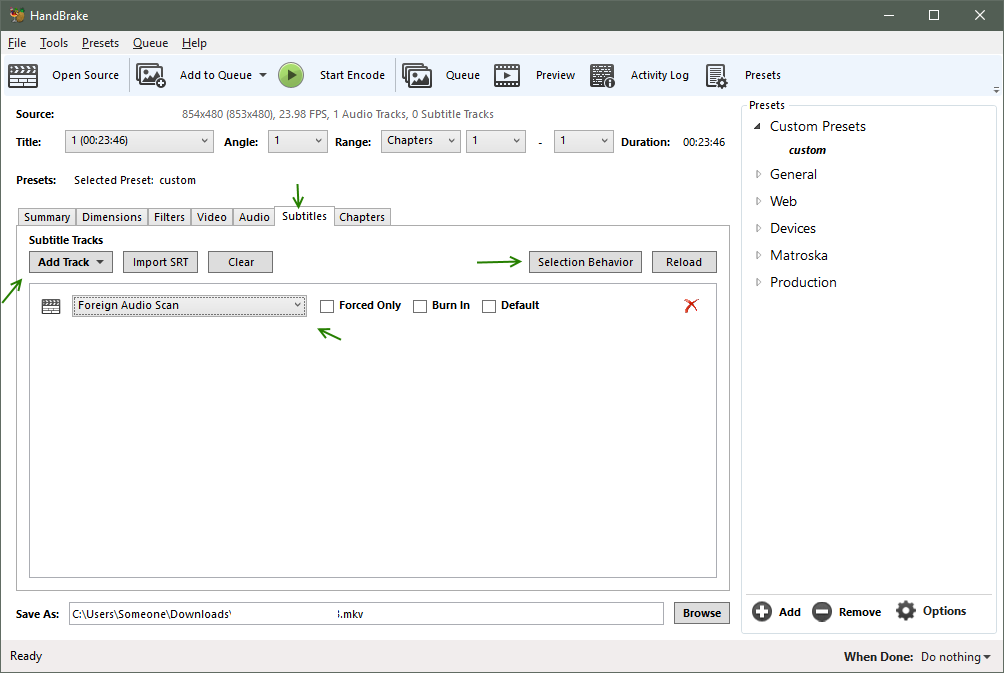
(understand what they are saying!)
  • You can add or remove multiple subtitles that your source video file contains
    • Even if you do not like viewing subtitles yourself, they are still useful if you are trying to figure out what an actor is trying to say! Add all subtitles for you language.
  • Some video files or discs will have foreign subtitles as a special track which Handbrake can try to find
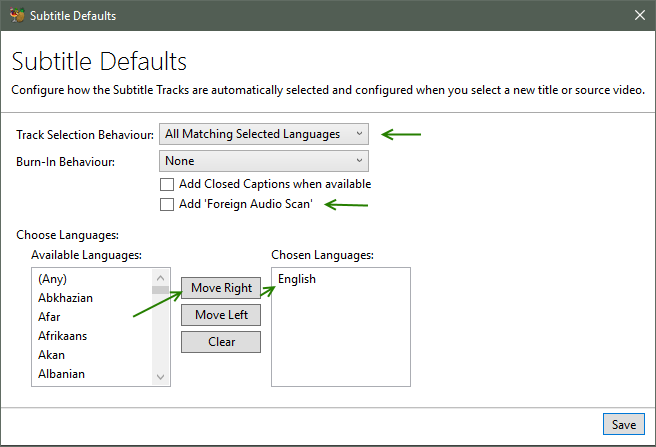


Subtitle Defaults
  • You can set defaults for all new video files  (Click Selection Behavior)
  • Select the languages you want
  • Subtitles can be turned on or off by most video players.
  • Burning in subtitles means the subtitle is part of the video and always plays.
  • If you use mkv, you do not have to burn in subtitles
  • If you use mp4, you can have only one subtitle
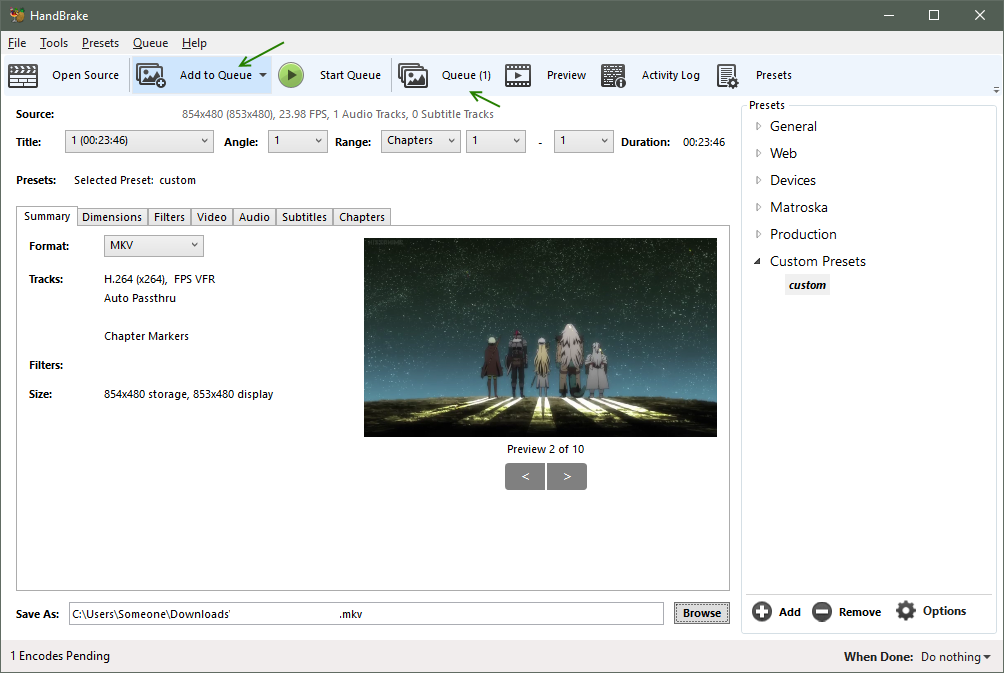

Add to Queue
  • Handbrake has a queue system, which allows you to configure multiple video encodes and then let them encode automatically one after another, such as overnight, or while you do other things.
  • Click Add to Queue when you are done configuring your encoding options


View Queue
  • When you are ready to process the queue, click Queue
  • You can mouse over a queued video to see a summary
  • You can choose an action to perform when the queue is finished, such as Suspend
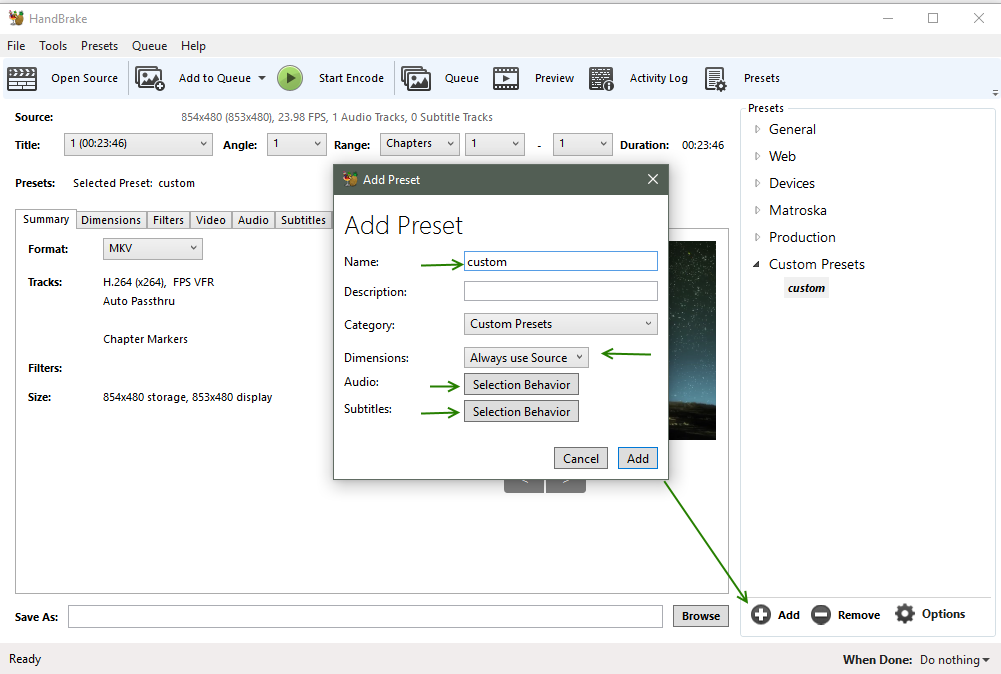

Presets
  • Presets allow you to apply your encoding configuration for the current video to all new videos
  • Click Presets to show the preset bar
  • Click Add to create a preset, or Options Update Preset to update a selected preset
    • Enter a name
    • Dimensions - select Always use Source, unless you are targeting a specific size
    • Audio and Subtitles will use your defaults if you’ve set them up, else do so now

Note: In the past, Handbrake presets were a little flakey when it came to editing or viewing; it took some trial and error.  But with version 1.2.0 and on, presets seem to be more stable.
Note: While you can export presets, choose Options, presets from one version may not work with the next version, so it may be good to take a screenshot of the important options, or write them down.


Sally forth and encode!

Well, that’s a good overview of Handbrake’s configuration and you now have a good start on encoding your video files. But before encoding the world, it would be smart to encode one or two videos with different settings to get a feel of the end results. Then Sally forth and encode!

For more information, reference the official docs at
https://handbrake.fr/docs/en/latest/

Other related software which may be useful:
  • videolan- play any movie (aka vlc)
  • kodi- nice graphical interface to play movies
  • tinymediamanager- download poster,fanart,movie.nfo for library; video library browser
  • emdb- video library browser
  • mkvtoolnix- edit mkv file headers ie turn off/on subtitles, change audio labels/order/default, etc
  • filebot- rename copied/archived files (good for tv series)
  • aren- advanced file renamer
  • mediainfo lite - video file info
  • avidemux- edit video/audio
  • http://thetvdb.com/- movie/tv info/posters


-End of Document-
Thanks for reading

Friday, November 8, 2019

Merge multiple git repositories into one repository

Sometimes you may have multiple code repositories which you always end up checking out together, and deploying together.  Or maybe it seemed like a good organization idea to separate your code based on functionality, but in practice, it has become cumbersome.

With a few commands, you can merge the multiple repositories into one repository, keeping their history.  You can also keep the separate repositories in their own sub directory, thus maintaining the organization of your code, but utilize one repository to facility development, branches, and deployments.

Example list of current separate repositories:
    ls 
    /local_git/old_project_1
    /local_git/old_project_2
Update your local repositories with the latest code
Pull and Commit/Push any changes

Create a new repository for the combined project and push
    cd /local_git
    mkdir new_combined_project
    touch README.md
    git init .
    git commit -m "add readme"
    git remote add origin remote https://github.com/your_repo_url
    git push

Add the first separate repository to the new combined repository
    cd /local_git/new_combined_project
    git remote add old_project_1 ../old_project_1

List repositories
    git remote -v    

    old_project_1  ../old_project_1.git (fetch)
    old_project_1  ../old_project_1.git (push)
    origin  https://github.com/your_repo_url.git (fetch)    origin  https://github.com/your_repo_url.git (push)
 
Note: If you get the wrong path to your local repository, you can remove repository entries
    git remote remove old_project_1

Fetch the branch/tags/master for the first separate repository
    git fetch old_project_1 --tags

Merge the files and histories for the first separate repository
    git merge --allow-unrelated-histories old_project_1/master
    list of files

You should have a list of files and directories from the first separate repository
    ls
    your files from old_project_1


Optionally create a sub directory to move the files into.
    cd /local_git/new_combined_project
    mkdir old_project_1
 
Move the files and folders into the new nested directory
    git mv !(old_project_1|old_project_2) old_project_1

Note: If you just mv or cut/paste the files into the new directory, git may not persist the history for those files.

Note: !() excludes the listed directory/file

Note: If you get an error about unknown bash command !, enable the glob extension
    shopt -s extglob

Your directories/files from the first separate repository should now be in
    /local_git/new_combined_project/old_project_1
and you should have the git history for old_project_1

Consolidated commands repeating for the second separate repository
    cd /local_git/new_combined_project
    ls
    git remote add old_project_2 ../old_project_2
    git remote -v
    git fetch old_project_2 --tags
    git merge --allow-unrelated-histories old_project_2/master
    mkdir old_project_2
    git mv !(old_project_1|old_project_2) old_project_2
    ls
    ls old_project_2

Your multiple separate repositories are now merged into one repository, with their history.  After verifying by checking out to a new directory, viewing it's history, you can remove the prior separate repositories.

Reference: https://stackoverflow.com/a/10548919


-End of Document-
Thanks for reading

Friday, October 11, 2019

NodeJS Configuration per Environment

Dotenv is a zero-dependency module that loads environment variables from a .env file into process.env. Storing configuration in the environment separate from code is based on The Twelve-Factor App methodology.
Reference: https://github.com/motdotla/dotenv

While you can use NodeJS Dotenv to manage configurations per environment,
another approach is to create a configuration per environment, and use an environment based file to distinguish which configuration to use. 
Why? 
It is useful to actually version control your configuration, so every developer and every instance of your application has the same configuration keys and values.

An example of how to setup a production and staging environment follows.

Create the environment file as root to minimize the odds of the environment being removed or changed

> cd /home/yuourapp/
> sudo touch env-prod

> cd /home/yuourappstg/
> sudo touch env-stg


Helper scripts to start and restart your NodeJS Forever service

Note: [ -f "env-stg" ] returns true if the file exists

> start-yourapp.sh
#!/bin/bash

if [ -f "env-stg" ]; then
    forever start -a --minUptime 1000 --spinSleepTime 2000 --uid yourapp-stg yourapp.js
else
    forever start -a --minUptime 1000 --spinSleepTime 2000 --uid yourapp yourapp.js
fi


> restart-yourapp.js
#!/bin/bash

if [ -f "env-stg" ]; then
    forever restart yourapp-stg
else
    forever restart yourapp
fi


Create a configuration file per environment, ensuring that each configuration has the same keys, and varying the values as appropriate.

> config/config-stg.js
module.exports = {
port : 9011,
log : {
console : { level : 'silly' }
}
};

> config/config-prod.js
module.exports = {
port : 9001,
log : {
console : { level : 'error' }
}
};


Create a base configuration script to read in the appropriate configuration file

An example for a NodeJS process
> config/config.js
const path = require('path');
const fs = require('fs');

let env;
// check for env-stg or env-prod file
if (fs.existsSync('env-stg')) {
env = 'stg';
} else {
env = 'prod';
}
const configPath = path.resolve(process.cwd(), `config/config-${env}`);
const config = require(configPath);
// visual validation of correct env
console.log('Using config ' + configPath);
module.exports = config;


An example for a VueJS/Nuxt process

Due to VueJS/Nuxt being a browser based solution,
to avoid warnings and errors, create another env file to be required

> sudo vi env
module.exports = {
    env: 'stg'
}

Add configuration as needed
> nuxt.config-stg.js
module.exports = {
server: { port: 9013 },
};

> nuxt.config-prod.js
module.exports = {
server: { port: 9003 },
};

Create a base configuration script to read in the appropriate configuration file.
> nuxt.config.js
const path = require('path');

// check for env file
let env;
try {
// (base)/
// require ('./env-stg');
// using exports, as when require from .vue, build causes warning 'Module not found: Error: Can't resolve './env-stg''
env = require ('./env');
env = env.env;
} catch (e) {
// default prod
env = 'prod';
}

// check for env based nuxt config when called from different relative paths
let configPath;
let config;
try {
// (base)/
configPath = `./nuxt.config-${env}.js`;
// config = require(configPath); // on build, results in warning 'Critical dependency: the request of a dependency is an expression'
config = require(`./nuxt.config-${env}.js`);
} catch (e) {
try {
// (base)/server/
configPath = `../nuxt.config-${env}.js`;
config = require(`../nuxt.config-${env}.js`);
} catch (e) {
// (base)/pages/dir/
configPath = `../../nuxt.config-${env}.js`;
config = require(`../../nuxt.config-${env}.js`);
}
}

// visual validation of correct env
console.log('Building nuxt using ' + configPath);
module.exports = config;

Now you can check in the configuration files, but do not check in the .env and env-stg, env-prod files (add them to .gitignore), as those should vary based on the deployed environment.


-End of Document-
Thanks for reading

Friday, September 13, 2019

NodeJS Forever

The purpose of NodeJS Forever is to keep a child process (such as your node.js web server) running continuously and automatically restart it when it exits unexpectedly. Forever basically allows you to run your NodeJS application as a process.
Reference: https://stackoverflow.com/a/32944853

A simple CLI tool for ensuring that a given script runs continuously (i.e. forever)
https://github.com/foreversd/forever#readme


A simple example to start and manage Forever
> forever start -a --minUptime 1000 --spinSleepTime 2000 --uid yourapp-stg yourapp.js

-a                        append to logs
--minUptime       1000     wait a second before considering restart
--spinSleepTime 2000    wait two seconds before restarting
--uid                   name the forever process

List all running Forever processes
> forever list
info:    Forever processes running
data:    uid   command       script                          forever pid   id          logfile                            uptime
data:    [0]   yourapp-stg   /usr/bin/node start.js   1668             23197   /home/yourapp/.forever/yourapp.log     0:1:20:14.94

You can restart and stop by name or uid.
Note: uid is incremental, so it may not always be the same number.

> forever restart yourapp-stg
> forever restart 0

> forever stop yourapp-stg
> forever stop 0

And since you may not want to type or remember all these options, create some helper shell scripts

> start-yourapp.sh
#!/bin/bash
forever start -a --minUptime 1000 --spinSleepTime 2000 --uid yourapp-stg yourapp.js

> restart-yourapp.sh
#!/bin/bash
forever restart yourapp-stg


While forever will keep your NodeJS process running, it will not start on reboot.
One simple method to ensure your NodeJS runs on reboot, is to add crontab entry to your forever process.

Create a crontab entry as the user your app runs as
> crontab -e

@reboot /bin/sh /home/yourapp/crontab-reboot.sh

And create the reboot script
> crontab-reboot.sh
#!/bin/bash

# export path to NodeJS, Forever
export PATH=/usr/local/bin:$PATH

# cd to location of script
cd /home/yourapp || exit

# run script, in this case Forever
forever start -a --minUptime 1000 --spinSleepTime 2000 --uid yourapp start.js

So now you application will run .. Forever .. yup.

-End of Document-
Thanks for reading

Saturday, July 27, 2019

MongoDB 4.0 on Ubuntu 18.04 bionic


MongoDB is a cross-platform document-oriented database program. 
Classified as a NoSQL database program, MongoDB uses JSON-like documents with schema. 
Source: Wikipedia

MongoDB 4.0 was released on 2018-08-06

New 'wow' features of MongoDB 4.0:

  • multi-document ACID transactions
  • data type conversions
  • 40% faster shard migrations
  • non-blocking secondary replica reads

And some other niceties:
  • native visualizations with MongoDB Charts
  • Compass aggregation pipeline builder
  • Stitch serverless platform
  • SHA-2 authentication
  • Mobile database
  • HIPAA compliance to the MongoDB Atlas database service
  • free community monitoring service
  • Kubernetes integration

While the new features in MongoDB 4.0 are great, 
the latest Ubuntu version 18.04 official repository still installs MongoDB version 3.6

To get the current version of MongoDB
> mongo --version

To install MongoDB version 4.0, you need to install from MongoDB's repository.

Instructions to install MongoDB 4.0 and some hurdles I encountered follow:

1) Add the MongoDB repo
> sudo vi /etc/apt/sources.list.d/mongodb-org-4.0.list  
deb [arch=amd64] https://repo.mongodb.org/apt/ubuntu bionic/mongodb-org/4.0 multiverse  

2) Add MongoDB the repo key
> sudo apt-key adv --keyserver hkp://keyserver.ubuntu.com:80 --recv 9DA31620334BD75D9DCB49F368818C72E52529D4

3) Update your system
> sudo apt-get update

4) Install MongoDB 4.0
> sudo apt-get install mongodb-org

5) Status and restart MongoDB
> sudo systemctl status mongod
> sudo systemctl restart mongod

Hurdles:
If MongoDB does not start, there may be some issues with removing the prior MongoDB version.

Errors I encountered:
error processing archive /var/cache/apt/archives/mongodb-org-server_4.0.10_amd64.deb (--unpack):
error trying to overwrite '/usr/bin/mongod', which is also in package mongodb-server-core 1:3.6.3-0ubuntu1.1
error trying to overwrite '/usr/bin/mongos', which is also in package mongodb-server-core 1:3.6.3-0ubuntu1.1
error trying to overwrite '/usr/bin/bsondump', which is also in package mongo-tools 3.6.3-0ubuntu1

Some potential fixes
> sudo apt --fix-broken install
This by it self did not help

Remove prior MongoDB and other unused packages
> sudo apt autoremove
This did fix the issue and allow me to run MongoDB 4.0

To get version of MongoDB
> mongo --version

Also, if you accidentally tried to get the version from the daemon
> mongodb --version  
MongoDB will start as your user, often sudo/root,
which may cause some MongoDB files to be created as root.

You may have to reset user/group permissions
> sudo chown -R mongodb:mongodb /data/mongodb/


-End of Document-
Thanks for reading